Tuesday, December 21, 2010

Merry Christmas


I just wanted to take the opportunity to wish you all a very Merry Christmas and only the very best for a prosperous 2011! Your support in 2010 has meant the world to me and I hope to be back in January with new ideas and recipes!

With love,
Susi

Tuesday, December 14, 2010

Tate's Bake Shop Giveaway Winner


A BIG thank you to everyone for entering this fantastic giveaway from Tate's Bake Shop. I loved reading all about your favorite cookies and started getting excited about maybe baking a few myself. In case you are wondering what my favorite cookie during the holidays is, it's one of my sister's recipes called Nougat-Stangen. They're a chocolate hazelnut cookie that with a filling of Nutella and also a drizzle of chocolate. They're a lot of work to make, but the end-result is so worth it. 

To get back to the giveaway though, the winner of this great cookie gift-pack and the cookbook is:

Number 60 which happens to be Amanda from BakingWithoutaBox, who won with her entry of:
"I already follow you with Google!"


Congratulations Amanda! Please send me an email with your full name, address and phone number so Tate's Bake Shop can get this wonderful gift-pack send right out to you. 

Also keep in mind that Tate's Bake Shop is still offering a 15 % off coupon through December 31st, 2010 on their website. All you have to do is enter the code "cookie" during checkout.

Wednesday, December 8, 2010

Toffee Pecan Cookies and a Giveaway


Every once in a while an email lands in my inbox that gets me excited just by reading the subject line. This was the case when Elizabeth from Tate's Bake Shop contacted me to inquire if I was interested in reviewing some of their cookies and cookbook. Cookies and a cookbook, ummm, yes please! What made this even more exciting was the fact that I had known of Tate's Bake Shop cookies for quite some time, but have never had the pleasure of trying them myself. The bakery was founded by Kathleen King and is located in Southhampton, NY. The cookies are actually quite famous and have been featured in Everyday with Rachael Ray Magazine, the New York Times, the Wall Street Journal and InStyle Magazine, just to name a few.


The package arrived promptly and I couldn't wait to taste test. Of course, I had my trusty crew (my husband and kids) help me with this enormous "chore".  The first thing I recognized when opening the cookies was the fact that not one of them were broken or chipped, which might be due to the fact that they are all hand-packed with care. They contain all natural ingredients that you can taste with every bite. The cookies are actually quite flat and crispy compared to most cookies my family has been used to.  The smell is incredible on these cookies, they are buttery with lovely caramel undertones. Considering the cookies my family usually prefers, it was quite a surprise of how quickly they were gone, but they were quite addicting. The front runner by far were the White Chocolate Chip Macadamia Nut cookies, followed by the Chocolate Chip and then Oatmeal Raisin. My husband and I really loved the Oatmeal Raisin since it has the perfect amount of spice to it without any of them standing out or being overpowering, but the kids crowned both of the chocolate varieties the winner. 


I've also had the pleasure of reviewing Kathleen Kings cookbook. There are quite a few recipes inside that I have bookmarked already. All of the recipes are down to earth with readily available ingredients. When trying to figure out which one to bake first I was faced with quite a hard decision, but ended up picking the Toffee Pecan Cookies. They sounded perfect for the season and quite frankly, ended up being absolutely divine. My daughter, exclaimed that these cookies are so awesome you don't even miss the fact that they don't include chocolate, while my youngest proclaimed "now that is a good cookie, it tastes just like a cookie should", which is pretty much the highest compliment ever from a 9 year old boy ;o)


The cookie and cookbook review was made just a little sweeter since Tate's Bake Shop is also giving away the same cookie gift-pack and cookbook to one lucky reader. Keep them for yourself, or give them as a gift, the choice is yours.

*This Giveaway is Closed*

To enter the giveaway here is what you need to do (Please leave a SEPARATE comment for each entry):

To enter: Since 'tis the season, let me know your favorite cookie to eat or bake during the Holidays in the comments section

For Bonus Entries (again, please use separate comments):


If you play along you can get up to 6 entries for this giveaway
  • Giveaway is open to U.S. Residents only, no P.O. Boxes please
  • Giveaway is open until Monday, December 13th at Midnight Pacific time
  • I will pick a winner via Random.org and will announce the winner on Tuesday, December 14th

Also, Tate's Bake Shop has graciously offered a 15% off coupon for all of you readers through the 31st of December. All you have to do is enter the code "cookie" during check-out on their website


Toffee Pecan Cookies 

Ingredients:

1 1/2 cups all-purpose flour
1 teaspoon baking soda
1 1/2 cups instant quick oats
1 cup salted butter, softened to room temperature
1 cup firmly packed dark brown sugar
1/4 cup white sugar
1 egg
2 teaspoons vanilla
1 cup pecans, chopped
2 cups toffee bits


Preparation:

Preheat the oven to 350 degrees. Grease two cookie sheet or line them with Silpat (parchment paper will work as well).

In a large bowl, combine the flour, baking soda, and oatmeal. Set it aside.

In another large bowl, cream the butter and sugars till creamy. Add the egg and mix well. Add the vanilla and mix. Scrape down the sides of the bowl and mix again.

Add the flour mixture to the butter mixture and beat them till they are combined. Don't overmix. Stir in the toffee bits and pecans.

Using two tablespoons, drop the cookie dough two inches apart onto prepared cookie sheet.

Bake them for 12 to 15 minutes for chewy cookies and 18 to 20 minutes for crunchy cookies. The crunchy cookies will be browner in the middle and firmer to the touch.

Adapted from: Tate's Bake Shop Cookbook

Friday, December 3, 2010

And The Giveaway Winners Are ......


First off, I'd like to thank all of you for participating in this very special giveaway and once again express my gratitude to Lindsay Olives for supporting such an important food related cause. You are all fabulous and I'm so impressed with how charitable each and everyone of you is. I'm sure glad that the winners were picked via random.org as I could have not made a choice myself. In my opinion you are all winners and I truly wish I could give all of you one of these beautiful wreaths. Unfortunately, my connections are not that great (yet) ;o) However, if you did like the wreath and didn't end up winning, there is still time to order one from Lindsay Olives. They make for great gifts, beautiful decorations and best of all benefit the Meals on Wheels Association of America. In my opinion, that's about as good as it gets.

So without further ado, here are the two fabulous recipients.

Kim with her Number 4 entry 
"Went to facebook and liked MOWAA. Glad to see you on fb."

and 

Reeni with her Number 44 entry
 "The wreaths are so beautiful Susi! I am buying gifts for a child in need - I pick a tag (or two) off a tree at the mall with their list on it and then shop for them. I think meals on wheels is awesome! I know lots of people who benefit from their meals."

Congratulations to Kim and Reeni, I guess 4 was a lucky number for the both of you! Please send me an email with your full name, mailing address and phone number so that Lindsay Olives can ship the wreaths out to you as soon as possible.

Thursday, December 2, 2010

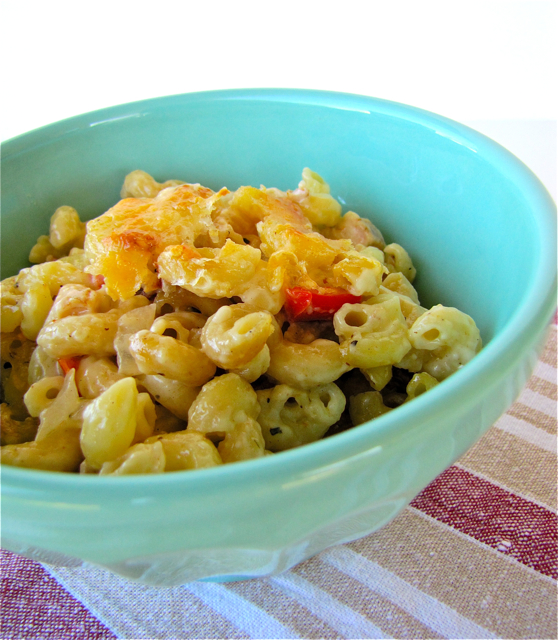
Chicken Mac and Cheese

 
I like Mac and Cheese, but it is not one of my favorites, which is truly weird since I love pasta and cheese. I think most of them are just kind of "eh" and I'm always looking for a bit more flavor. I know, I'm strange, blame it on my German genes if you must. On the other hand, mac and cheese is pretty easy to fix and can feed a crowd fairly inexpensively. The few times I've made mac and cheese at home, I've played with different cheese combos and while they were all good and certainly edible, they didn't have me do cartwheels.

I haven't been very inspired to prepare meals in the last few weeks, but when I do feel well enough to cook, I'm usually looking for recipes that utilize either what I already have on hand, or make it easy for my husband (who has been a saint) to pick up a few extra ingredients on his way home from work at the grocery store. I found the recipe for this dish on Tasty Kitchen while I was looking for a quick dinner. It utilizes leftover grilled chicken breast that I already had in the refrigerator but this dish can just as easily be fixed with leftover rotisserie chicken as well. Sharp cheddar cheese, Gruyere and Parmesan add flavor along with crumbled bacon. Milk and heavy cream make this very rich tasting and certainly not diet food (which we will all need come January). Don't fret though, it does have a red bell pepper thrown into the mix, so at least you're getting a little bit of vegetables. However, they are disguised enough that even non-bell pepper lovers (like my daughter) will eat it without complaint.

This is a great dish that easily serves a lot of people. Add a side salad and you have a complete meal that even with all the hustle and bustle of the season is prepared in less than an hour and lets you sit down as a family and appreciate each other.

On a personal note, I wanted to thank all of you for your kind comments and emails regarding my health. I'm still not feeling well, but really miss blogging and all of you. I've made it a goal to pop in a few of your blogs everyday. So while you might not hear daily from me, I'm still around. :o)

If you haven't entered my Holiday Wreath Giveaway, make sure to do so soon, since it closes tonight at midnight and this giveaway is too good to pass up, especially for such a good cause! Also stay tuned for another fantastic giveway coming soon.


Chicken Mac and Cheese

Ingredients:

1 pound elbow or corkscrew pasta, uncooked
1 tablespoon olive oil
1 medium onion, chopped
1 sweet red bell pepper, chopped
4 tablespoons butter
4 tablespoons flour
2 cups milk
1 cup heavy cream (or half-and-half)
2 cups sharp cheddar cheese, shredded
1 cup Gruyere cheese, shredded
1 cup Parmesan cheese, shredded
1 generous pinch freshly grated nutmeg
Salt and Pepper, to taste
2 - 3 cups cooked boneless chicken breast (grilled or rotisserie), chopped
6 slices bacon, fried and crumbled

Preparation:

Preheat oven to 350 degrees F. Grease a 9x13-inch baking dish.

Boil water for pasta and cook according to package directions. Drain and rinse when cooked and set aside.

In a skillet over medium heat, add the olive oil and saute onions and red peppers until soft, about 5 minutes. Set aside.

In a medium saucepan over medium heat, add butter and flour and whisk together to create a roux. Add milk and cream (or half-and-half), stirring constantly. Add 3 cups of the cheese mixture (reserving one cup to top the dish with ) and the nutmeg. Season with salt and pepper and stir mixture for 5-8 minutes or until mixture thickens.

Mix cooked pasta with the onion/pepper mixture, the chopped and cooked chicken and the bacon.
Add half of the mixture to the greased baking dish and top with half of the cheese sauce. Add the other half of the pasta mixture and top with the rest of the cheese sauce. Sprinkle the dish with the reserved cup of cheese and bake for about 35 to 40 minutes or until the dish is hot and the top is golden brown. Let sit for about 5 minutes before serving.

Adapted from: Tasty Kitchen

Monday, November 29, 2010

Holiday Wreath Giveaway


With the holiday season finally here, the season of giving and being charitable has also arrived for many of us. So when the kind folks over at Lindsay Olives (you might remember my Bloody Olivia drink that was sponsored by them) approached me yet again with a wonderful giveaway for my readers, I did not hesitate. Lindsay Olives is selling beautiful fresh handmade wreaths made from olive, bay and eucalyptus branches on their website with all the proceeds going towards the The Meals on Wheels Association of America.


The Meals on Wheels Association of America (MOWAA) is the oldest and largest national organization in the United States representing those programs that provide meals to people in need. MOWAA's mission is to end senior hunger by 2020. With our economy still trying to recover, programs like these are definitely in high demand. To get more information about helping or how to locate a local Meals on Wheels program, visit the MOWAA website at www.mowaa.org. If this is a cause that you find worthy to support you can donate  directly (remember, no donation is ever to small, even a few dollars can help), or you can purchase one of the gorgeous wreaths from Lindsay Olives by either ordering online or by calling (800) 765-2029 . The wreaths come in two sizes, a 12-inch and a 16-inch, are reasonably priced, make for beautiful holiday decorations or gifts and best of all you can support a great cause.


For the giveaway, Lindsay Olives generously offered me two of their 16-inch wreaths to give away to two of my wonderful readers. I'm thinking that is certainly a fantastic way to kick off the season!

* This Giveaway is CLOSED*

As always, here are a few rules for entering:

- To enter, simply leave me a comment of what you are planning to do this season to help or support a worthy cause

- For a second (bonus) entry, go to facebook and "like" MOWAA, then let me know in a separate comment you did this

- For a third (bonus) entry, follow my blog on google friend connect, then let me know in a separate comment that you already do or did

- This giveaway is open to U.S. Residents only (sorry my international friends)

- The wreath must be shipped to a physical street address, sorry no P.O. Boxes

- The giveaway will close on December 2nd at midnight pacific time.

I will pick two winners via Random.org, which will be announced on December 3rd. Lindsay Olives will then ship the wreaths to you before Christmas, so please make sure to contact me quickly with your address/shipping information if you are the winner.

Friday, November 12, 2010

A Blog Update

Hi guys!

I'm sure by now a few of you have been wondering were my posts for this week are and while I wasn't sure if this would be the right forum, I also figured I owed you guys an explanation for my absence. The truth is that I've been dealing with some health related issues for a couple of months now and while I thought I could do it "all", I've been brought back to reality when I started feeling worse with each passing day. I struggled through last week and have finally reached the conclusion over the weekend that I needed to stop pretending everything is fine. My priorities have always been family and friends first and following a close third this blog, which has become my creative outlet. The one place that has brought me immense joy, where I could "shine" and allowed me to meet so many wonderful, encouraging, and talented people all over the world. Unfortunately, with pretty much zero energy and a few other problems associated with my illness, I realized I couldn't keep up the pace I had been keeping. I don't know when I will feel better at this point, but I do know that I love this little place I have created for myself on the Internet. So, at this point I guess all I'm asking of you is that you continue to be patient and supportive of Susi's Kochen und Backen. In return, all I can promise at this point is that I'm not giving up blogging, but depending on how I'm feeling any given day or week, you may see more or less of me. Some weeks I might feel good enough to post a few times, while during others I will struggle to put on one post and on others, like this past week, I may not even be able to do one. I'm also sorry for my lack of commenting. I will still try and visit a few pages a day, but this is all taking a little backseat while I'm trying to feel better. I'm not asking for sympathy, but any good vibes or prayers you want to send my way would be greatly appreciated.

With love,
Susi
(Susi's Kochen und Backen Adventures)

Friday, November 5, 2010

Apple Toffee French Toast Bake with Apple Syrup

 
Sometimes I happen to find recipes in the strangest places and those turn out to be the best ones. Today's recipe came in a little Magazine that Costco puts out for their members called Costco Connections. I was doing a quick thumb through before putting it in my recycling pile and that is when this recipe caught me eye. After reading through the recipe I knew I had to make this for my family. Apples, toffee and french toast? There was no way this could go wrong. Hold on, there is also cream cheese and toffee bits in the filling? And the finished bake is topped with an apple syrup? Sold, sold, sold!

This is definitely not a weekday recipe (unless you are on vacation or you like getting up really early), but more of a weekend breakfast/brunch item. The preparation is pretty much a cinch, but you do have to let the casserole soak overnight, plus count in the baking time the next morning. French bread is cut into cubes, half of the bread is layered into a greased casserole dish before topping it with a tart apple variety (I used Granny Smith) that has been chopped. Cream cheese is then mixed with brown sugar, white sugar and apple juice until creamy and smooth and then English toffee bits are stirred in. This mixture is spread over the apples and finally the other half of the bread goes on top. The whole casserole gets an egg/milk bath and is placed in the refrigerator overnight to soak and let the flavors mingle. The next morning, after letting the dish come to room temperature, it is baked until the eggs are set. Meanwhile the apple syrup is prepared. It is simply apple juice, sugar, cornstarch, cinnamon, nutmeg and lemon juice which are brought to a boil and finally butter is incorporated.

Wow, wow, wow! This is pretty much one of the best sweet french toast bakes I have ever made. It is wonderfully crunchy on top, creamy in the middle with just a hint of toffee, tart apples and a custard like consistency. Absolutely amazing! The syrup just adds another little bit of apple flavor, but this would be just as tasty with maple syrup. With Thanksgiving and Christmas approaching, many of us will be hosting guests and this French Toast would be wonderful for anyone to wake up to. If you like apples and enjoy breakfasts on the sweeter side, this is one recipe I'm urging you to make this season. I don't think you will regret it!


Apple Toffee French Toast Bake with Apple Syrup
(adapted from "Costco Connections")

Ingredients:

For the French Toast:
8 cups French bread, cut into 1-inch cubes
3 tart apples, peeled and chopped (I used Granny Smith)
8 ounces cream cheese, softened
3/4 cup brown sugar
1/4 cup sugar
1/4 cup apple juice
2 teaspoons vanilla extract, divided
1/2 cup English toffee bits
6 eggs
1 cup milk

For the Apple Syrup:
1 cup sugar
1 1/2 tablespoons cornstarch
1/2 teaspoon cinnamon
1/2 teaspoon nutmeg
2 cups apple juice
2 tablespoons lemon juice
5 tablespoons butter

Preparation:

For the French Toast: Place half of the bread cubes in a greased 9 x 13-inch baking pan; top with apples. In a large bowl, beat the cream cheese, sugars, apple juice and 1 teaspoon vanilla until smooth; stir in toffee bits. Spread over apples. Top with remaining bread cubes.

In another large bowl, beat the eggs, milk and 1 teaspoon vanilla until well blended; pour over bread. Cover with foil and refrigerate overnight.

Remove from the refrigerator 30 minutes before baking. Pre-heat your oven to 350 degrees F. Bake, uncovered, for 40 to 45 minutes or until a knife inserted in the center comes out clean.

While the French toast is baking, prepare the syrup.

For the Apple Syrup: In a medium-size saucepan, whisk together the sugar, cornstarch, cinnamon, nutmeg, apple juice and lemon juice; heat to a boil, whisking constantly. Boil for 1 minutes, then stir in butter. Serve over warm Apple Toffee French Toast Bake.

Adapted from: Costco Connections


Thursday, November 4, 2010

Southwestern Corn-Potato Chowder


My husband is by all means a great eater. I don't recall many things he won't eat or at least try once. However, he is a huge flavor person. If the food is tasteless or bland he won't touch it. I've learned over the years that big flavors and especially a good amount of spice, will make him love pretty much anything. In the early years of our marriage I tried my hand at corn chowder. It was only received lukewarm and so I figured the time had come to give this soup another go. This time around I thought I would have a true winner on my hands if I went the Southwestern route and boy was I ever right. 

Looking all over the internet for a recipe for this chowder I came to find out very quickly that most of them weren't going to cut it and would just end up being another mediocre meal. My plan was to just take bits and pieces from several recipes and come up with my own version. This soup comes with a bit of a warning though. If you are a sissy when it comes to spicy food, then this is probably not the bowl for you, but if you love a good flavorful soup with a good kick, I encourage you to read on.


I started the soup by crisping up some bacon. See, already a step in the right direction! Sauteing onions in the leftover bacon flavored grease was the next step. Flour, salt, pepper, chili powder and cumin made up my seasonings. For the stock I decided to go with chicken stock since that is what I had in my freezer, but you could certainly use vegetable as well. Potatoes are then added, and again I went with flavor by using the Yukon Gold variety. Once the potatoes are cooked nice and tender in the flavorful broth, I added frozen corn which I always have in my freezer and consider one of my convenience items. To add the final touch and to make this truly Southwestern, I decided on a combination of canned diced green chiles and minced chipotle peppers in adobo sauce which added a wonderful smokiness to the dish. To "cool" the palate down, I went with some half-and-half which made the soup creamy, without making it too rich. For garnish, I used the previously crisped bacon bits and fried tortilla strips which my husband ever so kindly agreed to fry for me. They are simply flour tortillas cut into thin strips and fried in some hot oil before getting a sprinkling of sea salt.

Great soup, great flavors and you will definitely get warmed through and through with a bowl of this corn-potato chowder. This dish is going into my permanent recipe file and will be made many more times throughout the colder months.


Southwestern Corn-Potato Chowder
(Printable Recipe)

Ingredients:

8 ounces bacon, chopped
1 large onion, chopped
2 tablespoons unsalted butter
4 tablespoons flour
1 teaspoon kosher salt
1/2 teaspoon freshly ground black pepper
3/4 teaspoon chili powder
1/2 teaspoon ground cumin
6 cups chicken stock (vegetable can be used as well)
3 cups Yukon Gold potatoes, peeled and medium-diced (about 1 pound)
4 cups frozen corn
1 (7 ounce) can diced green chiles
3 whole chipotle peppers in Adobo Sauce, finely minced
2 cups half-and-half
Fried tortilla strips for garnish (optional)

Preparation:

In a large stockpot over medium-high heat, cook the bacon until crisp. Remove the bacon with a slotted spoon and reserve. Reduce the heat to medium, add the onions and butter to the bacon fat, and cook until onions are translucent.

Stir in the flour, salt, pepper, chili powder and cumin and cook for a couple of minutes. Add the chicken stock and potatoes, bring to a boil, and simmer uncovered for 15 minutes or until the potatoes are tender. Add the corn to the soup, then stir in the green chiles and minced chipotle peppers. Cook for 5 minutes, add the half-and-half and cook for another 5 minutes. Check one more time for additional salt and pepper. Serve hot with a garnish of the reserved bacon and fried tortilla strips (if desired).

Tuesday, November 2, 2010

Oma Ingrid's German Apple Cake


With Halloween behind us, the next holiday, Thanksgiving, is already looming over our heads again. This is another holiday I did not grow up with, but have come to love as well. Seriously, what's not to like about a holiday that is pretty much centered around good food, family and friends? There are so many delicious eats that are hard to resist. From the wonderful cooked turkey, to great sides and last but certainly not least, amazing seasonal pies and cakes.

I usually make a few very traditional dishes for our feast, but my German touches are never far. Our Thanksgiving dessert table also holds an assortment of "American" pies and at least a German cake or two. Today's featured apple cake is one that my mom (Oma Ingrid to my kids) has been baking for as long as I can remember and was also one of the first cakes I baked for my husband. Apple desserts are some of my favorites and this one is irresistible by having a fantastic nut topping. Served with some whipped cream it is a true family favorite.


The cake has three components. A crust, reminiscent of ones that are used in sweet tarts. A grated apple filling that really let's the apples shine without overpowering them with spices, and a nut crust made from butter, sugar, finely ground nuts and heavy cream. The crust is made quickly with the use of a food processor, but can also be made in a stand mixer. After pressing the crust into a greased springform pan it is set into the refrigerator while the apple filling and topping are prepared. Use your favorite apples in this, Cameo, Gala, or Honey-crisp are great choices that lend the perfect balance of sweet and tart, without getting too mushy after baking. The apples are grated before mixing them with a bit of lemon juice, sugar and flour, then placed inside the crust. Finely ground almonds or hazelnuts (my favorite) are mixed together with melted butter, sugar and heavy cream and then spread over the apple filling making sure to cover the entire cake before baking.

The cake takes a little bit time to put together, but is well worth the effort. It might not be the prettiest or most colorful cake you've ever seen, but let me tell you it makes up for it in flavor and has a wonderful rustic charm that fits so well into the season. This is a cake that is requested over and over in our home and is never missing on our Thanksgiving table. I do hope if you give this recipe a try, you'll enjoy adding some German touches to your table as well!


Oma Ingrid's German Apple Cake

Ingredients:
For the crust:
250 grams all-purpose flour
1 teaspoon baking powder
100 grams sugar
125 grams unsalted butter, at room temperature
1 large egg

For the apple filling:
6 medium apples
1 tablespoon all-purpose flour
2 tablespoons sugar
2 teaspoons lemon juice

For the nut topping:
125 grams finely ground hazelnuts or almonds
75 grams melted butter
100 grams sugar
3-4 tablespoons heavy cream

Directions:
Preheat oven to 350 degrees F. Grease a 9-inch springform pan and set aside.

For the crust: Add flour, baking powder and sugar into the bowl of a food processor. Pulse to combine. Add the butter and pulse again until mixture resembles coarse oatmeal. Add the egg and once again pulse until the dough comes together. Turn out onto a floured surface and quickly knead until dough comes together. Press dough into the bottom and up the sides of the prepped springform pan. Set pan in the refrigerator while you prepare the filling and topping.

For the filling: Peel, core and grate apples. Add them to a large bowl and toss with flour, sugar and lemon juice. Set aside while you prepare the nut topping.

For the topping: In a medium bowl combine the ground nuts, melted butter, sugar and heavy cream. Stir to combine until the mixture is like a paste.

Putting it all together: Remove springform pan with crust from the fridge. Pour apple mixture into the formed crust and spread evenly. Spread nut topping over top of the apples, making sure to cover apples completely. Bake in preheated oven for about 50 - 55 minutes. Check after 45 minutes and if the topping and crust get to dark, cover with a piece of aluminum to prevent over browning.

Remove cake from oven and cool for about 20 minutes before removing sides of the pan (make sure to run a sharp knife around the edges before attempting). Let cool completely before serving.

Adapted from: My mom


Monday, November 1, 2010

"Bloody Olivia"


 ~ Welcome to a Progressive Party ~
 I know, right now most of you are saying "what?", but let me explain. It is actually the fantastic brainchild of Casey over at TasteStopping. It boils down to 6 different bloggers, 6 different assigned dinner courses, 1 product, kitchen tool, or ingredient, equaling one fun, unique internet party like no other. You can find more info about all of this over at Kitchen Play since Casey has a much better way of explaining than I do, but think of it kind of like Iron Chef meets Chopped.

This month the ingredient is sponsored by Lindsay Olives who happen to produce a fantastic array of different olives for any occasion. My assignment: A cocktail. The mission: Create a signature cocktail using Lindsay Olives that is NOT a martini. Sounds easy enough? Well, yes and no. Let's just say my husband had a glorious time sampling different drinks. In all honesty, those that know me are aware of the fact that I'm not an olive kind of girl and my drink of choice is usually on the sweeter side. My husband on the other hand had absolutely no problems helping me out, and in the end I was surprised that I liked the finished cocktail as much as I did.


I was trying to figure out which direction to take this drink and then it hit me. What better way to create something that also represents my geographical living area than coming up with a Southwest inspired cocktail? And what better way to achieve this than with Lindsay's Spicy Jalapeno Queen Olives. After experimenting with a few different drinks, I decided to intertwine one of my favorite drinks (the Margarita) with one of my husbands favorite drinks (the Bloody Mary) and born was the "Bloody Olivia"!


The main ingredient of a Margarita is tequila and a Bloody Mary is made with tomato juice and vodka. Trying to figure out how to combine these two drinks into one was fairly easy, but how could I showcase these great supplied olives? After a few trials and errors it came to me that I could infuse the most flavor by not just using the olive brine from inside the jar, but also by taking one of the Spicy Jalapeno Queen Olives and adding it to the drink. To do just that, I decided to break out my blender, and it worked like a charm. The drink gets additional flavor from a few spices, horseradish, Worcestershire sauce and last but not least, another traditional margarita ingredient, lime juice. After blending the tomato/olive base together, all that was left to do was stir in the tequila and enjoy.

I served the drink in a Chili-Lime Salt (which I found at a liquor store with the specialty salts) rimmed glass over ice and as a garnish I added a pickled jalapeno along with another stuffed Lindsay Spicy Jalapeno Queen Olive. This made for a tasty cocktail that had quite a kick to it. With all of the holidays and get-togethers coming up, I'm happy to have another great cocktail in my repertoire so I guess I better stock up on a few more Lindsay Olives!


"Bloody Olivia"
(Makes 1 drink)
(Printable Recipe)

Ingredients:

8 oz. vegetable juice
1/4 teaspoon kosher salt
1/8 teaspoon ground pepper
1/8 teaspoon celery salt
1 pinch of cayenne pepper
1/2 teaspoon Worcestershire sauce
1/4 teaspoon prepared horseradish
1 teaspoon lime juice
1 tablespoon Lindsay Spicy Jalapeno Olive brine (the liquid from inside the jar)
1 Lindsay Spicy Jalapeno Olive
1 1/2 oz. Tequila
Ice
Chili-Lime Salt to rim the glass (for garnish)
Pickled Jalapeno (for garnish)
1 Lindsay Spicy Jalapeno Olive (for garnish)

Preparation:

In a blender add vegetable juice, salt, pepper, celery salt, cayenne, Worcestershire sauce, horseradish, lime juice, olive brine and 1 jalapeno olive. Blend until mixture is combined and smooth. Stir in tequila. Carefully pour over ice into a salt rimmed glass. Add the pickled jalapeno and olive for garnish. Serve immediately!


Last, but certainly not least, these progressive parties have a great way to get all of you, my wonderful readers, involved. You have the chance to win $100  cold, hard cash and all you have to do is either make my signature cocktail and blog about it, or pick any of the other party recipes to make and blog about it. You can also make all 6 courses for 6 entries to increase your chances of winning. To find out more info and all the the rules that come along with this contest, hop on over to Kitchen Play. This is a great opportunity for some easy money and who couldn't use that  right before the holidays?  Don't wait though, you have only until November 30th, 2010 to enter.

Thursday, October 28, 2010

....And the Halloween Food continues

 
The Halloween fun continues today on Susi's Kochen und Backen with a couple more ghoulish treats. Earlier this week I featured fun drinks like "Swamp Juice" and appetizers like "Eye of Newt" and today is no different with a couple more fun party foods like "Vampire Blood Shots" and "Puff Pastry Intestines". Now, who wouldn't want to come to THAT party?

When trying to come up with a themed party my planning always starts with the food. A good mix of finger food is easiest to serve, since it allows your guests to walk around and be social. I like to have a good mix of cold and warm appetizers, some that contain meat and some for all the vegetarians . If in doubt, a vegetable platter, cheese tray or fruit platters are always a hit and they can round out your buffet.  One of my big requirements for "fun" food is that it has to be appealing to the eye as well as the taste buds.


Kicking it off today are the "Vampire Blood Shots". Now, I need you all to humor me and pretend that I'm serving these fun shooters in Test Tubes rather than shot glasses. I had ordered a test tube set to display them in, but of course, I'm still waiting for them to be delivered. Plan B to the rescue. While not quite as cool looking as test tubes, serving the "Blood" in shot glasses works just as well. The blood happens to be a very quickly cooked, but incredibly tasty tomato soup that can easily be made a day ahead. Since tomatoes aren't at their prime anymore, I went with a couple of cans of whole tomatoes which are always flavorful and at their best taste. A smooth soup is key when you are serving it  "drink-style" and with that I relied on my food mill to get the right texture. A fine mesh strainer will do the job as well though.


Second up are the "Puff Pastry Intestines". I found them on The Knead for Speed who had adapted it from canarygirl.com and the second I laid I eyes on this fun treat I was hooked. My boys coming home from school, seeing them on the counter and exclaiming "most awesome guts EVER!" confirmed my excitement. They are pretty simple to make, all you need is a bit of time. Puff Pastry is cut into strips, filled with a meat filling, then pinched together to form one long continuous roll before being placed in a 9 x 13 inch pan (here is a great tutorial). Red food coloring adds a bit of gore. The puff pastry sheets were pretty easy to work with in the beginning, only towards the end it became difficult and started to fall apart on me when transferring to my baking dish. Not a big deal though since intestines aren't all that neat anyway. This recipe can also be made ahead and refrigerated until ready for baking. They are great fresh out of the oven but still tasty at room temperature.


I hope you all enjoyed the recipes featured this week on my blog. I figured with so much candy around and more treats and sweets to come in the next couple of months, it would be fun to show a different food side of Halloween.
Since I'm trying to get ready for this weekend, I'm wishing you all a Happy Halloween at this point! Enjoy yourselves, whether you are hosting a party, going to a party, or simply getting into the fun by handing out candy to all the little ghosts and goblins out there. See you next week!


Vampire Blood Shots

Ingredients:
1 tablespoon olive oil
1/2 medium onion, finely diced
2 (28 ounce) cans whole tomatoes
2 vegetable bouillon cubes
3/4 teaspoon kosher salt
1/2 teaspoon pepper
Pinch of sugar
1/2 teaspoon dried basil
1/2 teaspoon dried oregano
1/4 cup heavy cream
1 tablespoon balsamic vinegar

Directions:
In a large pot heat olive oil over medium heat. Add onion and cook until translucent. Add the whole tomatoes and crush with a potato masher. Add the bouillon cubes, salt, pepper, sugar, basil, oregano and cook covered for about 15 minutes.

Pour mixture through a food mill, discard solids or alternatively pour mixture through a fine mesh strainer, making sure to press all the liquid out of the mixture.

Return strained soup to the pot. Check for additional seasoning. Add the heavy cream and balsamic vinegar. Serve immediately or refrigerate until ready to use and re-heat.

A Susi's Kochen und Backen Original Recipe


Puff Pastry Intestines

Ingredients:
1 (17.3 ounce) package frozen puff pastry
Meat filling (recipe to follow)
1 egg, beaten
red food coloring
small paintbrush

Directions:
Thaw puff pastry according to package directions. Preheat oven to 400 degrees F and line a 9 x 13-inch baking pan with parchment paper.

Cut each puff pastry sheet lengthwise into 6 strips. Lightly flour a big work area, table, or kitchen island and lay each strip next to one another. (I did 4 strips at a time) Press and seal the seams between the strips.

Spread the filling down the entire length of the dough, leaving a bit of space on each side to pinch closed.

Pinch the entire length of the dough closed, stretching the dough slightly around the filling as you go.

Carefully lift intestine into your baking dish, seam-side down, and form an "intestine-like" pattern.

Brush puff pastry with beaten egg. Dip small paintbrush into red food coloring and draw "blood" in the creases.

Bake for 15-20 minutes or until golden brown.


Meat Filling for "Puff Pastry Intestines"

Ingredients:
1/2 lb. ground beef or turkey
1/4 medium onion, finely diced
1/2 cup frozen corn, thawed
1 1/2 tablespoons taco seasoning
1/4 cup water
1 tablespoon ketchup

Directions:
Brown meat in a pan until no longer pink. Add onions, corn, taco seasoning, water and ketchup. Cook for about 5 minutes or until water is dissolved. Let cool before filling the puff pastry. 


LinkWithin

Related Posts with Thumbnails