"Cooking my way through life, one dish and new adventure at a time"
Showing posts with label dessert. Show all posts
Tuesday, February 11, 2014
Rustic Raspberry Lemon Cheesecake Tart
Valentine's Day is only a few days away and everywhere you look you are being inundated with chocolate desserts. Don't get me wrong, I like chocolate as much as the next person, but over the years my taste buds are definitely changing. These days I find myself gravitating towards fruit based desserts more often than not. There is just something about the combination of sweet and slightly sour or tart that seems to go oh so well together.
As far as desserts go, today's recipe comes together quickly and ranks high in the fruit satisfaction department. Store bought puff pastry sheets, a creamy no-bake cheesecake filling laced with a luscious lemon curd and topped with glorious sweet, red raspberries. Perfection! I made my own lemon curd following my recipe for Meyer Lemon Curd, but store bought is a perfectly fine substitution and will help to streamline the process.
The combination of flaky crust, creamy filling, and fresh fruit makes this dessert irresistible in my book. This is the perfect alternative for all of you non-chocolate lovers (like my husband) and I don't think that the chocolate connoisseurs would even mind a slice of this beautiful tart.
Rustic Raspberry Lemon Cheesecake Tart
~makes 1 tart~
(Print this Recipe)
Ingredients:
1 sheet puff pastry, thawed but still cold
4 oz. cream cheese, softened
1/3 cup sugar, plus more for sprinkling
2 Tbsp. heavy cream
1/3 cup lemon curd, homemade or store-bought
1 pint raspberries
1/4 cup seedless raspberry jam, warmed
Powdered sugar
Directions:
For the tart: Preheat oven to 425° F. Line a baking sheet with parchment paper or a Silpat baking mat. Unfold the thawed out puff pastry on a lightly flour dusted area and gently roll into a 10x11 inch rectangle. Carefully transfer to your baking sheet.
Brush edges with a little bit of water and fold over all 4 sides to create a lip. Using a fork, poke holes all over the center of your tart. Gently brush the entire tart with an egg wash and sprinkle about 2 tsp. of sugar over the center. Bake until golden brown, about 15-20 minutes. Remove from oven and carefully with the back of a spoon press the center back down if it has puffed. Transfer to a wire rack to cool.
For the filling: In a bowl combine softened cream cheese and sugar. Mix with a hand-mixer or by hand until smooth and the sugar is well incorporated. Add the heavy cream and mix for about 1 minute. Fold in the lemon curd.
To assemble the tart: Carefully spread your lemon cheesecake mixture over the center of your cooled tart crust. Arrange berries decoratively over the curd and drizzle with the warmed jam. Dust the tart with powdered sugar.
Notes: This tart is best made and eaten on the same day. You can prepare the tart along with the cheesecake filling ahead of time. Refrigerate the filling and assemble the tart right before eating.
Other berries would be lovely as well. I bet blueberries, strawberries, blackberries or a combination would also be great!
A Susi's Kochen und Backen Original Recipe
Labels:
cream cheese,
dessert,
lemon,
lemon curd,
puff pastry,
raspberry,
tart,
Valentine's Day
Wednesday, April 6, 2011
Blueberry Lemon Buttermilk Cake
Tomorrow I'm having a surgical procedure. Nothing huge, but I will receive general anesthesia and will most likely be quite uncomfortable for a few days. Stuff like this tends to give me a little bit of anxiety in the days leading up to it. To keep my mind of off things, I headed into the kitchen over the weekend to work on some recipes and posts so you guys would be well entertained during my "down time". Working in the kitchen, concentrating on a recipe, always has a calming effect on me and helps me to clear my head and this time was no different.
First thing I made was this Blueberry Lemon Buttermilk Cake that I found once again on "Tasty Kitchen". It struck a chord with me right away for its flavor combination, but also for the simplicity of the recipe. Another bonus: getting rid of some of my very last frozen berries, which is perfect since fresh berry season is just around the corner. The cake is made quickly with just a few everyday items. Once baked, it almost appears like the cake has layers because of the blueberries sinking to the bottom and the taste is very reminiscent of an old fashioned cake you would find in Grandma's kitchen. The cake crumb is just lightly sweetened with hints of lemon throughout, without the citrus flavor being too overpowering. The buttermilk ensures a light and fluffy texture and the juiciness of the berries works perfectly. To top it all off, the cake has a crunchy sweet crust from sprinkled on sugar which is added right before baking. The sugar crust also helps balance the sweetness level.
This cake is simply wonderful for breakfast or even dessert, especially when enjoyed with a cup of coffee or tea. Since I made this on the weekend it was an amazing early morning treat that everyone in the family gave the thumbs up to. This recipe worked great with the frozen berries and there was minimal "bleeding"; however, I'm really looking forward to making it again when fresh berries are in season. Blueberry Lemon Buttermilk Cake; it's a good thing!
Blueberry Lemon Buttermilk Cake
Ingredients:
1 cup all-purpose flour
1/2 teaspoon baking powder
1/2 teaspoon baking soda
1/4 teaspoon salt
1/2 stick (4 tablespoons) unsalted butter, at room temperature
2/3 cup sugar plus 1 1/2 tablespoons for sprinkling on top
1/4 teaspoon vanilla extract
1 teaspoon lemon zest
1 tablespoon lemon juice
1 large egg
1/2 cup buttermilk, well shaken
5 ounces fresh (or frozen, un-thawed) blueberries
Preparation:
Preheat oven to 400 degrees F. Grease an 8-inch round cake pan and line bottom with parchment paper. Grease the parchment paper.
Whisk together flour, baking powder, baking soda and salt; set aside.
Beat butter and 2/3 cup sugar on medium-high until pale and fluffy, about 2-3 minutes. Add vanilla extract, lemon zest and lemon juice. Add the egg and beat well.
At low speed, mix in flour mixture in three batches, alternating with the buttermilk in two batches, mixing until just combined. Carefully fold in berries.
Pour batter into cake pan, spreading and smoothing the top. Sprinkle with 1 1/2 tablespoons sugar.
Bake until cake is golden and a toothpick inserted into the center comes out clean, 25 to 35* minutes. Remove from oven and cool in the pan for 10 minutes then turn out onto a rack and cool for an additional 15 to 20 minutes. Invert onto a plate and cut into 8 slices.
*When using fresh berries start checking the cake after 20 minutes
Adapted from: Tasty Kitchen
Labels:
baking,
blueberries,
breakfast,
buttermilk,
cake,
dessert,
easy,
lemon
Monday, March 28, 2011
Mini White Chocolate Raspberry Cheesecakes
Yesterday my husband and I celebrated our 19th wedding anniversary. I can honestly say it's been a blast. 19 years of laughter and love and hopefully many more to come.
We decided to keep our special day fairly low-key and enjoy it with our children. The weather was spectacular with lots of sunshine and temperatures in the high 70's. Perfect!
We started our day with a lovely brunch of salmon and different cheeses along with artisan bread, fruit and of course mimosas (for the adults). We spent the afternoon just hanging out on the back porch, reading and sharing a good bottle of wine. Our dinner was just as lovely and truly a combined effort. My husband grilled some nice looking T-bone steaks and fresh asparagus, while I made roasted herbed fingerling potatoes and my Favorite "Fancy" Salad. I knew I wanted something special for dessert and knowing how much my husband loves anything with fruit that's not too sweet, I thought a cheesecake would fit the bill.
I found this great recipe on foodnetwork.com for a white chocolate raspberry cheesecake. I did make a few changes to the written recipe and it turned out great. Instead of making one big cheesecake I thought it would be fun to make mini cheesecakes. There is something that appeals to me every time when presented with a "personal" dessert. The crust is simply composed of graham crackers and slivered almonds, ground up in a food-processor until well combined and mixed with butter. That's it, no extra sugar required, which I really liked considering the filling is quite rich. The cheesecake part is pretty much your average recipe, but is in enhanced with melted white chocolate which takes away a little more of the tartness of the cream cheese and leaves you with an incredible smooth mouth-feel with every bite. It also helps adjust the sweetness level since the filling only calls for a little more than 1/2 cup of sugar. To make my cheesecakes even more special, I decided to add dollops of seedless raspberry jam to each of my Mini Springfrom Pans
and gently swirl it into the filling with a toothpick. The mini version of this dessert bakes up in just 25 minutes. You will however have to cool the cheesecakes in the refrigerator over night which really helps "set" the finished dessert.
We ate these fantastic cheesecakes with fresh raspberries on the side and they were indeed a fitting ending to a wonderful Anniversary! I think these cheesecakes would be wonderful for any occasion. I could definitely see them being served for baby showers, birthdays, a special dinner, or simply as the perfect dessert for the perfect husband!
Mini White Chocolate Raspberry Cheesecakes
~makes 6 Mini Cheesecakes~
Ingredients:
For the crust:
1 cup slivered almonds
2 cups (7 ounces) graham crackers
1 stick unsalted butter, melted
For the filling:
7 ounces fine-quality white chocolate
4 (8-ounce) packages cream cheese, softened
1/2 cup plus 2 tablespoons sugar
4 large eggs
2 tablespoons all-purpose flour
1 teaspoon vanilla
1/3 cup seedless raspberry jam, slightly warm and whisked to remove any lumps
Fresh raspberries for decoration (optional)
Directions:
For the crust: Finely grind almonds and graham crackers in a food processor and add butter, blending until combined. Press over bottom and 2/3 up the sides of 6 mini springform pans*. Set aside.
For the filling: Preheat oven to 350 degrees F.
Melt chocolate in a double boiler or a large metal bowl set over a saucepan of barely simmering water, stirring until smooth, and remove from heat.
Beat cream cheese with an electric mixer at medium speed until fluffy, then beat in sugar. Add eggs, one at a time, beating well at low speed and scraping down the bowl after each addition.
Beat in flour and vanilla until just combined, then add melted chocolate in a slow stream, beating until filling is well combined.
Pour filling over crust. Add a couple of teaspoons of raspberry jam to each pan and gently swirl with a toothpick to get a marble effect being careful not to overmix.
Set mini-pans on a baking sheet and place in the middle of oven. Bake for about 25 minutes or until cake is set, but center is still wobbly when pans are shaken gently shaken.
Remove from oven, run a thin knife around edge of cake to loosen, then cool completely in pans on a rack. (Cake will continue to set as it cools). Serve chilled with additional raspberries if desired.
*Alternately you can just make this in a 10-inch springform pan.
Adapted from: Foodnetwork
Labels:
almonds,
anniversary,
baking,
cheesecake,
cream cheese,
dessert,
entertaining,
Personal,
raspberry
Friday, March 18, 2011
Nutella Chocolate Cookies
I would like to thank you from the bottom of my heart for inventing "Pasta Gianduja" or as we have come to know it, Nutella, in 1946. Because of your incredible creation you have brought me hours at the gym joy in eating, and just as much happiness baking with this wonderful chocolaty goodness. It is rare that something that is quite simple in ingredients would sweep nations and cause almost "mass hysteria" when showcased in a dessert. You have done an outstanding public service, and for that I'm eternally grateful!
Sincerely,
Susi's Kochen und Backen Adventures
Oh yeah, my love for Nutella is like no other. I'm hardcore and prefer it straight up, with a spoon, but also can't pass up a great dessert made with this stuff. So it was only logical when I came across today's recipe and saw it was utilizing one whole cup of the brown gold, that I had to make it. Another good reason (or justification), all three of my kids are on spring break and we all know that kids and cookies go together hand in hand, right? This recipe makes for pretty thin, crispy cookies, but the center stays semi-soft. Most of my family prefers big thick chewy cookies, but I haven't heard any complaints so far and the batch is almost gone.
This cookie doesn't look fancy, but don't let that deceive you. The batter is kicked up with the addition of Nutella, chopped hazelnuts and chocolate chips. Both of the latter ingredients mimicking Nutella and with that, the cookie is full of flavor and depth.
The batch makes quite a lot of cookies, but after sending some to work with my husband and countless neighbor-kids "passing by", there are only a handful left. I had a couple of 9 year old boys tell me that I make the best homemade cookies. That made my day and earned this recipe a permanent spot in my recipe files. So, if you are like me and harbor a quite unnatural love for Nutella and cookies, don't wait to make these little guys. There is never a wrong time to bake cookies and these chocolaty gems taste great with a big tall glass of milk or a cup of coffee.
Nutella Chocolate Cookies
~makes 6 dozen~
Ingredients:
1 1/2 sticks of unsalted butter, at room temperature
3/4 cup packed brown sugar
3/4 cup white sugar
1 cup Nutella
1/2 teaspoon vanilla extract
2 eggs
2 cups, plus 2 tablespoons all-purpose flour
1/4 cup unsweetened cocoa
1/2 teaspoon baking soda
1/2 teaspoon kosher salt
1 cup chocolate chips
1 cup chopped hazelnuts
Preparation:
Preheat oven to 350 degrees F. Cream butter in an electric mixer for 3 minutes until light and fluffy. Add the sugars and Nutella and mix well, scraping down the sides of the bowl to ensure even mixing.
Add the eggs, one at a time, beating for 30 seconds between each. Add the vanilla and mix for 10 seconds.
Sift together the flour, cocoa, salt, and baking soda (do not skip this step as sifting eliminates clumps of cocoa). Mix into the butter mixture on low speed until fully incorporated, scraping down the bottom and sides at least once to ensure even mixing. Fold in the chocolate chips and hazelnuts and refrigerate the dough for ten minutes.
Spoon tablespoon-sized drops of dough onto parchment or silpat
lined cookie sheets. Bake for 10 - 12 minutes. Allow to cool on the sheets for a minute or two before transferring to a wire rack to finish cooling.
Adapted from: Simply Recipes
Tuesday, March 15, 2011
St. Patrick's Day Cupcakes
Would you like to know how to make new friends? It's actually quite easy, first thing you have to be invited to a party. Secondly you need to make some very tasty "adult only" cupcakes and bring them along to said party. Lastly, sit back and enjoy watching everyone moan while eating those cupcakes. Follow all of these steps and I guarantee you will be an instant hit at any party.
These cupcakes are made up of three distinct components. A chocolate Guinness cupcake filled with a white chocolate Bailey's truffle center and topped with Bailey's buttercream. Oh yeah, these little babies are laced with liquor and are somewhat reminiscent of a drink called an "Irish Car Bomb". It consists of a glass of Guinness along with Irish Whiskey and Bailey's Irish Cream. The whiskey is floated on top of the Irish Cream in a shot glass, and the shot glass is then dropped into the stout. Talk about potent!
Guinness and chocolate are a match made in heaven and I'm now officially in love with with this combination. You can't tell that the batter is made with beer, but it rather enhances the chocolate flavor and adds a rich undertone, almost reminding me of espresso. I also chose to go with an extra dark cocoa powder which along with the beer makes for a not too sweet cupcake which happens to be the perfect vessel for the truffle center and frosting. The truffle center is chopped white chocolate (I used Lindt) mixed with hot heavy cream, butter and Bailey's. After the cupcake is baked I used an apple corer
to remove part of my cupcakes so I could fill them with the truffle mixture. Putting the truffle mixture into a disposable pastry bag made filling the cakes a cinch. I didn't even bother replacing the tops since I knew the holes would be covered by frosting anyway, and this way they ended up being my afternoon snack. The buttercream is simply butter with powdered sugar, and for additional flavor more Bailey's Irish Cream is incorporated.
These cupcakes were really a hot commodity at the party. People were pleasantly surprised, especially by the Guinness in the cupcake batter and every single person that tried them was in agreement that these cupcakes were pretty much one of the best ones they had ever eaten. So, if you are still looking for a little something to bring along to a St. Patrick's day celebration or just looking for a great dessert after that corned beef and cabbage, then this is your recipe. On Thursday make sure to wear something green, drink a green beer, but most of all have a happy St. Patrick's Day. Éirinn go Brách - Ireland Forever!
Also, make sure to check out some of my posts from the previous year when my blog was still in its infancy if you are looking for more St. Patrick's Day inspired recipes:
Glazed Corned Beef
Irish Colcannon Potatoes
Fried Cabbage
Irish Soda Bread
Shepherd's Pie
Irish Cream Cupcakes with Bailey's Frosting
Guinness Chocolate Cupcakes with Bailey's Truffle Centers and Bailey's Buttercream
~makes 24 cupcakes~
(Print this Recipe)
Ingredients:
For the Guinness Chocolate Cupcakes:
1 cup Guinness beer
16 tablespoons unsalted butter
3/4 cup unsweetened dark cocoa powder
2 cups all-purpose flour
2 cups sugar
1 1/2 teaspoons baking soda
3/4 teaspoon salt
2 large eggs
2/3 cup sour cream
For the Bailey's Truffle Centers:
8 ounces white chocolate, finely chopped
1/2 cup heavy cream
2 tablespoons unsalted butter, at room temperature
4 tablespoons Bailey's Irish cream
For the Bailey's Buttercream:
12 tablespoons unsalted butter, at room temperature
4 cups confectioners' sugar, sifted
1/2 teaspoon vanilla
5-8 tablespoons Bailey's Irish cream
Directions:
For the Guinness Chocolate Cupcakes: Preheat the oven to 350 degrees F. Line two cupcake pans with paper liners. Combine the Guinness and butter in a medium saucepan over medium heat. Add the cocoa powder and whisk until smooth. Remove from the heat and allow to cool slightly.
In a large mixing bowl, combine the flour, sugar, baking soda and salt. In the bowl of an electric mixer fitted with paddle attachment, beat together the eggs and sour cream to blend. Add the Guinness/butter mixture and beat just to combine. Mix in the dry ingredients on low speed just until incorporated. Divide the batter evenly between the cupcake liners, filling them about 2/3 to 3/4 full. Bake until a toothpick inserted in the center comes out clean, about 17 minutes. Allow to cool in the pan for 5-10 minutes, then transfer to a wire rack to cool completely.
For the Bailey's Truffle Centers: Place the chopped chocolate in a heatproof bowl. Heat the cream in a small saucepan until simmering, the pour it over the chocolate. Let sit for one minute and then whisk until smooth. If the chocolate is not completely melted, place the bowl over a double boiler or give it a very short burst in the microwave (15-20 seconds). Add the butter and Bailey's and stir until combined.
Set aside to let the ganache cool until it is thick enough to be piped. (You can use the refrigerator to speed the cooling process, but be sure to stir every 10 minutes or so to ensure even cooling).
Meanwhile , cut out a portion from the center of each cooled cupcake with an apple corer or using the cone method (a small paring knife words best for this). Once the truffle mixture has reached the correct consistency, transfer it to a piping bag fitted with a wide tip and pipe it into the cupcakes.
For the Bailey's Buttercream: Place the butter in the bowl of a stand mixer fitted with the paddle attachment. Beat on medium-high speed until light and fluffy, about 2-3 minutes. Gradually add the powdered sugar until it is all incorporated. Mix in the vanilla and Bailey's until smooth. Add more Bailey's if necessary until the frosting has reached a good consistency for piping or spreading. Frost the cupcakes as desired.
Slightly adapted from: Annie's Eats
Labels:
Baileys,
baking,
buttercream,
chocolate,
cupcakes,
dessert,
party,
St. Patrick's Day
Friday, March 11, 2011
Chocolate-Raspberry Marble Pound Cake with Chocolate-Raspberry Glaze
Do you ever cook or bake something and when it's time to write your post you are at a loss for words? Well, that's how I feel today. I should talk about this great cake I made, but I would much rather talk about my youngest son and the awesome soccer season we've been having. Or how about my middle son, he just got done with a big science project. I could certainly tell you about the effects aspirin has on plants. Not your thing? Well then how about my oldest? She is a senior in high school and we are in the middle of prom season. Would you like to know about all the emails she sends me daily of the pretty dresses she is finding all over the internet. I could also talk about all the yard work we've been doing since our weather has been gorgeous and we are having a big graduation party coming up in just a few short months. None of those are of interest to you? Well, then can I tell you about my two silly, extremely loving dogs who've been enjoying the warmer days by exploring the yard like they've never seen it before. In fact our little Cocker Spaniel is out there with her nose on the ground and her little "nub" wagging all day long, that is as long as I'm out there with her, since she has a slight case of separation anxiety, but we'll save this subject for another time. All of those things are going on in my life and I could easily talk about all of them for hours, but coming up with an interesting post about this recipe is just not in my cards today. I really don't want to bore any of you, so I guess I better try and turn this around and bring it back to my cake (how did you like this extremely smooth transition?).
OK fine, let's talk about this recipe. This is an extremely tasty cake, which I found in a great little book called "Cake Keeper Cakes
" by Lauren Chattman. This cake is a kicked up version of a marble/pound cake. Kicked up with raspberry flavor that is. The chocolate part of this cake comes from melted bittersweet chocolate which is folded into half of the dough. The other half of the dough gets some berry love from raspberry jam. Both are layered alternating into a loaf pan and then swirled with a knife to get the marbled effect. Once baked, the cake gets even more flavor from raspberry jam, which is brushed all over the cake. Last, but not least, once the cake is cool, a chocolate glaze with a little bit of Chambord liqueur adds the finishing touch for this delectable dessert.
This is a great cake with a wonderful, but yet subtle raspberry flavor. The whole family (minus my chocolate hating husband) really enjoyed this. In fact, my youngest was terribly upset when he got home from school and realized his brother and sister had gotten to the last couple of pieces before him. Yeah, it is that good and apparently it makes a 9 year old very upset when gone. I'll be making this one again and this time a little someone already put "dibs" on the last piece.
Chocolate-Raspberry Marble Pound Cake with Chocolate-Raspberry Glaze
~makes 1 cake~
Ingredients:
For the cake:
3 ounces bittersweet chocolate, finely chopped
4 large eggs, at room temperature lightly beaten
2 teaspoons pure vanilla extract
1 1/2 cups cake flour
3/4 teaspoon baking powder
1/4 teaspoon salt
1 cup (2 sticks) unsalted butter, softened
1 1/4 cups sugar
1/4 cup raspberry jam
For the glaze:
1/4 cup raspberry jam
6 tablespoons heavy cream
2 tablespoons light corn syrup
4 ounces bittersweet chocolate
1 tablespoons raspberry liqueur (Chambord)
Preparation:
For the cake: Preheat the oven to 325 degrees F. Grease a 9-inch by 5-inch loaf pan and dust with sugar.
Put 1 inch of water in the bottom of a double boiler or a small saucepan and bring to a bare simmer. Place the chocolate in the top of the double boiler or in a stainless steel bowl big enough to rest on top of the saucepan, and set the bowl on top of the simmering water, making sure that the water doesn't touch the bottom of the bowl. Heat, whisking occasionally, until the chocolate is completely melted, 5 to 7 minutes. Set aside to cool.
Combine the eggs and vanilla in a glass measuring cup and lightly beat. Combine the flour, baking powder, and salt in a medium mixing bowl.
Combine the butter and sugar in a large mixing bowl and cream with an electric mixer on medium-high speed until fluffy, about 3 minutes, scraping down the sides of the bowl once or twice as necessary.
With the mixer on medium-low speed, pour the egg mixture into the bowl in a slow stream, stopping the mixer once or twice to scrape down the bowl.
Turn the mixer on low speed an d add the flour mixture, 1/2 cup at a time, scraping down the sides of the bowl after each addition. After the last addition, mix for 30 seconds on medium speed.
Scrape half the batter into a medium mixing bowl and whisk in the raspberry jam. Whisk the melted chocolate into the batter remaining in the mixer.
Scrape 1/2 the raspberry batter into the prepared loaf pan and smooth the top, then add 1/2 of the chocolate batter. Repeat the layers with the remaining batters. Run a butter knife blade through the batter to create marbling. Do not overmix.
Bake the pound cake until it is golden and a toothpick inserted in the center comes out clean, about 1 hour and 15 minutes. Let the cake cool in the pan for about 10 minutes, invert it onto a wire rack, and then turn it right side up on a rack to cool completely.
For the glaze: Heat 1/4 cup raspberry jam until loose, and use a pastry brush to brush the warm jam all over the top and sides of the cake. Combine the heavy cream, corn syrup, and chocolate in a samll pot and heat over medium, whisking until smooth. Stir in the raspberry liqueur. Let stand until thickened, about 30 minutes. Spoon the glaze over the cake, smoothing it over the top and sides with a small metal spatula to cover. Let stand until the glaze firms up, about 1 hour. Slice and serve.
Adapted from: Cake Keeper Cakes
Monday, February 28, 2011
Piña Colada Cake for a Special Birthday
The special meal (Sauerbraten, Semmelknödel, and Blaukraut) that I featured recipes for last week were for my husband whose birthday happens to fall on Valentine's Day. It is tradition in our home, that the birthday boy or girl gets to pick the meal (homemade or eating out) and the cake. If you've been reading my blog for a while you know by now that my husband is not a fan of chocolate, with the exception of a few dishes like the German Chocolate Cupcakes he requested last year. For his birthday it is usually a given that he will pick a cake that has not one fleck of chocolate (white chocolate excluded) in it. Last year he picked Dorie Greenspan's Perfect Party Cake which is what started my blog and this year after looking through a couple of my recipe books he "settled" on Piña Colada Cake from Sky High: Irresistible Triple-Layer Cakes
. Always up for a good challenge, I decided this would be some great practice to continue working on my layered cake skills.
Layered cakes and in specific, more than two layer cakes are something that does not come easy to me. I'm getting better at it, and the cakes do taste very good after all is said and done, but the process gives me a little bit of anxiety. Today's featured cake is composed of three key components. A brown sugar cake, a pineapple filling and a coconut buttercream. First up the cake. This cake was everything and more I had hoped for. Fantastic flavor and texture, but it gave me a little bit of trouble in the oven and happened to dome in the middle (which might be due to my oven, I haven't figured that one out yet). I had to level all three layers with a knife (not an easy task for this lefty) before being able to use them. The second component was the pineapple filling. Who knew, that a combination of crushed pineapple, sugar, lime and vanilla bean would end up tasting so utterly decadent. I could eat this stuff by the spoonful, on vanilla ice cream, Greek yogurt, etc, I'm sure you get the picture. I will definitely be making this filling again all by itself since there are so many great applications for it. The last, and most certainly not least, component was the coconut frosting, which is another winner. An Italian meringue buttercream which to me tastes so much better and lighter (if that is even possible, considering all the butter) that gets its coconut flavor from a combination of coconut milk and coconut extract. Everything came together very easy, putting it together is where the going got a little tougher for me. The cake is assembled by placing one of the cake layers on a cake plate where it is then drizzled with rum (oh yeah, baby) and a layer of the pineapple jam. Another cake layer, more rum and pineapple filling and then the final cake layer and more rum. If you look closely at my cake slice you'll see I put my second and third layer together upside down which makes the cake appear like there is a whole different layer of filling. Nope, not the case, just Susi messing up slightly ;o) I tried removing the layer so I could fix it but between the rum-drenched cake and filling it started to fall apart and I just decided to leave it as is.
The final step, frosting the cake and applying toasted coconut to the sides. For decoration I simply chose fresh pineapple slices and a bit more coconut.
The verdict? The cake is incredible! The birthday boy loved every little thing about it. A perfect balance of flavors that will just melt in your mouth. It is truly reminiscent of the drink. With a couple of teeny tiny adjustments this recipe would be perfect. First up the amount of rum, which my kids were not nearly as enthusiastic about as the adults. You could leave it out completely or replace it with pineapple juice. I also ended up reducing the rum to about 1/3 cup (I reflected this change in the recipe) total between all the layers. The 2/3 cup the recipe called for would have been overkill and I happen to like rum flavored desserts. The other thing I would change the next time is to double the recipe for the pineapple jam. There could have easily been more of that without being too much and I ended up having to spread it a little too thin around the edges so that there would be enough. I made the cake one day before my husband's birthday and while I was busy for a few hours, baking, cooking and assembling, the process wasn't too bad or difficult. One thing I did recognize is that the cake actually got better with each additional day it sat in the refrigerator. The rum had time to soak into all the layers and the flavor wasn't nearly as strong on day 3 as when it was first cut. Another plus is that the cake stayed wonderfully moist. My husband ended up taking some of it to work where it got the thumbs up and a few requests for the recipe. Would I bake this cake again? Absolutely, without a doubt, this recipe is a keeper and if Piña Coladas make you think of tropical islands, sunshine, umbrella drinks and sandy beaches give this recipe a go, chances are you won't regret it and you'll feel like you are on vacation!
Piña Colada Cake
(adapted from "Sky High: Irresistible Triple-Layer Cakes"
)
Ingredients:
For the pineapple filling:
1 can (20 ounces) crushed pineapple in juice (no sugar added)
1 cup sugar
1/4 cup fresh lime juice
1 one-inch piece of vanilla bean, split in half
For the brown sugar cake:
3 3/4 cups cake flour
1 3/4 teaspoons baking soda
1 teaspoon baking powder
1/2 teaspoon salt
2 1/4 cups light brown sugar
2 sticks (8 ounces) unsalted butter, at room temperature
1 3/4 cups buttermilk
5 eggs
2 teaspoons vanilla extract
For the coconut buttercream:
3 egg whites
1 cup sugar
1/4 water
2 1/2 sticks (10 ounces) unsalted butter, at room temperature
2/3 cup unsweetened coconut milk
1 1/2 teaspoons coconut extract
For assembling the cake:
Brown Sugar Cake (baked and cooled)
Pineapple Filling, at room temperature
Coconut Buttercream
1/3 cup rum (light, amber, or dark, whichever you prefer)
Toasted coconut flakes
Thin slices of pineapple for decoration
Preparation:
For the pineapple filling: Combine the crushed pineapple, sugar, and lime juice in a large nonreactive skillet. With the tip of a small knife, scrape the vanilla seed into the pan; add the pod as well. Warm over medium-low heat, stirring to dissolve the sugar, 2 to 3 minutes.
Raise the heat to medium and simmer, stirring occasionally to prevent scorching, until the juices have almost completely evaporated and the pineapple has a jam-like consistency. Remove from the heat an discard the vanilla pod. Let the pineapple filling cool completely before using. (The filling can me made a day ahead and refrigerated. Let return to room temperature before using.)
For the brown sugar cake: Preheat the oven to 350 degrees F. Butter three 9-inch cake pans. Line the bottom of each pan with a round of parchment or waxed paper and butter the paper.
Sift together the flour, baking soda, baking powder, and salt into a large mixer bowl; whisk gently to combine. Add the brown sugar, butter, and 1 1/2 cups of the buttermilk to the dry ingredients. With the mixer on low, blend to incorporate. Raise the speed to medium and beat until light and fluffy, 2 to 3 minutes.
Whisk the eggs with the remaining 1/4 cup buttermilk and the vanilla and add to the batter in 3 additions, scraping down the sides of the bowl well and beating only long enough to incorporate between additions. Divide the batter among the 3 prepared pans.
Bake for 25 to 28 minutes, or until a cake tester or wooden toothpick inserted in the center comes out clean. Let the layers cool in the pans for 10 minutes; then turn out onto wire racks, carefully peel off the paper liners, and allow to cool completely before filling and frosting.
For the coconut buttercream: Put the egg whites in the bowl of an electric mixer fitted with the whip attachment so they are all ready to go.
Combine the sugar and water in a small heavy saucepan and place over medium heat, stirring to dissolve the sugar. Bring to a boil and cook, without stirring, until the syrup reaches the soft-ball stage, 238 degrees F on a candy thermometer.
Beat the egg whites briefly at medium speed.Slowly add the hot syrup in a thin stream, being careful to avoid the beaters. Continue to whip until the meringue has cooled to body temperature.
With the mixer on low speed, gradually add the butter, several tablespoons at a time, and continue to beat until a smooth, fluffy frosting forms.
Add the coconut milk in several additions, scraping down the sides of the bowl well after each addition. Add the coconut extract and mix until smooth.
For assembling the cake: Place one layer, flat side up, on a cake stand or serving plate. Carefully brush with rum. Spread half of the pineapple filling over the layer, leaving a 1/3-inch margin around the edge. Add the second layer, brush with more rum, and cover with the remaining filling. Top with the third layer, flat side up, brush with the remaining rum. Frost the top and sides of the cake with the coconut buttercream. Decorate with toasted coconut and thin slices of pineapple.
Adapted from: Sky High: Irresistible Triple-Layer Cakes
Tuesday, February 15, 2011
Susi's Kochen und Backen 1st Blogoversary!
Wow, I can't believe it's been one whole year already since I started this "blog thing". One year ago, my very smart 17 year old daughter told me I should start a blog. Little did she, or I know what a fun and at times exhausting ride this would be. The year has certainly been filled with a few trials, a few extra gray hairs, but mostly great memories. If it wouldn't have been for my little "hiatus" named Valley Fever, I would have finished as strongly as I started, but sometimes life does not work out the way you intend it to. However, through all of this I could not be prouder of this blog and how far I have come. I have challenged myself with recipes, photography and writing. I'd like to think that I've improved in all areas. The cooking and baking part comes easily to me, the other two don't come as naturally, but it has been a great experience and learning curve. None of this would have been possible without all the support you guys have given me. Some of you have been around since the very beginning and I can't begin to express how much your kind comments have meant to me. Some of you are newer to my blog, nonetheless your friendship and equally encouraging comments have been what keeps me coming back. All of your great blogs are what drives me to push and improve myself everyday. The last year would have not been as possible or successful without all of you and for that I thank you from the bottom of my heart. I could not be prouder to have "met" every single one of you!
So what is in store for year 2 on Susi's Kochen und Backen Adventures? At this point, I'm just happy that I'm feeling well enough to blog again, however, I do have a few "monsters" I would like to tackle this year. Baking more of my own bread is on the top of my list, along with trying my hand at macarons which I have only admired on other blogs thus far. I would also like to challenge myself into creating more "original" recipes and keep working on my photography skills, which is still my greatest struggle (even though I think I've improved from my early months). I will also continue to feature more German recipes since I enjoy sharing my heritage with you. Lastly, but not least, some popular features will make a return along with a few more recipes that focus on healthy eating in general. I'm certainly looking forward to a great year and can't wait to share all of this with you!
To celebrate this momentum occasion I struggled with the decision of what recipe to feature today. I finally decided to go with this cupcake recipe and in true Susi's Kochen und Backen fashion, this recipe ended up turning out a bit different then intended. Chocolate cupcakes, with a cream cheese center who were "supposed" to be topped with a chocolate glaze and chocolate curls. Unfortunately, once baked, the cupcakes decided to have a mind of their own and the cheesecake center decided to sink on me, leaving them looking more like craters then photographic gems I had envisioned. That's when I decided to macerate some of my bounty of frozen fruit from last summer and top the cupcakes with that. Everyone agreed that they looked prettier than the original in the book and while I can't compare taste, I'd like to think that the fruit gave them this little extra special something. These cupcakes were a hit and I will definitely be baking them again, "Susi's Kochen und Backen Style".
Black & White Cupcakes
~makes 12 cupcakes~
Ingredients:
8 ounce cream cheese, at room temperature
1 tablespoon sour cream
1 1/4 cups sugar
1 cup cake flour
1/3 cup unsweetened cocoa powder
1/2 teaspoon baking soda
1/4 teaspoon salt
4 tablespoons unsalted butter, at room temperature
1 large egg, at room temperature
1 teaspoon vanilla extract
1/2 cup milk
1 cup berries, frozen or fresh, tossed with 2 tablespoons sugar
Preparation:
Toss berries with 2 tablespoons sugar and set aside.
Position a rack in the middle of the oven and preheat to 350 degrees F. Line a standard 12-cup muffin pan with paper liners.
To make the cream cheese filling, in a bowl, using an electric mixer on high speed, beat the cream cheese until fluffy, about 2 minutes. Add the sour cream and 1/2 cup of the sugar and beat until combined.
To make the cupcake batter, sift together the cake flour, cocoa powder, baking soda, and salt into a bowl. In another bowl, using an electric mixer on medium-high speed, beat the butter and remaining 3/4 cup sugar together until light and fluffy, 2-3 minutes. Add the egg and vanilla and beat until combined. Add the flour mixture in 3 additions, alternating with the milk in 2 additions, beating on low speed until just combined; scrape down the sides of the bowl as needed.
Divide the batter evenly among the prepared muffin cups, filling each about one-half full. Spoon the cream cheese filling onto the center of each, dividing it evenly (the filling will sink into the cupcakes as they bake). Bake until the cupcakes are set in the center, about 15-20 minutes. Let the cupcakes cool in the pan on a wire rack for 5 minutes. Transfer the cupcakes to the wire rack and let cool completely, about 1 hour.
Labels:
anniversary,
baking,
blog,
chocolate,
cream cheese,
cupcake,
dessert
Sunday, February 13, 2011
Nutella Espresso Mousse
Tomorrow is Valentine's Day! I know a lot of people think this is a Hallmark holiday, but it is nonetheless a great day to show that special person in your life how much you love them. And what better way to show that, than in the form of food, by making a dinner at home from scratch rather than going out. We always stay home, but that is because Valentine's Day is also my husbands birthday. I always cook him a special by request meal and tomorrow will be no different. He picked a wonderful authentic German meal for his birthday dinner and he could not be more excited about it. If you are a fan of my facebook page you know I have already spilled the beans of what I'm cooking. The recipes will certainly be featured soon. Anyway, I'm sure a lot of you already have your dinner plans for tomorrow firmed up as well, but if you are still looking for that final touch without a lot of fuss, then look no further.
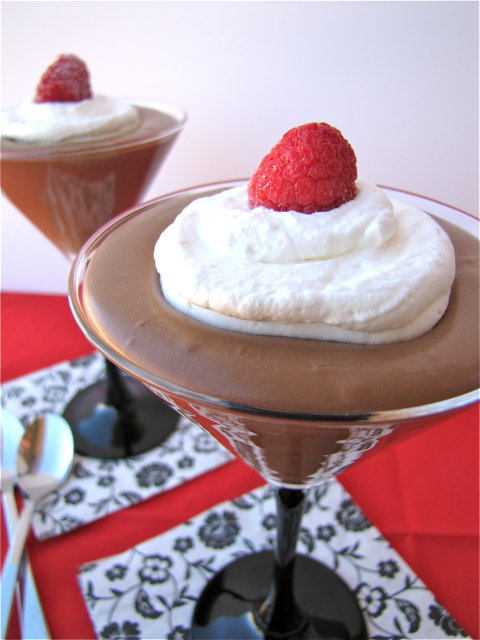
Sometimes we tend to "over-think" desserts when in reality, simple can just be as effective and tasty. I had it in my head that I wanted to feature a chocolate mousse. After looking through some of my cookbooks I knew I didn't want to mess with raw eggs in my recipe that many versions suggested. I was looking for something simpler. I also wanted to kick up the flavors so instead of chocolate I decided I was going to use Nutella. Trying to think of ways to enhance the hazelnut flavor, Frangelico liqueur was my logical choice and to take it just a step further I figured espresso powder would harmonize with the mousse as well. For the espresso powder I have come to love the Starbucks Via packets. They pack a lot of flavor and incorporate beautifully into wet or dry ingredients.
This recipe literally does not get much easier and with only a handful of ingredients it won't break the bank either. Heavy Cream, a Starbucks Via packet, Frangelico liqueur and of course the star of this concoction; Nutella. The ingredients get mixed with a handmixer until everything comes together and the mixture forms soft peaks. Fill into your favorite dessert glasses and chill for a few hours in the refrigerator. Before serving, you can top the mousse with additional whipped cream or simply place some fruit on top. Easy, yet elegant, and the flavor is amazing! It tastes rich, full of chocolate with a hint of coffee. Even my non-chocolate loving husband gave this one the thumbs up. Think of this one as a chocolate pudding for grown-ups and spoil your special someone with this recipe tomorrow, he or she might thank you later ;o)
Nutella Espresso Mousse
(A Susi's Kochen und Backen Original)
~makes 4 servings~
(Printable Version)
Ingredients:
1 cup chilled heavy cream
1 Starbucks Via Italian Roast Packet (1/2 teaspoon of espresso powder will work also)
2 tablespoons Frangelico liqueur (Kahlua would be wonderful as well)
3/4 cup Nutella
Whipped Cream and Berries for topping (optional)
Preparation:
Combine heavy cream and espresso powder in a medium mixing bowl. Stir together. Add Frangelico and Nutella. Beat with an electric mixer 1 minute. Scrape down the sides and continue beating until soft peaks form. At this point the mousse is very soft/loose, but will firm up once chilled. Divide the mixture into the serving dishes of your choice and chill at least 2 hours in the refrigerator.
If desired, top with additional whipped cream or berries just before serving.
Labels:
cream,
dessert,
easy,
espresso,
Frangelico,
Nutella,
Valentine's Day
Subscribe to:
Posts (Atom)