Showing posts with label vegetarian. Show all posts

Wednesday, April 2, 2014

Radish Cream Cheese Spread for Spring


Are you a part of the radish fan club or do you not care for them because of their peppery and at times, sharp taste? If you already like radishes I don't need to convince you, but if you are on the fence about this vegetable or even hate the way it tastes (gasp) here are a few facts that might sway your mind. The little red root vegetable is actually good for you! Yes, I know, I know, all vegetables are good for you, but these little guys are full of vitamin C, have cancer fighting properties and are low in calories to name a few. See, I thought this might peek your interest. 


My husband loves radishes as much as I do, however my kids are staunch radish opponents. When I try adding them to our salads, they always end up picking theirs out. They really don't know what they are missing out on ;-) One of my favorite ways to enjoy radishes growing up was adding thin slices of them on top of a piece of buttered rye bread, with just a tiny sprinkle of salt. Super simple, but so tasty. In fact, I get fairly nostalgic thinking about the beautiful red radishes from my mom's garden along with that wonderful baked bread that German bakeries are well known for.

 
While radishes are available year round these days, I tend to think they are synonymous with spring. This easy to make radish cream cheese spread is the perfect appetizer or light lunch for the season. Cream cheese paired with plain yogurt, radishes, chives, lemon zest and lemon juice give this spread a light taste and make it irresistible. Add a dollop of the spread on top of a piece of seeded bread and sprinkle with some beautiful micro greens for added color. Arrange them on a platter and you now have the most perfect appetizer to serve for a spring luncheon or your Easter celebration. Oh, and for the record, everyone in my family enjoyed this radish cream cheese spread. Yes, even my radish haters!


Radish Cream Cheese Spread
~makes about 1 1/2 cups~
(Print this Recipe)

Ingredients:
1 bunch radishes, washed and finely cubed (about 3/4 cup)
1/4 tsp. Kosher salt
8 oz. cream cheese, softened (can use 1/3 less fat cream cheese)
1/4 cup plain (2%) yogurt 
2 Tbsp. fresh chives, chopped
Zest from 1 lemon
1 tsp. lemon juice
1/4 tsp. Kosher salt
1/4 tsp. freshly ground black pepper
Micro Greens
Sliced Bread

Directions:
Place your washed and cubed radishes in a small bowl. Sprinkle with 1/4 tsp. Kosher salt and let sit for about 20 minutes to draw out excess moisture.

In a medium bowl whisk together cream cheese, yogurt, chives, lemon zest, and lemon juice. Season with salt and pepper.

Drain salted radishes well and fold into the prepared cream cheese mixture. Place mixture in the refrigerator for about 30 minutes before assembling.

When ready to serve place a dollop of the radish cream cheese on your bread slices. Top with micro greens and serve.


Notes: Drawing the moisture out of the radishes before adding them to the cream cheese is an important step that will prevent your spread from getting to watery after it sits.

You can also serve this radish spread as a dip. In this case place the dip in a bowl and serve with bread, crackers and assorted vegetables, like carrots, bell peppers, and celery.

For a change of pace, use the spread as a tasty bagel topping.

The spread will keep in the refrigerator for a couple of days.

Recipe inspired by: Kuechengoetter.de

Tuesday, March 18, 2014

German Cucumber Salad (Gurkensalat)


When I was little, I wasn't a big fan of any salad that contained green lettuce leaves. I thought it tasted like grass and was better used as food for rabbits. I ate it, but many times it was very begrudgingly and only the smallest amount my mom would let me get away with. However, there was always one salad I didn't need convincing for and that was my mom's Gurkensalat (cucumber salad). I could happily eat a big bowl in one sitting without complaint.


Gurkensalat is as quintessential in Germany as Bratwurst, Sauerkraut or Schnitzel. Most families have a recipe that has been handed down from generation to generation with a few slight variations depending on the region in Germany. My love for this salad has only grown stronger over the years and I'm happy that my family loves it equally as well. In fact, this is one of my most requested recipes from friends who have tried it at our home. I've always told them "it's a little of this and a little of that", so I guess many of them will be happy that I've finally added it to my blog with a "real" recipe.


Cucumbers are mild and pretty neutral tasting, plus they are very refreshing, especially on a warm day. Making this salad doesn't require a lot of time, but there are a few key points to remember. I peel my cucumber and use a mandolin to get thin, even slices. Salting the cucumbers prior to adding the salad dressing helps remove some of the moisture and prevents the salad from being to watery. Fresh dill will really bring out the freshness in this salad, but in a pinch I've used dried dill before and it will work just fine, but in this case fresh is best. Last, but not least, while I use extra virgin olive oil for every other salad dressing or vinaigrette I make, for this salad I prefer a very neutral tasting oil like grapeseed oil which is a great healthy alternative.


This salad tastes best if it can "hang out" for about an hour before serving. It helps all the flavors meld together and makes it even more tasty. Gurkensalat is a great side dish for any grilled meat, but one of my favorite ways to eat it is the way my mom and grandma served it quite frequently, alongside some freshly made Käsespätzle (Cheese Spaetzle). I really hope you will give this recipe a try and that it becomes a family favorite of yours as well.


German Cucumber Salad (Gurkensalat)
~makes 4 servings~
(Print this recipe)

Ingredients:
1 English Cucumber, peeled and finely sliced
1/2 tsp. Kosher salt


For the dressing:
2 Tbsp. grapeseed oil
2 Tbsp. white vinegar
2 Tbsp. apple cider vinegar
1/2 tsp. Kosher salt
1/2 tsp. black pepper
1 tsp. spicy brown mustard
1 Tbsp. honey
1/4 cup sour cream
1/3 cup red onion, finely diced
1 Tbsp. fresh dill, finely chopped
1 Tbsp. fresh chives, finely chopped

Directions:
Peel and slice cucumber and place in a strainer over a bowl. Add 1/2 tsp. Kosher salt, mix with the cucumbers and let sit for about 20 minutes to drain.

Meanwhile to make the dressing whisk oil, white vinegar, cider vinegar, salt, pepper, mustard and honey in a small bowl until emulsified. Whisk in sour cream, onions, dill and chives.

In a bowl add your drained cucumber and your prepared dressing. Combine and let sit for about 1 hour in the refrigerator before serving.

Notes: My mom taught me to peel the cucumber from the "flower to the stem" (top to bottom), this way if you have a bitter cucumber end you don't drag the bitterness across the entire cucumber.

Always taste both ends of your cucumber before using, there is nothing worse than a bitter cucumber ruining your salad.

I use a mix of white vinegar and apple cider vinegar for this salad. Over the years I have found that this mix comes pretty closely to the unique taste German vinegar has.

A Susi's Kochen und Backen Family Recipe


Tuesday, February 18, 2014

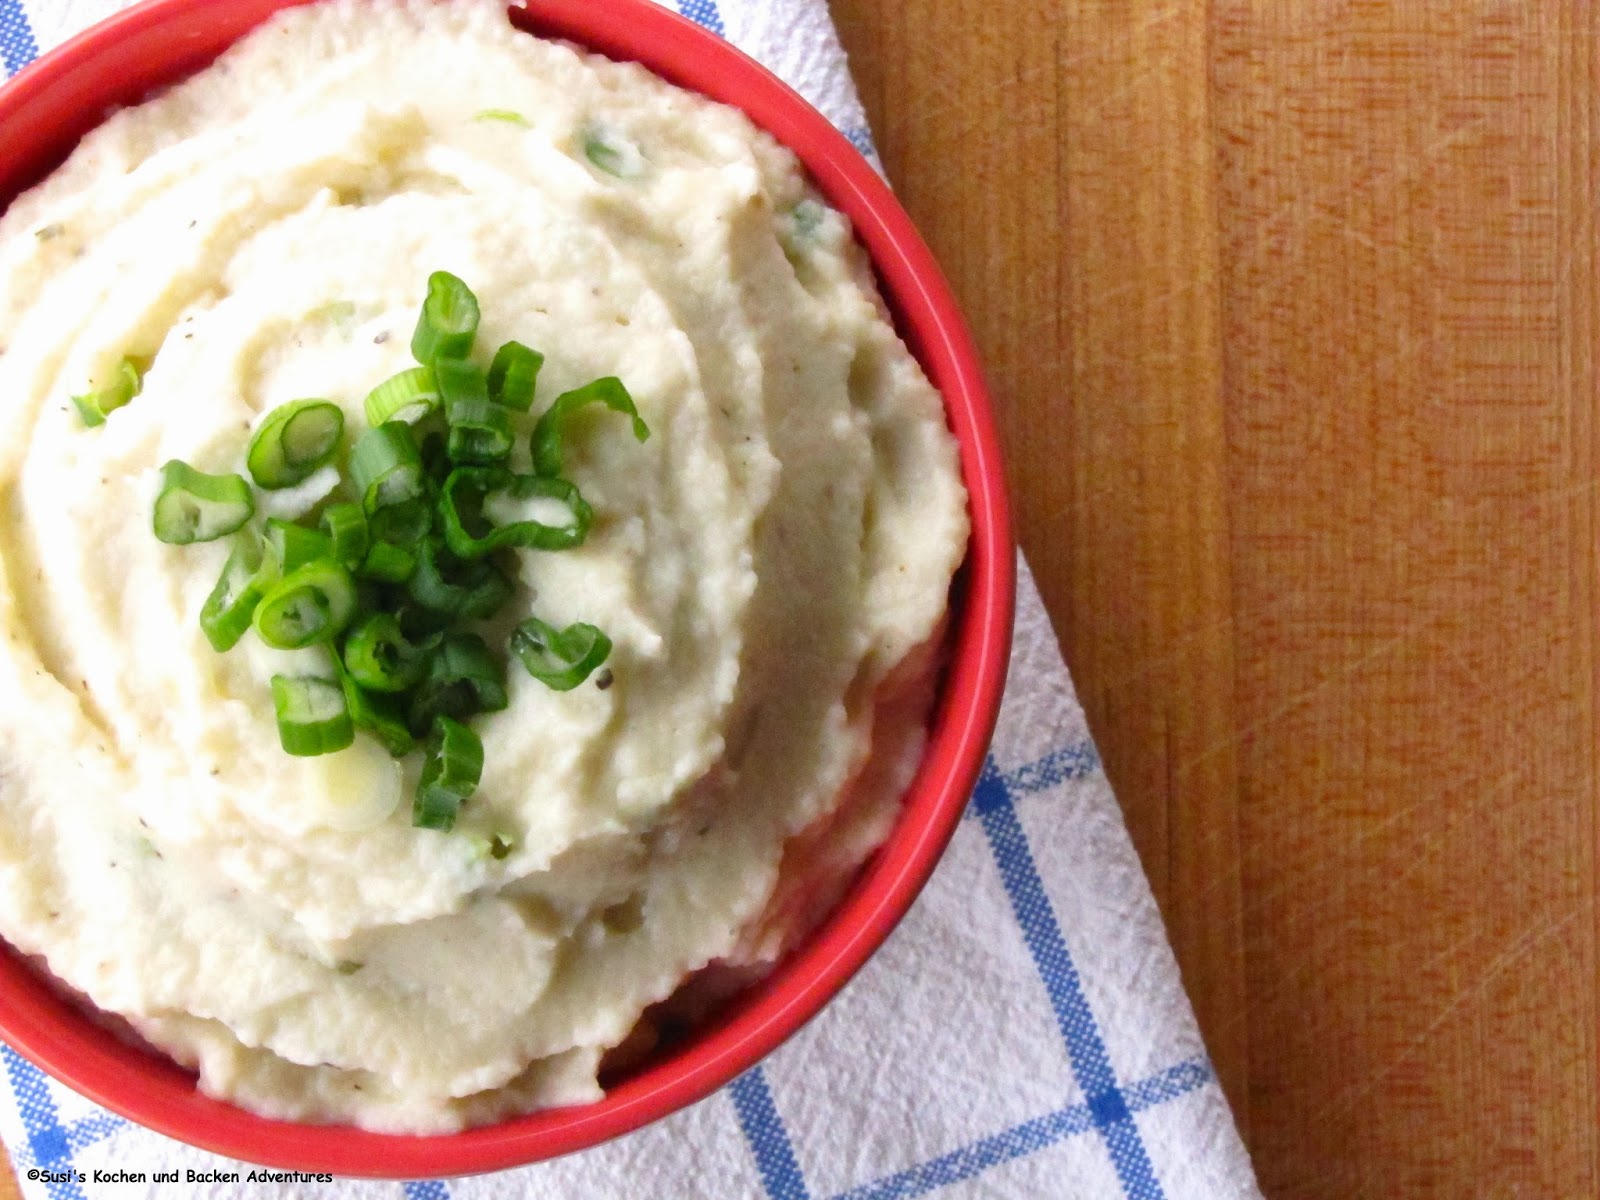
Mashed Cauliflower with Roasted Garlic & Goat Cheese


I have come to the conclusion that many times when people claim they don't like to eat certain vegetables, it really means they probably have never had it prepared in a way that would appeal to them. With so many different options and recipes available on how to turn an otherwise boring vegetable into a showstopper, it makes it hard to believe that an aversion against a certain food couldn't be overturned.

I think Cauliflower is a great example. By simply steaming the vegetable you end up with a "blah" version that can be kind of tasteless, but because of its mild flavor it can also be extremely versatile and lend itself to a lot of different and tasty applications. Recently there has been a surge in popularity for cauliflower. The florets are low in fat and carbs, high in fiber, folic acid and vitamin C, which makes this vegetable a winner in my book. If you perform a quick search, you can find an amazing variety of recipes. They range from roasted cauliflower, gratins, soups, dips, faux alfredo sauces and even pizza crust. While I've tried quite a few of these different versions, cauliflower pizza crust is still one that eludes me, but I will never say never.

A few weeks ago I made Canadian Bacon Cauliflower Cheddar Cups for my family with great results, so  I decided to experiment a little more and came up with this delicious mashed version. I started with a basic recipe, but by adding sweet, roasted garlic along with tangy and tart goat cheese, the dish was elevated to a whole new level. I achieved the desired consistency with my food processor, but an immersion blender or even a good old fashioned potato masher should do the trick as well. I served this with grilled steak and a big side salad, but ate leftovers with a couple of over-easy eggs the next day and had to restrain myself from licking the plate. So tasty, so simple, and most definitely one of my new favorites.  


Mashed Cauliflower with Roasted Garlic & Goat Cheese
~makes 5-6 servings~
(Print this Recipe)

Ingredients:
5-6 cups cauliflower florets (about 1 medium head)
1 vegetable bouillon cube
8-10 roasted garlic cloves (see notes)
4 Tbsp. soft goat cheese
1/8 tsp. grated nutmeg
Kosher Salt and Pepper to taste
4 Tbsp. green onions, chopped

Directions:
Roast garlic (see note), remove cloves from skin and set aside.

On the stove-top, add cauliflower to a pot, fill with about 4 cups of water. Add the vegetable bouillon cube and steam/cook cauliflower until soft. Drain the cauliflower and add to a food processor.

Process cauliflower along with the roasted garlic cloves, goat cheese, 1/2 tsp. salt, 1/4 tsp. pepper and 1/8 tsp. nutmeg until smooth.

Transfer mixture to a bowl, check for additional salt and pepper and fold in 3 Tbsp. of the green onions. Sprinkle with additional reserved onions and serve immediately.

Notes: To roast the garlic, preheat oven to 400° F. Take one whole garlic bulb and cut 1/4 to 1/2 inch off the top. Lay on a piece of aluminum foil big enough to wrap the head of garlic, drizzle with about 1 tsp. of olive oil and season lightly with salt and pepper. Wrap it in the foil and roast in preheated oven for 35-45 minutes or until garlic is soft and golden brown. Let cool for about 15 minutes before handling. Use your fingers or a fork to squeeze and pull roasted garlic out of the skin. 

If you don't like the taste of goat cheese, cream cheese would also be an acceptable substitution.

A Susi's Kochen und Backen Original Recipe

Wednesday, May 2, 2012

Greek Pasta Salad

  
During any kind of pot-luck you can be sure to find your array of mayo-based salads. While I like them as much as the next person, my first love will always be vinaigrette based salads. They are so much easier to keep fresh, especially when it's hot outside and the salad needs to be transported.

This Greek pasta salad is another one of those "what's in the fridge" recipes that just came about. I knew what flavor profile I was going for and just rolled with it. The end result is extremely tasty and can be enjoyed by itself for a quick lunch, a vegetarian dinner or simply served with some grilled chicken, fish or tofu on the side.

Cucumbers, tomatoes and bell peppers add a freshness to this salad that is enjoyable, especially on a hot summer day. The olives, artichokes and feta add a little richness, and the balsamic vinaigrette balances it all out. This recipe comes together quickly and can be made a few hours ahead to let the flavors mingle. I hope you'll give this Mediterranean inspired salad a try for your next pot-luck or casual summer dinner.

  
Greek Pasta Salad
~Serves 8-10~

Ingredients: 
1 pound Pasta Fusilli
1 English Cucumber, peeled and diced
2 cup Grape Tomatoes, halved
1 sweet red pepper, diced
1/2 red onion, diced
1/2 cup marinated Artichoke Hearts, chopped
4 oz. pitted Kalamata Olives, halved
6 oz. Feta Cheese, crumbled
2 Tbsp. Olive Oil
6 Tbsp. Balsamic Vinegar
2 tsp. Mustard
1/2 Tbsp. Honey
1 tsp. Dried Oregano
Salt and Pepper to taste

Directions:
Cook pasta according to package directions. Drain and set aside.

In a large bowl, add the diced vegetables (cucumber, grape tomatoes, red pepper, onion, artichoke hearts and olives). Add the cooked pasta and gently toss together.

In a small bowl whisk olive oil, balsamic vinegar, mustard, honey and oregano. Season with salt and pepper to taste. 

Add half of the vinaigrette to the pasta mixture and toss. Let the salad sit for about 15 minutes at room temperature. Add the other half of the vinaigrette and refrigerate for at least one hour. Before serving gently fold in the feta cheese.

A Susi's Kochen und Backen Original Recipe


Sunday, April 29, 2012

Quinoa Stuffed Portobello Mushrooms


I love mushrooms in every shape or form and Portobello mushrooms rank pretty high on my favorite foods list. I love how versatile they are and how you can turn them into a filling, delicious, vegetarian meal with very little effort.  This recipe came about simply by checking the pantry and refrigerator. What started as a meal to get rid of a few extra vegetables, turned into an unforgettable dinner and inspired me to get back on this computer to write a short post.

While trying to come up with the finished recipe I decided to forgo the usual breadcrumbs as a binder and instead turned to Quinoa, which is quickly becoming one of my favorite grains to incorporate into recipes. By doing so, I was actually able to create a recipe which is not just vegetarian, but also gluten free. Served with a big salad on the side and bowl of watermelon this turned into a great meal that none of us will soon forget.


Quinoa Stuffed Portobello Mushrooms 
~Serves 4~

Ingredients:
4 Large Portobello Mushrooms
1/2 cup Quinoa
1 cup Vegetable Broth
1 Tbsp. Olive Oil
1/2 Red Onion, diced
4 cups Baby Spinach, rough chopped
4 Tomatoes, seeded and diced
1/2 cup Fresh Basil, chiffonade
1/2 tsp. dried Oregano
Salt and Pepper
4 oz. Fresh Mozzarella, cubed
1/4 cup Parmesan, grated

Directions:
Clean Portobello mushrooms by removing the stem and cleaning out the gills and gently wiping the mushroom tops. Chop the stems and reserve. 

Meanwhile bring 1/2 cup quinoa and 1 cup of vegetable broth to a boil in a small pot. Cover and simmer for 15 to 20 minutes, or until all the broth is absorbed. Take off the stove and cool to room temperature.

While the quinoa is cooking, heat 1 Tbsp. olive oil in a pan. Add the red onions, and cook until the onions begin to soften. Add the reserved chopped mushroom stems, spinach and tomatoes and saute until the spinach is wilted and the mixture is heated through. Season with oregano and salt and pepper to taste.  Add the basil and remove from the stove. Gently stir in the quinoa and let everything cool to room temperature. Once the mixture has cooled, fold in the cubed mozzarella.

Take the cleaned mushroom caps and brush them lightly all over with olive oil. Season the inside with salt and pepper. Divide the filling equally into each mushroom cap. 
Sprinkle each with Parmesan.

Grill for 15 minutes over medium heat or until the mozzarella starts melting and the mushrooms are heated through.
Serve immediately.

A Susi's Kochen und Backen Original Recipe


Monday, April 11, 2011

Israeli Couscous with Balsamic Glazed Vegetables


I'd like to thank you all of you for your kind comments, thoughts, prayers and emails regarding my surgery. It meant a lot and I don't say this lightly. My surgery went off without a hitch Thursday and I was back home resting that evening. I had a few days of more pain than I expected, but I'm feeling a little better with each day.  I still have to take it easy for a few more days, but didn't want to leave you all "hanging". I'm not ready to hop back into the kitchen just yet, but I made a few recipes ahead of time before I went in for my procedure. So again, thanks to all of you and your support :o)

I love shopping at Trader Joe's and no, this is not a paid advertisement, it just happens to be one of my favorite grocery stores. It reminds me a lot of the stores I grew up with as a kid. Small, neighborhood stores with a fairly limited assortment of products, but yet everything available that you would need. Trader Joe's is like that. I could spend hours walking through that little store, checking out all of the cool and unique products they have. I always check out their flowers and more often than not, I end up with a bouquet in my basket to brighten up my day. Next up, I always have to stop at the cheese coolers, the glorious, amazingly stocked cheese coolers where I usually stand and have to check out all of the mouthwatering and at times, unique flavors. I also enjoy their wine selection and always seem to walk away with a new find. In fact, they do carry a lot of things that you just can't find at an ordinary grocery store and it is also the place where I buy my couscous among many other things. Israeli couscous that is, because my local supermarket likes to be difficult and won't stock it.

Israeli couscous is just one of those interesting foods, that put a little smile on my face every time  I cook with it. I don't know exactly what it is about it, but I guess I enjoy that the texture is quite unique and unlike regular couscous. Many times I turn it into a salad or simply cook it in some chicken broth for a bit of added flavor. This time though, I wanted to incorporate a good amount of vegetables into the dish and not just any vegetables, but balsamic glazed ones. Red and green bell peppers along with onion and baby portobello mushrooms were my choice for this recipe. To make this a true vegetarian dish, I decided to cook the couscous in vegetable broth to infuse flavor throughout. While the couscous cooks, the cut up vegetables are simply sauteed in a bit of olive oil.  They are seasoned with salt and pepper and a final touch of balsamic vinegar made these vegetables a standout. I also made sure to cook them "al dente" since I wanted to keep the integrity of the vegetables intact. Finally they are folded into the cooked couscous before serving.

The end result was such an incredibly tasty dish, that goes well with so many things. Anything from chicken to fish would be wonderful alongside, but it can certainly stand on its own as well. I served this dish hot right out of the pan, but happened to try it once it had cooled down, and it was equally delicious at room temperature. This turned out so well, that my family has already requested this dish again and with it being chock-full of good for you ingredients, I certainly won't have a problem cooking this in the future.


Israeli Couscous with Balsamic Glazed Vegetables 
~makes 8 servings~ 

Ingredients:
For the couscous:
1 1/3 cup Israeli couscous
1 tablespoon olive oil
1 3/4 cups vegetable broth

For the balsamic vegetables:
2 tablespoons olive oil
1/2 medium red onion, chopped
1 red bell pepper, 1/2-inch diced
1 green bell pepper, 1/2-inch diced
1 pound baby portobello mushrooms, cleaned and chopped
Kosher salt and pepper to taste
2 tablespoons balsamic vinegar

Directions:
For the couscous: In a 2 quart saucepan, saute 1 1/3 cups Israeli couscous with 1 tablespoon olive oil over medium heat until couscous is lightly browned (about 5 minutes). Slowly add 1 3/4 cup hot vegetable broth and bring to a boil. Reduce heat to medium low and cover. Simmer for 12 minutes or until liquid is absorbed.

For the balsamic vegetables: In a large pan, heat 2 tablespoons olive oil over medium heat. Add the onions, peppers and portobellos and saute until vegetables begin to soften. Season with salt, pepper and balsamic vinegar. Continue to cook until most of the moisture from the vegetables has evaporated and the balsamic has glazed them, making sure not to over-cook the vegetables. Fold the sauteed vegetables into the cooked couscous and serve immediately or at room temperature.

A Susi's Kochen und Backen Original Recipe

Friday, February 25, 2011

Blaukraut (German Red Cabbage)


Remember my last post? The one with the Semmelknödel, where I told you I wasn't an expert in cooking dumplings? Well, I am definitely an expert in cooking Blaukraut (not that I'm gloating here). Blaukraut literally translates into "blue cabbage" and the name is mainly used in southern Germany. Most areas in Germany though either call this Rotkraut or Rotkohl which means "red cabbage". I've been cooking Blaukraut for probably 20 years and by now I don't even need a recipe anymore. I usually don't measure my ingredients and know exactly just what and how much to add to achieve a consistent tasting cabbage each and every time. However, just for you, my wonderful blog readers, I had my kitchen helper (my daughter) write down everything I did as I went along.

Most Americans are familiar with Sauerkraut and while we Germans do tend to eat that a lot (and no, we don't wear "Lederhosen" all day long), Blaukraut is cooked just as often and is another treasured German recipe that most families cook quite frequently. Blaukraut is so versatile and can be served alongside many dishes like German dumplings, Spaetzle, or mashed potatoes. In restaurants it is a given that it is served with Sauerbraten, venison, boar and goose. I've always loved Blaukraut and we had it a lot growing up since red cabbage was bountiful every year from my parent's and grandparent's vegetable gardens. Cabbage tends to be ready for harvest in the fall and we mostly ate this throughout the colder months. My mom would cook several cabbage heads at a time and freeze the leftovers, which works beautifully.


Cooking Blaukraut is fairly easy as long as you consider a few simple steps. You can shred the cabbage by hand, but if your knife skills aren't that great, go ahead and use a mandolin or the shredding blade of a food processor which will always give you consistent results. I find it also very important to "layer" my cabbage while cooking it. 2-3 layers are sufficient and each layer will receive lots of love from the ingredients, which will ensure a great tasting side dish. Not many ingredients are needed, but it does call for vegetable bouillon cubes which impart great flavor. A good tasting sweet apple (like pink lady) is also important, and while I love Granny Smith for most of my baking, they are too tart for this recipe. Last, but certainly not least, a little bit of a good tasting red wine is added (do not use cooking wine!) which along with the vinegar doesn't add flavor, but also helps preserve the beautiful color of the cabbage.

This time around I served the Blaukraut with my German Sauerbraten and Semmelknödel, but it is a wonderful side dish that is tasty alongside all kinds of meals and goes extremely well with a beef pot roast. My family (including the kids) love this recipe and so has every guest that has ever had it served in our house. I know, strong statement, but it is just that good!


Blaukraut (German Red Cabbage)

Ingredients:
1 medium head red cabbage, shredded
1 tablespoon olive oil
1/3 cup red wine
1/2 medium onion, finely chopped
1 apple, peeled, cored and finely chopped
2 vegetable bouillon cubes
4 tablespoons apple cider vinegar
1 teaspoon sugar
1 cup water
Kosher Salt and Pepper

Directions:
Heat olive oil in a large pot over medium heat. Add the onions and saute until translucent. Add the 1/3 cup of red wine. Add 1/2 of the shredded cabbage, 1/2 of the apple, 1 bouillon cube, 2 tablespoons vinegar, 1/2 teaspoon of sugar, 1/2 cup of water, season with 1/2 teaspoon of salt and 1/8 teaspoon of pepper. Repeat the layer adding the other half of the ingredients in the same fashion.
Give a quick stir, cover and simmer for about 20 - 30 minutes or until the cabbage is soft. At this point stir, taste for seasonings and adjust if a little more salt and pepper is needed. 

A Susi's Kochen und Backen Family Recipe

Thursday, August 26, 2010

Grilled Panzanella Salad


In some areas of the country, summer has been quite the mixed bag. Very hot days, but also very cold and rainy days. For us it has just been plain hot and unbearable with very little rain. Summer in Arizona is unfortunately not letting up for probably another couple of months. It will hold a firm grip on us, making us wish for cooler temperatures, even if it just means to dip below 100 degrees F. Yes, most of us Arizonians should be used to it, but are fed up with this terrible heat by early August. Unfortunately, we forget year after year about the temperatures when we are sitting outside enjoying a BBQ-ed meal in January while the rest of the country is freezing.

Since summer is still here to stay for at least a while longer, I'm still on the hunt for great salad recipes to expand my repertoire. This one comes courtesy of "Cuisine at Home" yet again. I really like their approach to recipes which are fairly simple, but wonderful tasting, and most of my magazines from them are covered in sticky notes for dishes to try. Today's post had been on my to-do list for a while, and last weekend I finally got around to it. Panzanella Salad is an Italian dish that is a bread salad. It varies widely depending upon region and ingredients available, however, day old bread is always included. It is also important to use a sturdy bread when making this dish. It is best to use a chewy, rustic bread that can withstand being tossed with a vinaigrette, otherwise your bread will get way too mushy. Ripe, juicy tomatoes are another must, and while any tomato will work, the sweetness of cocktail or grape tomatoes seem to harmonize best with this salad. Cucumbers, red onions, kalamata olives, fresh mozzarella and basil round out this dish.

This is a fantastic salad to serve along side any kind of meat. We had pork chops with it, but steak or chicken would be wonderful as well. Since the bread is grilled on the BBQ, grilling the meat is a logical choice and with that you can leave the stove off, which is always a plus with this heat. We all really enjoyed this unique salad. It incorporated all of our favorite ingredients and so it was kind of a given that we liked it, but nonetheless, I'm surprised by the simplicity of certain recipes that just "wow" you. This is another recipe I'm keeping, and will be making over and over again!


Grilled Panzanella Salad
(adapted from "Cuisine at Home")
(Printable Recipe)

Ingredients:

1/4 cup olive oil
2 tablespoons white wine vinegar
1 teaspoon Dijon mustard
Salt and Pepper to taste
1 cup grape tomatoes, halved
1 cup cucumber, seeded and chopped
1 cup red onion, sliced
1/2 cup fresh mozzarella, cubed
1/4 cup kalamata olives, pitted and halved
1/4 cup torn fresh basil leaves
1/2 a baguette or ciabatta bread, halved lengthwise and brushed with olive oil
2 garlic cloves

Preparation:

Preheat grill to medium-high. Whisk oil, vinegar, mustard, salt, and pepper together; set aside.

Toss vegetables, mozzarella, olives, and basil together in a bowl.

Grill bread, cut side down, until golden, 2-3 minutes, then rub with the garlic cloves. Slice bread into cubes, add to vegetables, and toss with vinaigrette.

Monday, August 16, 2010

Peas and Carrots "German Style"


Peas and carrots mixed together always bring me back to my childhood. It was my absolutely favorite vegetable my mom prepared, and to this day, it holds a special place in my heart. It is a super kid friendly vegetable mix, and my children have loved it since they were little babies and were able to start eating table food. This is another one of my mom's recipes that I made sure to acquire as soon as I moved out, and it has been a staple in our home ever since.

The dish is reminiscent of creamed vegetables without the heaviness. It starts by sauteing diced onions in a bit of olive oil. Cleaned, chopped carrots are added and sauteed for a minute. A little bit of water is added along with a vegetable bouillon cube, salt, and pepper. Frozen peas are thrown into the mix, and everything is cooked until the carrots are soft, but still have a bit of bite left to them (nothing worse than mushy vegetables). A couple tablespoons of heavy cream along with freshly chopped parsley add the finishing touch. This recipe is certainly not difficult to fix, chopping the vegetables will be the hardest "chore" in this dish. After that, it is finished in no time.

I especially like to serve this along side mashed potatoes or simple boiled potatoes and a protein. Anything from a steak, to chicken or pot roast will be delicious. It is a very mild vegetable that is always incredibly well received, and despite the few ingredients, it tastes fresh and flavorful. So, if you are still guilty of heaving canned peas and carrots in your pantry, go ahead, and try this from scratch version, you might never go back to store bought again!


Peas and Carrots "German Style"

Ingredients:
1 tablespoon olive oil
1/2 medium onion, finely chopped
2 cups carrots, diced
1 cup water
1 vegetable bouillon
Salt and pepper to taste
2 cups frozen peas
2 tablespoons heavy cream
2 tablespoons fresh parsley, minced

Directions:
In a medium saucepan over medium-high heat, add onion to the olive oil and saute until the onion turns translucent and slightly soft. Add the carrots and cook for another minute. Add water, vegetable bouillon, salt, and pepper. Bring to a boil, add the frozen peas, turn down heat and simmer for about 5-10 minutes or until the carrots have the desired consistency. Add the heavy cream and parsley, taste for seasonings and serve!

A Susi's Kochen und Backen Family Recipe

Monday, August 2, 2010

Cheesy Cauliflower Casserole


Cauliflower happens to be one of my favorite vegetables. This is another vegetable that my mom had in her garden in abundance while I was growing up, so it was frequently on the dinner table. My mom had a few different ways to prepare it, but most of the time she just turned it into a simple dish of cauliflower in a white sauce with a hint of cheese. Most of the time she served it along with boiled salt potatoes and Schnitzel or Fleischkuechle (they are a mix between a mini meatloaf and a burger). I still love eating it this way, but I also like to cook today's "kicked up" version.

I found this recipe in my trusty "Ich helf Dir kochen" book which I received over 20 years ago from my parents. I've added a few of my own touches to this recipe over the years, which makes this cauliflower irresistible, at least for my family. I always start by cutting up the cauliflower into florets and soaking them in a big bowl of salt water for about 30 minutes. One reason why I do this is because, growing up and harvesting the fresh crop from my mom's garden (which is completely organic and without commercial fertilizer) it wasn't uncommon to find that a little snail or the like had made its way into the lettuce or cauliflower. The salt water kills them, and lets them float to the top for easy removal. It is probably not necessary to do so today, especially if purchasing the cauliflower at a super market, but sometimes old habits die hard.


The cleaned cauliflower is then cooked "al dente" in a big pot of salted water that has a bit of milk added to it. The milk in the water helps preserve the white color of the vegetable. Make sure you don't overcook the cauliflower as it tends to get a "soapy" taste if it is cooked too much.
A white sauce is then made by making a simple roux. Reserved cauliflower cooking water is added to the roux and seasoned with salt, pepper, cayenne, and nutmeg (very important!). Freshly grated Swiss cheese is added, and the mixture is stirred until smooth. This is poured over the cooked cauliflower into a casserole dish and more Swiss cheese is sprinkled on top prior to baking.

Just like my mom, I love to serve this with boiled Yukon Gold potatoes. Sometimes I add a bit of chopped up ham to the cauliflower casserole for an easy fulfilling meal, but usually I serve it with some kind of protein on the side. Everyone loves this dish, and since cauliflower is on sale quite frequently for less than a dollar, it also makes for a fairly cheap meal. If you haven't had cauliflower in a while or only know it overcooked with a pat of butter on it, you should give this version a try, you won't be disappointed.


Cheesy Cauliflower Casserole

Ingredients:
1 large head cauliflower
10 cups salted water
1 cup milk

For the cheese sauce:
3 tablespoons butter
3 tablespoons flour
1 1/2 cups reserved cauliflower cooking water
1 cup milk
Salt and Pepper to taste
Pinch of cayenne pepper
1/4 teaspoon freshly grated nutmeg
1 vegetable bouillon cube
3 tablespoons heavy cream
6 ounces grated Swiss Cheese, divided

Directions:
Clean and cut up the cauliflower into florets. Rinse or use method described above.
Bring saltwater along with 1 cup milk to a boil in a large pot. Add cauliflower and cook on medium-low heat for about 10-15 minutes or until "al dente". Drain, making sure to reserve 1 1/2 cups of the cooking liquid. Set aside.

Preheat oven to 400 degrees F.

For the cheese sauce: Melt butter in a saucepan over medium heat. Add flour and cook for about 1 minute. Slowly add your reserved cooking liquid along with the additional cup of milk making sure to whisk constantly as you do so. Season with salt, pepper, cayenne, nutmeg, and bouillon cube and cook on low heat for about 10 minutes stirring occasionally or until thickened.

Add heavy cream and 4 ounces of the Swiss Cheese and stir until combined making sure not to bring the mixture to a boil.

Butter a casserole dish and add the cauliflower. Pour cheese sauce evenly over the top. Sprinkle with reserved Swiss cheese. Bake for about 10 minutes in preheated oven, or until the dish is heated through and nicely browned.

Adapted from: Ich helf Dir Kochen

Tuesday, June 1, 2010

Broccoli-Noodle Casserole


I had this dish the very first time about 15 years ago. My friend and her boyfriend had my husband and I over for a dinner party and this is what she served at the time. I begged her for the recipe and have made this dish time and time again.

The recipe is easy to fix, but you do have to plan ahead a bit. In my version, I added cooked cut up chicken breast to the casserole. You can also serve grilled chicken on the side  but I've also made just the meatless version many times as well. Because of the use of vegetable broth in the dish it is an excellent meal that can be served to vegetarian eaters.


The broccoli, along with the pasta and creamy, cheesy sauce are even better tasting by sprinkling the dish generously with sliced almonds. Who knew that broccoli and almonds were such good "friends".
This truly is a very tasty dish and even kids who usually don't like to eat broccoli trees have been chowing down on this family friendly recipe without complaint.

I hope you will give this wonderful dish a try and maybe 15 years from now you love it still as much as we do!


Broccoli-Noodle Casserole

Ingredients:
1 1/2 pounds fresh broccoli, cleaned and pre-cooked in salted water for 5 minutes and drained
1 pound Gemelli Pasta or any other favorite pasta, cooked al dente and drained
2 tablespoons unsalted butter
2 tablespoons flour
1/2 medium onion, finely diced
1 1/2 cups vegetable broth
3/4 cup half-and-half or heavy cream
4 ounces Gouda cheese, shredded
Salt and Pepper to taste
2 ounces sliced almonds
1 pound chicken breast, diced, seasoned and cooked (optional)

Directions:
Pre-heat oven to 350° F. Generously butter a 9 x 13 casserole dish. Set aside.

In a medium sized pan melt butter, add onions and cook until onion is translucent. Dust with the flour and cook for another 1 minute while stirring. With a whisk add in your vegetable broth and continue to whisk until thickened. Add half-and-half (or heavy cream) and Gouda, stir until cheese is melted. Taste for seasonings and adjust accordingly.

In a large bowl toss together cooked pasta, broccoli, and chicken if desired. Add the mixture to your buttered casserole dish. Pour the cheese sauce evenly over the top. Sprinkle with sliced almonds and bake in your pre-heated oven for 30 minutes. Let casserole sit for about 5 minutes before serving!

Thursday, May 27, 2010

Mango Salsa


Inspired by a recent shopping trip where I found beautiful ripe mangoes, fresh vine tomatoes, and English cucumbers on sale along with some great looking fresh Tilapia fillets, I set out to create a summer dinner fit for any hot day.

I love fresh grilled fish combined with salsa of any kind, but this time I was going a different way. I wanted a sweet, savory, spicy combination and the flavor of the mild Tilapia was the perfect canvas to showcase what I came up with. 

I started by chopping and dicing all of my vegetables and mango, and then just kept adding what sounded and looked good. The result; an incredibly tasty Mango Salsa that could also be served alongside chicken, pork, other fish, or just plain with tortilla chips.

The whole family agreed that this dish needs to make many more repeat appearance throughout the summer months, with fruits and vegetables that are in season. If you like this kind of combination, I hope you will give this dish a try, it is low-fat, and good for you, but you would never guess that based on flavor alone!


Mango Salsa

Ingredients:
1 ripe mango, diced
1 English cucumber, diced
2 medium tomatoes, diced
1/2 medium red onion, diced
1 jalapeno or serrano pepper, finely minced
1/4 cup fresh cilantro, chopped
Juice of 1/2 lime
1 tablespoon extra virgin olive oil
1 tablespoon balsamic vinegar
Salt and Pepper to taste

Directions:
In a bowl add mango, cucumber, tomatoes, red onion, jalapeno and cilantro. 

In a small bowl whisk together lime juice, olive oil, balsamic, salt and pepper.

Add to the vegetable mixture. Toss to coat evenly. Taste for additional seasonings and serve.

A Susi's Kochen und Backen Original Recipe

LinkWithin

Related Posts with Thumbnails