Wednesday, April 2, 2014

Radish Cream Cheese Spread for Spring


Are you a part of the radish fan club or do you not care for them because of their peppery and at times, sharp taste? If you already like radishes I don't need to convince you, but if you are on the fence about this vegetable or even hate the way it tastes (gasp) here are a few facts that might sway your mind. The little red root vegetable is actually good for you! Yes, I know, I know, all vegetables are good for you, but these little guys are full of vitamin C, have cancer fighting properties and are low in calories to name a few. See, I thought this might peek your interest. 


My husband loves radishes as much as I do, however my kids are staunch radish opponents. When I try adding them to our salads, they always end up picking theirs out. They really don't know what they are missing out on ;-) One of my favorite ways to enjoy radishes growing up was adding thin slices of them on top of a piece of buttered rye bread, with just a tiny sprinkle of salt. Super simple, but so tasty. In fact, I get fairly nostalgic thinking about the beautiful red radishes from my mom's garden along with that wonderful baked bread that German bakeries are well known for.

 
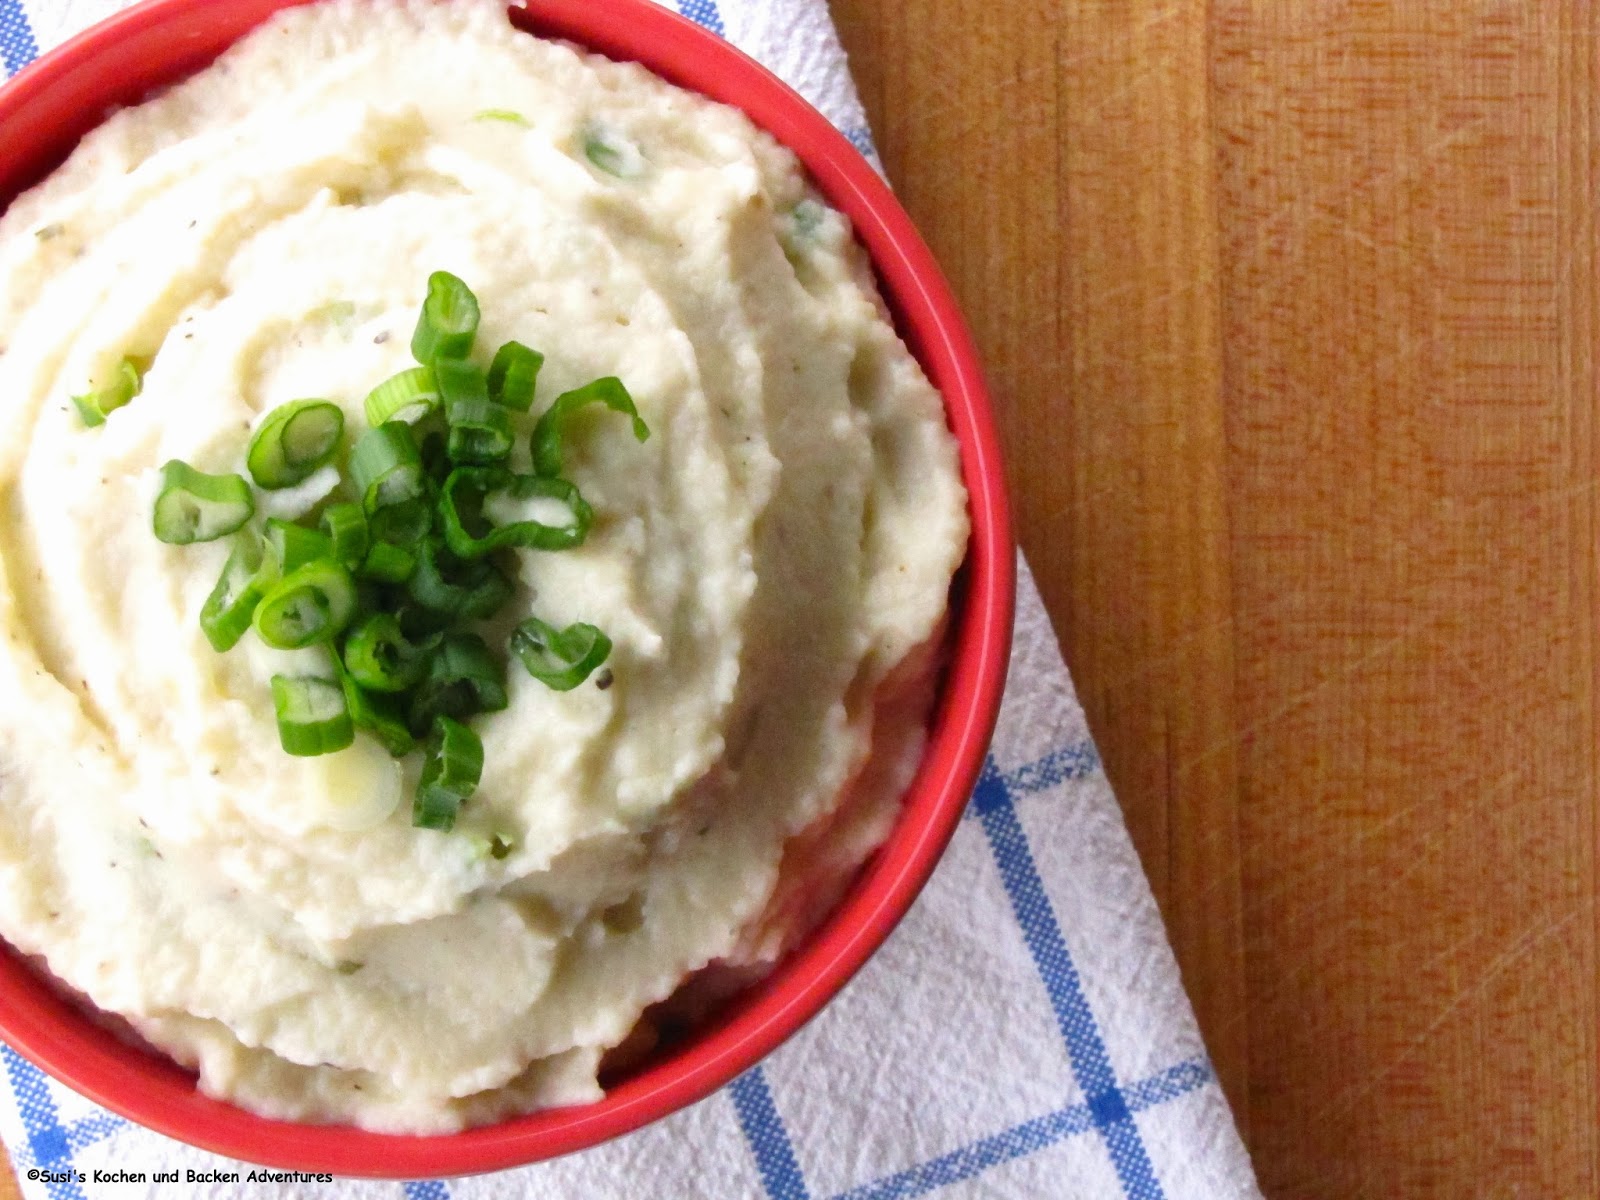
While radishes are available year round these days, I tend to think they are synonymous with spring. This easy to make radish cream cheese spread is the perfect appetizer or light lunch for the season. Cream cheese paired with plain yogurt, radishes, chives, lemon zest and lemon juice give this spread a light taste and make it irresistible. Add a dollop of the spread on top of a piece of seeded bread and sprinkle with some beautiful micro greens for added color. Arrange them on a platter and you now have the most perfect appetizer to serve for a spring luncheon or your Easter celebration. Oh, and for the record, everyone in my family enjoyed this radish cream cheese spread. Yes, even my radish haters!


Radish Cream Cheese Spread
~makes about 1 1/2 cups~
(Print this Recipe)

Ingredients:
1 bunch radishes, washed and finely cubed (about 3/4 cup)
1/4 tsp. Kosher salt
8 oz. cream cheese, softened (can use 1/3 less fat cream cheese)
1/4 cup plain (2%) yogurt 
2 Tbsp. fresh chives, chopped
Zest from 1 lemon
1 tsp. lemon juice
1/4 tsp. Kosher salt
1/4 tsp. freshly ground black pepper
Micro Greens
Sliced Bread

Directions:
Place your washed and cubed radishes in a small bowl. Sprinkle with 1/4 tsp. Kosher salt and let sit for about 20 minutes to draw out excess moisture.

In a medium bowl whisk together cream cheese, yogurt, chives, lemon zest, and lemon juice. Season with salt and pepper.

Drain salted radishes well and fold into the prepared cream cheese mixture. Place mixture in the refrigerator for about 30 minutes before assembling.

When ready to serve place a dollop of the radish cream cheese on your bread slices. Top with micro greens and serve.


Notes: Drawing the moisture out of the radishes before adding them to the cream cheese is an important step that will prevent your spread from getting to watery after it sits.

You can also serve this radish spread as a dip. In this case place the dip in a bowl and serve with bread, crackers and assorted vegetables, like carrots, bell peppers, and celery.

For a change of pace, use the spread as a tasty bagel topping.

The spread will keep in the refrigerator for a couple of days.

Recipe inspired by: Kuechengoetter.de

Wednesday, March 26, 2014

Make it Homemade: Dr. Pepper BBQ Sauce


We happen to live in a state where the weather is nice almost year round, which is perfect since we are big on back yard grilling. One item that is a must have for a good barbecue is a tasty BBQ sauce. The shear amount of sauces for sale at the grocery store can be overwhelming and even within each brand you can find smoky, sweet, spicy, mild, home-style and the list goes on and on. Store bought sauces are great in a pinch, but we wanted a condiment that had all of the above components combined into one tasty sauce. 

To achieve what we were looking for in a great sauce, we started to make our own saucy condiments from scratch. After a bit of experimenting, we have found a couple of fantastic recipes that we have added our own touches to that have replaced any grocery store sauce you can find on the shelf. Is it more time consuming to make your own barbecue sauce then opening a store bought bottle? You bet, but you can't beat the rich and complex flavor profile of a homemade sauce along with being able to control the ingredients that go into it.

Today I'm sharing our Dr. Pepper BBQ Sauce that we have been making over and over the past few years. We love serving it with pulled pork or using it as a  glaze on smoked ribs, but it is also tasty served with chicken or on a good burger. This flavorful topping has everything in it that we were looking for in a great BBQ sauce: sweetness, a hint of spiciness, a little smoke, a bit of tartness and most of all, lots of flavor.  Give it a try for yourself and see how easy and tasty this sauce can be on all of your grilled favorites and kick your grocery store sauces to the curb.


Dr. Pepper BBQ Sauce 
~makes 2 (16oz.) jars~

Ingredients:
4 tablespoons (1/2 stick) unsalted butter
1 large yellow onion, chopped
1 jalapeno pepper, diced
4 cloves garlic, chopped
1 cup ketchup

3 tablespoons tomato paste
One 12-ounce can Dr. Pepper
1/2 cup cider vinegar
1/3 cup Worcestershire sauce
1/4 cup packed dark brown sugar

1/4 cup molasses
2 teaspoons ancho or New Mexican chili powder

1/2 teaspoon smoked paprika powder
1/2 teaspoon red pepper flakes
1 teaspoon black pepper
1 teaspoon kosher salt

Directions:
In a heavy saucepan, melt the butter. Sauté the onion and jalapeno pepper in the butter until translucent, about 10 minutes. Add the garlic and cook for an additional minute, making sure not to burn the garlic. Add all the remaining ingredients and simmer for about 15 minutes, until the flavors have blended. Continue cooking until the sauce begins to thicken, 20 to 30 minutes. Taste and adjust the seasonings with salt and pepper if desired.

Let the sauce cool for about 10 minutes or until it is warm but no longer “boiling” hot. Puree with an immersion or traditional blender—this will make the sauce thicker. Let cool. Fill into cleaned jars. Store in the refrigerator.

Notes: The BBQ sauce will keep in the refrigerator for up to 3 weeks.

Slightly adapted from: Saveur 

Tuesday, March 18, 2014

German Cucumber Salad (Gurkensalat)


When I was little, I wasn't a big fan of any salad that contained green lettuce leaves. I thought it tasted like grass and was better used as food for rabbits. I ate it, but many times it was very begrudgingly and only the smallest amount my mom would let me get away with. However, there was always one salad I didn't need convincing for and that was my mom's Gurkensalat (cucumber salad). I could happily eat a big bowl in one sitting without complaint.


Gurkensalat is as quintessential in Germany as Bratwurst, Sauerkraut or Schnitzel. Most families have a recipe that has been handed down from generation to generation with a few slight variations depending on the region in Germany. My love for this salad has only grown stronger over the years and I'm happy that my family loves it equally as well. In fact, this is one of my most requested recipes from friends who have tried it at our home. I've always told them "it's a little of this and a little of that", so I guess many of them will be happy that I've finally added it to my blog with a "real" recipe.


Cucumbers are mild and pretty neutral tasting, plus they are very refreshing, especially on a warm day. Making this salad doesn't require a lot of time, but there are a few key points to remember. I peel my cucumber and use a mandolin to get thin, even slices. Salting the cucumbers prior to adding the salad dressing helps remove some of the moisture and prevents the salad from being to watery. Fresh dill will really bring out the freshness in this salad, but in a pinch I've used dried dill before and it will work just fine, but in this case fresh is best. Last, but not least, while I use extra virgin olive oil for every other salad dressing or vinaigrette I make, for this salad I prefer a very neutral tasting oil like grapeseed oil which is a great healthy alternative.


This salad tastes best if it can "hang out" for about an hour before serving. It helps all the flavors meld together and makes it even more tasty. Gurkensalat is a great side dish for any grilled meat, but one of my favorite ways to eat it is the way my mom and grandma served it quite frequently, alongside some freshly made Käsespätzle (Cheese Spaetzle). I really hope you will give this recipe a try and that it becomes a family favorite of yours as well.


German Cucumber Salad (Gurkensalat)
~makes 4 servings~
(Print this recipe)

Ingredients:
1 English Cucumber, peeled and finely sliced
1/2 tsp. Kosher salt


For the dressing:
2 Tbsp. grapeseed oil
2 Tbsp. white vinegar
2 Tbsp. apple cider vinegar
1/2 tsp. Kosher salt
1/2 tsp. black pepper
1 tsp. spicy brown mustard
1 Tbsp. honey
1/4 cup sour cream
1/3 cup red onion, finely diced
1 Tbsp. fresh dill, finely chopped
1 Tbsp. fresh chives, finely chopped

Directions:
Peel and slice cucumber and place in a strainer over a bowl. Add 1/2 tsp. Kosher salt, mix with the cucumbers and let sit for about 20 minutes to drain.

Meanwhile to make the dressing whisk oil, white vinegar, cider vinegar, salt, pepper, mustard and honey in a small bowl until emulsified. Whisk in sour cream, onions, dill and chives.

In a bowl add your drained cucumber and your prepared dressing. Combine and let sit for about 1 hour in the refrigerator before serving.

Notes: My mom taught me to peel the cucumber from the "flower to the stem" (top to bottom), this way if you have a bitter cucumber end you don't drag the bitterness across the entire cucumber.

Always taste both ends of your cucumber before using, there is nothing worse than a bitter cucumber ruining your salad.

I use a mix of white vinegar and apple cider vinegar for this salad. Over the years I have found that this mix comes pretty closely to the unique taste German vinegar has.

A Susi's Kochen und Backen Family Recipe


Tuesday, March 11, 2014

"Irish" Hot Pockets


When I was trying to come up with a fitting name for this post I had to think twice about including the words "hot pockets". After recent unflattering news about the frozen convenience food was everywhere I looked, I wasn't too sure if this was going to attract my readers attention or turn them away. Good news though, my hot pockets have nothing in common with their grocery store namesake and you can safely cook and enjoy them for your own family. ;-)

 
St. Patrick's Day has been one of those holiday's that my kids, no matter how old they get, always look forward to because of the delicious food. My youngest started asking a couple of weeks ago if I was going to fix my Glazed Corned Beef and Colcannon, while my sixteen year old is all about the Irish Soda Bread. While all of these favorites, along with my St. Patrick's Day Chia Seed Pudding will be making an appearance on St. Patrick's Day, I'm always thinking of some new and interesting recipes to add to my collection for the holiday.


The idea for these Hot Pockets came to me the other day while in the kitchen and I thought they would be a tasty addition to our St. Patrick's Day menu. The filling is a fairly simple combination of fried cabbage and corned beef. The meat can either be bought from the deli counter at your local supermarket or you can use leftover cooked corned beef. The cabbage mixture gets topped with a sprinkle of Dubliner Cheese and then everything gets encased in a flaky puff pastry crust. A quick bake in the oven and you are all set with the tastiest hot pockets you've ever had. 


A homemade thousand island dipping sauce for the baked pastries adds the final touch, but if you prefer, mustard is also wonderful served alongside. The finished pockets are a great addition to any St. Patrick's Day celebration. Make them as appetizers for a party or simply add a salad on the side for a filling meal. If it's any indication, my boys inhaled them in 5 minutes flat and proclaimed they had a new St. Patrick's Day favorite.


"Irish" Hot Pockets
~makes 12 pockets~
(Print this recipe)

Ingredients:
For the filling:
1 Tbsp. olive oil
4 oz. corned beef, finely cubed (about 1 cup)
1/2 cup onion, finely diced
1/2 head green cabbage, chopped (about 4 cups)
2 Tbsp. water
1 Tbsp. apple cider vinegar
1 pinch white sugar
Kosher Salt and Pepper to taste

For the pockets:
3 sheets puff pastry, thawed (1 1/2 boxes)
Prepared cabbage filling (see above)
3 oz. Dubliner cheese, finely grated
1 egg beaten with 1 Tbsp. water for egg-wash
Flour for work surface
Thousand Island Dipping Sauce (Recipe to follow)

Directions:
For the filling: In a large skillet heat olive oil over medium-high heat. Add the cubed corned beef and saute until slightly crispy and golden brown. 

Add the onions. Cook for 1 minute, then add the cabbage along with water, vinegar, and sugar. Season with salt and pepper to taste. Cook until cabbage wilts, about 5 minutes. Remove skillet from heat and set mixture aside to cool.

For the pockets: Pre-heat oven to 375 ° F. Line three baking sheets with silpat or parchment paper. 

Flour your work surface. Carefully unfold one sheet of puff pastry. Roll into a 10x12-inch rectangle. Using a ruler, cut the rectangle in half (you should now have two 5x12-inch rectangles), then cut each of those rectangles into 4 equal pieces, leaving you with eight 3x5-inch rectangles.

Place 4 rectangles on one of your prepared baking sheets. Add 2 scant tablespoons of the prepared cabbage filling right down the middle of your rectangles leaving about 1/4 inch all the way around, making sure not to over fill. Top the filling with a pinch of the grated cheese.

Brush all 4 edges of each rectangle with your prepared egg-wash. Place the remaining puff pastry rectangles on top and using a fork seal all the edges by crimping all the way around.

Place the baking sheet in the refrigerator while you work on the second and third sheet of puff pastry in the same manner. Place all the finished  pockets in the refrigerator for about 20 minutes before proceeding.

Remove baking sheets one at a time from fridge and brush tops of the pockets with remaining egg wash. With a sharp knife, carefully cut 3 small vents in each pocket. Bake in your pre-heated oven for about 20 minutes (rotating once) or until golden brown.

Remove from oven and place on a wire rack to cool for at least 10 minutes before serving them with the Thousand Island Dipping Sauce.

Notes: I asked for a couple of slices of 1/4-inch corned beef at my deli, but leftover cooked corned beef would be equally wonderful.

The filling can be made a day ahead of time. Keep it in the refrigerator until ready to assemble the hot pockets.

I used Dubliner Cheese from Kerrygold. The flavor is reminiscent of cheddar, Swiss and Parmesan. If you can't find it, Swiss, Gruyere or a sharp white cheddar will also work.

The baked pockets are best eaten the same day and taste best right out of the oven (after a quick cooling time so you don't scorch the skin in your mouth. Trust me, I've been there).

The thousand island dipping sauce can also be made a day ahead and kept covered in the refrigerator until ready to use.

 A Susi's Kochen und Backen Original Recipe 


Homemade Thousand Island Dipping Sauce
~makes about 3/4 cup~
(Print this Recipe)

Ingredients:
1/4 cup mayonnaise
1/4 cup plain (2%) Greek yogurt
2 Tbsp. Ketchup
2 Tbsp. sweet pickle relish
1 Tbsp. red onion, finely diced
1 tsp. white vinegar
1/4 tsp. Kosher salt
1/8 tsp. garlic powder
2-3 dashes Hot sauce (optional)

Directions:
Add all ingredients in a small bowl and whisk together. Taste and add additional salt if desired. Refrigerate for at least an hour to allow the flavors to meld.

Sauce slightly adapted from: Kitchen Treaty

Tuesday, March 4, 2014

St. Patrick's Day Chia Seed Pudding


I feel like I'm always a day late and a dollar short when it comes to food fads. What's in today, is out tomorrow. There has been a cupcake craze, the bacon craze, kale and green smoothies everywhere and the list goes on and on. Chia seeds have been around for quite a while, but I'm a novice when it comes to this ingredient.

I've known of chia seeds since I was little and chia pets made regular appearances in commercials. I did own a couple of them over the years and let me tell you, they never worked for me like they did on TV (#majorfail). So yes, I knew about chia, but it never crossed my mind to eat them. 

For the last year or so, I've seen more and more recipes including these little seeds pop up all over the internet and they began to peak my interest. I started to do some research on them and to my surprise they are a super food. Who knew that these little buggers are chock full of Omega 3, can balance your blood sugar, keep you full longer, add age-defying anti oxidants as well as many other health benefits.  Color me impressed!


So I figured I'll "ease" into it by starting with a fairly basic recipe for Chia Seed Pudding. There are a lot of recipes for this, but the gist is pretty much the same. Almond milk, yogurt, some kind of natural sweetener and of course chia seeds. Mix it up and let it sit overnight. The seeds do their magic thing after a few hours and you have this amazing concoction that is incredibly tasty on top of being healthy.

With St. Patrick's Day only a couple of weeks away I decided to add a little whimsy by matching my fruit topping to the colors of the Irish Flag. Kiwis, bananas and mandarin oranges along with a few toasted almonds for added crunch completed the pudding. The verdict: So freaking good! I think I have a new breakfast favorite and I can't wait to make this again. What a great way to wake up your family on St. Patrick's Day with this healthy breakfast.


St. Patrick's Day Chia Seed Pudding
~makes 4 servings~
(Print this Recipe)

Ingredients:
1 cup unsweetened almond milk
1 cup plain (2 percent) Greek Yogurt 
2 Tbsp. pure maple syrup
1 tsp. vanilla extract
1/8 tsp. Kosher salt
1/4 cup chia seeds
3 small kiwis, peeled and chopped
1 large banana, peeled and cut into slices
1 (11 oz.) can mandarin oranges (no sugar added), drained
1/4 cup sliced almonds, toasted
2 tsp. pure maple syrup

Directions:
In a medium bowl, gently whisk the almond milk, yogurt, 2 tablespoons maple syrup, the vanilla extract and the 1/8 teaspoon of salt until just blended. Whisk in the chia seeds; let stand 30 minutes. Stir to distribute the seeds if they have settled. Cover and refrigerate overnight.

The next morning, in a small bowl, toss the toasted almonds with 2  teaspoons maple syrup. Set aside. Spoon the pudding into 4 glasses or bowls. Top with kiwis, bananas, and mandarin oranges.  Mound the almonds on top and serve.

Slightly adapted from: Giada De Laurentiis

Tuesday, February 25, 2014

Blueberries and Cream Muffins with Lemon Glaze


When it comes to grocery shopping, I'd like to think I'm a pretty organized person. I write out a list and mostly stick to it. The only exception is Costco. I can never leave that store without a few additional items in my cart that are new to the store or that I find while browsing the aisles.

A lot of times that also means I find inspiration for new recipes by discovering ingredients while out shopping. It is often that these finds will make my wheels start turning and I come up with ideas on the spot. Usually my poor husband is on the receiving end with recipes spewing out of my mouth as we continue our grocery haul. I do have to give him credit though, he always listens patiently and gives good constructive criticism, but I'm sure many times he would rather roll his eyes at his crazy wife.


Finding a big bag of dried blueberries at Costco was my inspiration for today's recipe. I kept thinking along the lines of cookies, but after inspecting my pantry and seeing a big jar of coconut oil and a bag of white chocolate chips the idea for a muffin recipe was born. While most blueberry muffins are made with fresh berries, the dried version works extremely well in this recipe and adds a lot of flavor without adding the extra liquid or discoloring the finished product. The addition of coconut oil over a more traditional canola oil added the slightest hint of coconut without overpowering the finished baked good, along with giving the muffins a light and airy texture.

A simple lemon powdered sugar glaze provides a nice contrast of flavors while adding a bit of tartness to the muffins, but you could certainly serve them as is. This recipe got two giant thumbs up in our family and has since been added to our favorites list.


Blueberries and Cream Muffins with Lemon Glaze
~makes about 15 muffins~
(Print this Recipe)

Ingredients:
For the muffins:
2 cups all purpose flour
3/4 cup sugar
1/2 tsp. baking powder
1/2 tsp. baking soda
1/2 tsp. kosher salt
2 eggs
1 cup sour cream
1/2 cup coconut oil, melted
1/4 cup milk (almond milk is ok)
1 tsp. vanilla
1 cup dried blueberries
1/2 cup white chocolate chips

For the glaze:
1 tsp. lemon zest
2 Tbsp. lemon juice
3/4 cup powdered sugar

Directions:
For the muffins: Pre-heat oven to 375° F. Line a muffin tin with cupcake liners OR grease well. Set aside.

In a large bowl whisk together flour, sugar, baking powder, baking soda, and kosher salt.

In another bowl combine eggs, sour cream, coconut oil, milk, and vanilla.

Add the wet ingredients to the dry ingredients and stir to combine. 

Fold in blueberries and white chocolate chips.

Divide the batter equally among the muffin cups filling each about 3/4 full and bake in preheated oven for 20 minutes. Remove and let cool on a wire rack.

For the glaze: Whisk together lemon zest, lemon juice and powdered sugar until smooth. Drizzle over cooled muffins.

Notes: I used Nutiva Organic Extra Virgin coconut oil in these muffins. I found my giant container at Costco, but you can also find it online.

When using lemon zest in a recipe, I like to use an organic lemon. Most grocery stores carry them and they don't cost much more than conventional ones. 

A Susi's Kochen und Backen Original Recipe


Tuesday, February 18, 2014

Mashed Cauliflower with Roasted Garlic & Goat Cheese


I have come to the conclusion that many times when people claim they don't like to eat certain vegetables, it really means they probably have never had it prepared in a way that would appeal to them. With so many different options and recipes available on how to turn an otherwise boring vegetable into a showstopper, it makes it hard to believe that an aversion against a certain food couldn't be overturned.

I think Cauliflower is a great example. By simply steaming the vegetable you end up with a "blah" version that can be kind of tasteless, but because of its mild flavor it can also be extremely versatile and lend itself to a lot of different and tasty applications. Recently there has been a surge in popularity for cauliflower. The florets are low in fat and carbs, high in fiber, folic acid and vitamin C, which makes this vegetable a winner in my book. If you perform a quick search, you can find an amazing variety of recipes. They range from roasted cauliflower, gratins, soups, dips, faux alfredo sauces and even pizza crust. While I've tried quite a few of these different versions, cauliflower pizza crust is still one that eludes me, but I will never say never.

A few weeks ago I made Canadian Bacon Cauliflower Cheddar Cups for my family with great results, so  I decided to experiment a little more and came up with this delicious mashed version. I started with a basic recipe, but by adding sweet, roasted garlic along with tangy and tart goat cheese, the dish was elevated to a whole new level. I achieved the desired consistency with my food processor, but an immersion blender or even a good old fashioned potato masher should do the trick as well. I served this with grilled steak and a big side salad, but ate leftovers with a couple of over-easy eggs the next day and had to restrain myself from licking the plate. So tasty, so simple, and most definitely one of my new favorites.  


Mashed Cauliflower with Roasted Garlic & Goat Cheese
~makes 5-6 servings~
(Print this Recipe)

Ingredients:
5-6 cups cauliflower florets (about 1 medium head)
1 vegetable bouillon cube
8-10 roasted garlic cloves (see notes)
4 Tbsp. soft goat cheese
1/8 tsp. grated nutmeg
Kosher Salt and Pepper to taste
4 Tbsp. green onions, chopped

Directions:
Roast garlic (see note), remove cloves from skin and set aside.

On the stove-top, add cauliflower to a pot, fill with about 4 cups of water. Add the vegetable bouillon cube and steam/cook cauliflower until soft. Drain the cauliflower and add to a food processor.

Process cauliflower along with the roasted garlic cloves, goat cheese, 1/2 tsp. salt, 1/4 tsp. pepper and 1/8 tsp. nutmeg until smooth.

Transfer mixture to a bowl, check for additional salt and pepper and fold in 3 Tbsp. of the green onions. Sprinkle with additional reserved onions and serve immediately.

Notes: To roast the garlic, preheat oven to 400° F. Take one whole garlic bulb and cut 1/4 to 1/2 inch off the top. Lay on a piece of aluminum foil big enough to wrap the head of garlic, drizzle with about 1 tsp. of olive oil and season lightly with salt and pepper. Wrap it in the foil and roast in preheated oven for 35-45 minutes or until garlic is soft and golden brown. Let cool for about 15 minutes before handling. Use your fingers or a fork to squeeze and pull roasted garlic out of the skin. 

If you don't like the taste of goat cheese, cream cheese would also be an acceptable substitution.

A Susi's Kochen und Backen Original Recipe

Tuesday, February 11, 2014

Rustic Raspberry Lemon Cheesecake Tart


Valentine's Day is only a few days away and everywhere you look you are being inundated with chocolate desserts. Don't get me wrong, I like chocolate as much as the next person, but over the years my taste buds are definitely changing. These days I find myself gravitating towards fruit based desserts more often than not. There is just something about the combination of sweet and slightly sour or tart that seems to go oh so well together.

As far as desserts go, today's recipe comes together quickly and ranks high in the fruit satisfaction department. Store bought puff pastry sheets, a creamy no-bake cheesecake filling laced with a luscious lemon curd and topped with glorious sweet, red raspberries. Perfection! I made my own lemon curd following my recipe for Meyer Lemon Curd, but store bought is a perfectly fine substitution and will help to streamline the process.

The combination of flaky crust, creamy filling, and fresh fruit makes this dessert irresistible in my book. This is the perfect alternative for all of you non-chocolate lovers (like my husband) and I don't think that the chocolate connoisseurs would even mind a slice of this beautiful tart. 


Rustic Raspberry Lemon Cheesecake Tart
~makes 1 tart~
(Print this Recipe)

Ingredients:
1 sheet puff pastry, thawed but still cold
4 oz. cream cheese, softened
1/3 cup sugar, plus more for sprinkling
2 Tbsp. heavy cream
1/3 cup lemon curd, homemade or store-bought
1 pint raspberries
1/4 cup seedless raspberry jam, warmed
Powdered sugar

Directions:
For the tart: Preheat oven to 425° F. Line a baking sheet with parchment paper or a Silpat baking mat. Unfold the thawed out puff pastry on a lightly flour dusted area and gently roll into a 10x11 inch rectangle. Carefully transfer to your baking sheet.

Brush edges with a little bit of water and fold over all 4 sides to create a lip. Using a fork, poke holes all over the center of your tart. Gently brush the entire tart with an egg wash and sprinkle about 2 tsp. of sugar over the center. Bake until golden brown, about 15-20 minutes. Remove from oven and carefully with the back of a spoon press the center back down if it has puffed. Transfer to a wire rack to cool.

For the filling: In a bowl combine softened cream cheese and sugar. Mix with a hand-mixer or by hand until smooth and the sugar is well incorporated. Add the heavy cream and mix for about 1 minute. Fold in the lemon curd. 

To assemble the tart: Carefully spread your lemon cheesecake mixture over the center of your cooled tart crust. Arrange berries decoratively over the curd and drizzle with the warmed jam. Dust the tart with powdered sugar.

Notes: This tart is best made and eaten on the same day. You can prepare the tart along with the cheesecake filling ahead of time. Refrigerate the filling and assemble the tart right before eating.

Other berries would be lovely as well. I bet blueberries, strawberries, blackberries or a combination would also be great!

A Susi's Kochen und Backen Original Recipe


Wednesday, February 5, 2014

Homemade Brownies with Funfetti Frosting


At least once a week my 16 year old asks me to make him brownies. He really doesn't care what kind of brownies as long as they are rich, fudgy and most definitely none of that "cakey brownie nonsense". More often than not I laugh off his request since let's face it, if he had his choice, every day would be brownie day. However, once in a while I cave in and deliver, which makes me his favorite person in the world for at least that day!

Superbowl Sunday was a perfect occasion to add a little sweet treat to our menu that would also appease my brownie loving boy. So I spent way too much time pouring over recipes on Pinterest to find a brownie that would fit all the requirements of my 16 year old. Before I knew it, I had wasted spent an hour looking for "the one" when I came across these brownies. 

Rich and dense looking with a delicious frosting AND sprinkles. My teenager was sold. What was even more appealing to me was the one-bowl approach of the brownies itself, meaning they come together fast and without dirtying a lot of dishes. Once the brownies are cooled, the frosting is whipped up quickly and you have a scrumptious dessert in no time. Score for mom, mission accomplished!


Homemade Brownies with Funfetti Frosting
~makes one 9x13 pan~
(Print this Recipe)


Ingredients:
Brownies:
1 cup (2 sticks) unsalted butter, melted
1 cup unsweetened cocoa powder
2 cups granulated sugar
4 large eggs
1 Tbsp. vanilla extract 

1/4 tsp. salt
1 1/2 cups flour
12 oz (ish) jar hot fudge sauce
Frosting:
2 sticks unsalted butter, slightly softened
4 cups powdered sugar
1 Tbsp. and 2 tsp Butter Vanilla Emulsion
1/4 cup heavy whipping cream
2/3 cup ice cream sprinkles (find them near the ice cream)

Directions:
Preheat oven to 350. Line a 9x13 pan with foil (it makes the brownies easier to remove) and spray with cooking spray. Set aside.

In a large bowl, whisk together the cocoa and melted butter. Stir in sugar until combined. Stir in eggs, one at a time, mixing well after each. Stir in vanilla and salt. Fold in flour JUST until you no longer see flour streaks in the batter. Gently fold in hot fudge sauce (you may need to heat it just enough to spoon/pour out of jar).


Spread batter in prepared pan and bake for about 20 minutes. Brownies will look cakey on top and feel very dense -- that is normal. Let brownies cool completely.


Prepare frosting:

In the bowl of your mixer, beat butter and butter vanilla emulsion on medium speed until smooth. Slowly add powdered sugar, a little at a time, until just combined. Add heavy cream and beat on high for about 1 minute, until fluffy and smooth. Fold in sprinkles.


Frost cooled brownies. For best results, cover and refrigerate for several hours or preferably overnight.


Note: Don't skip the butter vanilla emulsion as it lends the "funfetti" flavor to the frosting. You can either buy it online or find it at your local Walmart in the cake decorating/supply section.

Adapted from: Confessions of a Cookbook Queen

Friday, January 31, 2014

Canadian Bacon Cauliflower Cheddar Cups


Hi there, is this blog still on? I know, it's been forever and a day since you heard anything new from me, but a breather was much needed for my sanity. I won't be making any big promises about a regular posting schedule, but will say that I intend to keep popping in here when I have something interesting to share. Like today.

I came across these Canadian Bacon Cauliflower Cheddar Cups while thumbing through the newest Costco magazine. Let me tell you that they could have fooled anyone in my house. Unless you know that the filling has cauliflower in it, you could have mistaken it for mashed potatoes. I'm happy to report that they were gone in a flash and we all thoroughly enjoyed them. 

Low-carb, gluten-free AND tasty, I don't think you can go wrong with these cute little appetizers. Serve them with a salad for a simple meal or as appetizers for a party. They might even make a great addition to your Superbowl Sunday menu. Go Seahawks!!!


Canadian Bacon Cauliflower Cheddar Cups
~Makes about 24~

Ingredients:
24 slices Canadian bacon
4 cups cauliflower florets
4 Tbsp. sour cream
2 Tbsp. fresh parsley, chopped
3 Tbsp. green onion, chopped
Kosher Salt and Pepper to taste
2 ounces cheddar cheese, grated

Directions:
Preheat oven to 375 F. Very lightly grease a 24-cup mini-muffin pan. Line each cup with a slice of Canadian bacon.

On the stovetop, add cauliflower to a pot, fill with about 2 cups of water. Add the vegetable bouillon cube and steam/cook cauliflower until very soft. Drain the cauliflower and add to a food processor.

Process cauliflower along with the sour cream, 1/2 tsp. salt and 1/4 tsp. pepper until well mixed and smooth. 

Transfer mixture to a bowl and fold in the parsley and green onions. Taste for more salt and pepper and adjust accordingly.

Fill Canadian bacon cups with cauliflower mixture. Top each cup with cheddar cheese. 
Bake for 15 minutes or until heated through. Let sit for a couple of minutes before serving.

Slightly adapted from: Costco Magazine

LinkWithin

Related Posts with Thumbnails