Showing posts with label chicken. Show all posts

Thursday, April 14, 2011

Ina Garten's Lemon Chicken Breasts

 
A few weeks ago I came down with a strep-throat like infection. I was miserable for several days and was pretty much surviving on  pudding and chicken broth until the antibiotics finally kicked in and brought relief. To keep me entertained, while trying to feel better and occupying the couch, I decided that watching some food-network was in order. Needless to say, it was also quite torturous watching the chefs prepare delicious looking dish after dish and not being able to eat. On the plus side though, I took tons of notes and ended up with several recipes on my "must-make list". One of the shows I watched was with Ina Garten aka the Barefoot Contessa, which had me and my husband (who kept me company) literally drooling watching her prepare a recipe for lemon chicken breasts. We decided right then and there that this recipe would make an appearance on our dinner table as soon as I was able to eat solid food again.

This recipe is a must for any garlic and lemon lover. There are no subtle flavors in this dish, it is a smack you in the face kind of recipe and will truly satisfy a craving for a "done right" chicken dish. Nine garlic cloves are heated in a bit of olive oil on the stove before lemon juice, lemon zest, white wine, oregano and thyme round out this flavor experience. The scented oil is then poured into a baking dish, de-boned, but skin on chicken breasts are placed on top of the lemon-garlic mixture and are brushed with more olive oil before receiving a final sprinkle of salt and pepper. For good measure and to ensure even more flavor a cut up lemon is tucked in between all of the meat into to the pan before baking. After a baking time of around 40 minutes, you are left with incredibly moist pieces of chicken and a sauce that is to die for.

I served this dish with rice, freshly grilled asparagus, and some crusty bread which helps to sop up all of the delectable sauce that is literally good enough to drink. This recipe is easily made on a weekday, but certainly would make for an impressive entree if entertaining as well. If you've been in a chicken "rut" and are always on the hunt to add a little excitement to dinner time, I highly recommend this dish. This is one of the few recipes that I've made recently that was good to go as written without me changing anything and that doesn't happen all too often. So far, none of the Barefoot Contessa's recipes have failed me yet and this one will be added to the list!


Ina Garten's Lemon Chicken Breasts
~serves 4~

Ingredients:
1/4 cup good olive oil
3 tablespoons minced garlic (9 cloves)
1/3 cup dry white wine (I used a Chardonnay)
1 tablespoon grated lemon zest (2 lemons)
2 tablespoons freshly squeezed lemon juice
1 1/2 teaspoons dried oregano
1 teaspoon minced fresh thyme eaves
Kosher salt and freshly ground black pepper
4 boneless chicken breasts, skin on (6 to 8 ounces each)
1 lemon

Directions:
Preheat the oven to 400 degrees F.

Warm the olive oil in a small saucepan over medium-low heat, add the garlic, and cook for just 1 minute but don't allow the garlic to brown. Remove pan from stove, and off the heat, add the white wine, lemon zest, lemon juice, oregano, thyme, and 1 teaspoon salt and pour into a 9 by 13-inch baking dish.

Pat the chicken breast dry and place them skin side up over the sauce. Brush the chicken breasts with olive oil and sprinkle them liberally with salt and pepper. Cut the lemon in 8 wedges and tuck it among the pieces of chicken.

Bake for 30 to 40 minutes, depending on the size of the chicken breasts, until the chicken is done and the skin is lightly browned. If the chicken isn't browned enough, put it under the broiler for about 2 minutes. Cover the pan tightly with aluminum foil and allow to rest for 10 minutes. Serve hot with the pan juices.

Adapted from: Ina Garten

Thursday, December 2, 2010

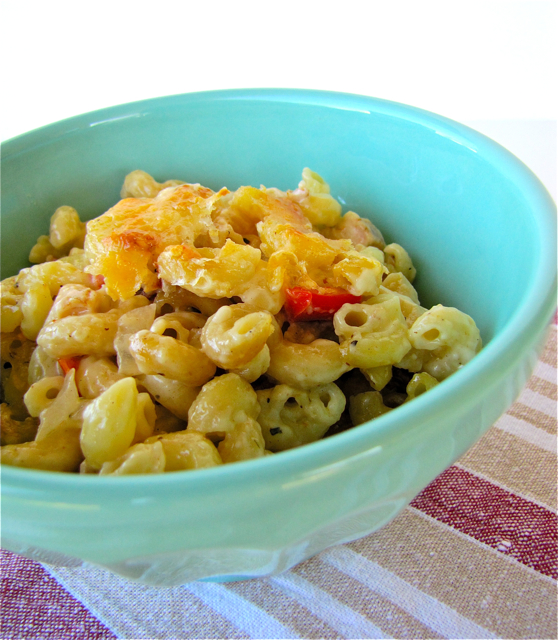
Chicken Mac and Cheese

 
I like Mac and Cheese, but it is not one of my favorites, which is truly weird since I love pasta and cheese. I think most of them are just kind of "eh" and I'm always looking for a bit more flavor. I know, I'm strange, blame it on my German genes if you must. On the other hand, mac and cheese is pretty easy to fix and can feed a crowd fairly inexpensively. The few times I've made mac and cheese at home, I've played with different cheese combos and while they were all good and certainly edible, they didn't have me do cartwheels.

I haven't been very inspired to prepare meals in the last few weeks, but when I do feel well enough to cook, I'm usually looking for recipes that utilize either what I already have on hand, or make it easy for my husband (who has been a saint) to pick up a few extra ingredients on his way home from work at the grocery store. I found the recipe for this dish on Tasty Kitchen while I was looking for a quick dinner. It utilizes leftover grilled chicken breast that I already had in the refrigerator but this dish can just as easily be fixed with leftover rotisserie chicken as well. Sharp cheddar cheese, Gruyere and Parmesan add flavor along with crumbled bacon. Milk and heavy cream make this very rich tasting and certainly not diet food (which we will all need come January). Don't fret though, it does have a red bell pepper thrown into the mix, so at least you're getting a little bit of vegetables. However, they are disguised enough that even non-bell pepper lovers (like my daughter) will eat it without complaint.

This is a great dish that easily serves a lot of people. Add a side salad and you have a complete meal that even with all the hustle and bustle of the season is prepared in less than an hour and lets you sit down as a family and appreciate each other.

On a personal note, I wanted to thank all of you for your kind comments and emails regarding my health. I'm still not feeling well, but really miss blogging and all of you. I've made it a goal to pop in a few of your blogs everyday. So while you might not hear daily from me, I'm still around. :o)

If you haven't entered my Holiday Wreath Giveaway, make sure to do so soon, since it closes tonight at midnight and this giveaway is too good to pass up, especially for such a good cause! Also stay tuned for another fantastic giveway coming soon.


Chicken Mac and Cheese

Ingredients:

1 pound elbow or corkscrew pasta, uncooked
1 tablespoon olive oil
1 medium onion, chopped
1 sweet red bell pepper, chopped
4 tablespoons butter
4 tablespoons flour
2 cups milk
1 cup heavy cream (or half-and-half)
2 cups sharp cheddar cheese, shredded
1 cup Gruyere cheese, shredded
1 cup Parmesan cheese, shredded
1 generous pinch freshly grated nutmeg
Salt and Pepper, to taste
2 - 3 cups cooked boneless chicken breast (grilled or rotisserie), chopped
6 slices bacon, fried and crumbled

Preparation:

Preheat oven to 350 degrees F. Grease a 9x13-inch baking dish.

Boil water for pasta and cook according to package directions. Drain and rinse when cooked and set aside.

In a skillet over medium heat, add the olive oil and saute onions and red peppers until soft, about 5 minutes. Set aside.

In a medium saucepan over medium heat, add butter and flour and whisk together to create a roux. Add milk and cream (or half-and-half), stirring constantly. Add 3 cups of the cheese mixture (reserving one cup to top the dish with ) and the nutmeg. Season with salt and pepper and stir mixture for 5-8 minutes or until mixture thickens.

Mix cooked pasta with the onion/pepper mixture, the chopped and cooked chicken and the bacon.
Add half of the mixture to the greased baking dish and top with half of the cheese sauce. Add the other half of the pasta mixture and top with the rest of the cheese sauce. Sprinkle the dish with the reserved cup of cheese and bake for about 35 to 40 minutes or until the dish is hot and the top is golden brown. Let sit for about 5 minutes before serving.

Adapted from: Tasty Kitchen

Thursday, October 14, 2010

White Chicken Chili


I know I sound like a broken record but it is still hot in Arizona. Not "I'm melting" hot, but still hot enough that we are having a hard time recognizing it is fall by the time 3:00 pm rolls around. This is why I have decided I would just pretend it is nice and crisp outside and I started treating my meals as such. My youngest has also decided he had enough of this heat and started wearing jeans to school again, despite the fact that he is a sweaty mess by the time he arrives back home. He pointed to the calendar the other day and told me that he HAS to wear long pants after fall break because that's just what you do. Seriously, how can I argue with this logic?

I found this recipe probably a little over a year ago on Tasty Kitchen and it caught my eye right away. After a little bit of tweaking the recipe, it has come to be a family favorite, especially after a long day of school and soccer practice in the evening. The chili comes together quickly and while I realize you could make this with dry beans that have been soaked and cooked, it would defeat the convenience of the recipe for me, but if that's what you like to do, I say go ahead and knock yourself out. Chicken breast is cubed and browned along with onion and garlic powder in a big pot. The drained and rinsed beans are added along with chicken broth, green chilies and spices. The mixture is simmered for about 30 minutes and for the final touch sour cream and heavy cream are added. This ensures a perfect balance of spiciness and creaminess.

The soup has quite a kick, so if you like it a little milder, make sure to use less chilies or leave the cayenne pepper out. I like to serve this chili with tortilla chips and a little sprinkling of cheddar cheese, but a good cornbread on the side would be just as delicious. This is one of those meals that never has leftovers in our house and my kids fight over the last few spoons. It is also not as thick as a traditional thick chili, think of it more like a hearty soup with a kick. The spiciness of this dish will warm you nicely on a chilly evening, so make it tonight and get yourself all toasty warm!


White Chicken Chili
(adapted from Tasty Kitchen)
(Printable Recipe)

Ingredients:

1 1/2 pounds boneless, skinless chicken breast, cubed
1 whole medium onion, chopped
3/4 teaspoon garlic powder
2 tablespoons olive oil
3 cans (15.5 oz) Great Northern Beans, drained and rinsed
2 cans (14.5 oz) chicken broth
3 cans (4 oz) chopped green chilies
1 1/4 teaspoon Kosher salt
1 1/2 teaspoons dried oregano
1 teaspoon ground cumin
1/2 teaspoon black pepper
1/4 teaspoon cayenne pepper
1/2 cup sour cream
1/2 cup heavy cream
Shredded cheddar cheese, for serving  (optional)


Preparation:

Heat oil in a large pot. Saute chicken, onion, and garlic powder until chicken is no longer pink. Add beans, broth, chilies, and seasonings. Bring to a boil. Reduce heat and simmer uncovered for 30 minutes. Remove from heat and stir in sour cream and cream. Serve garnished with cheese if desired.

Thursday, May 6, 2010

Sonoma Chicken Salad


Shopping at Costco is always an adventure. You never know what you can come across. On weekends when all the testers are out, you can actually make a meal of it, and unfortunately it also means more impulse buys since you think you "have" to buy the product you just tasted.

Costco's Sonoma Chicken Salad was one of those buys. It had cranberries, pecans and poppy seeds in it. This sets it apart from a lot of the chicken salads that are out there. It was mighty tasty and we all enjoyed it. The only downside of the Costco chicken salad is that for one, it is expensive, and for two, it also has some unpronounceable ingredients mixed in along with a high calorie count.


So in true fashion I decided to replicate the recipe, and we haven't bought one chicken salad from Costco since. It is a different kind of dish than what you might be used to since I add pecans, dried cranberries, poppy seeds, and grapes to my version which makes it incredibly delicious and look beautiful. Many people who I have served this to who were initially turned off by all the fruit, ended up liking it after all and I keep getting requests for the recipe. 

This salad can be served with crackers, with a loaf of good artisan bread or on a split croissant. It also travels well for picnics and potlucks. I hope you'll give my creation a try!


Sonoma Chicken Salad

Ingredients:
1 Rotisserie Chicken, skin and bones removed, roughly chopped
2 stalks celery, finely diced
1 cup green grapes, cut in half
1 cup red grapes, cut in half
1 cup dried cranberries
1 cup pecans, toasted and chopped

Dressing:
1/2 cup sour cream
1/2 cup mayonnaise
2 tablespoons fresh lemon juice
2 tablespoons poppy seeds
Salt and Pepper to taste

Directions:
In a large bowl add chicken, celery, green and red grapes, and dried cranberries.

For the dressing whisk together sour cream, mayonnaise, lemon juice and poppy seeds. Add salt and pepper to taste.

Gently toss chicken mixture and dressing together. Refrigerate for about 1 hour.
Fold in toasted pecans right before serving.

A Susi's Kochen und Backen Original Recipe, inspired by Costco

Wednesday, April 21, 2010

Tandoori Chicken


I have never cared for the spice ginger much. I don't know what it is about it, but a lot of times I feel like it overpowers the food itself. On the other hand, I love Asian food and many recipes do call for ginger in either dry or fresh form. Often, I would just reduce the ginger so I wouldn't be able to taste it on my first bite.

I guess things are changing around here and I'm a "ginger-convert". A few weeks ago my baking friend Grapefruit suggested Gingered Carrot Cookies for our bi-weekly Baking with Dorie Challenge and I loved them so much I have baked them several times since.

So when the newest Food Network Magazine arrived and I saw the Tandoori Chicken in their "Weeknight Cooking" column I wasn't turned off right away, in fact, I was intrigued. After further examination of the recipe and seeing that it called for a big 2-inch chunk of fresh ginger I was getting doubtful, but decided it was as good of a time as ever to get over my ginger phobia.


The recipe is easily put together, the meat only marinates a total of about 20 minutes. My husband decided to throw the chicken thighs on the grill which gave them a nice bit of char and added another dimension of flavor to the chicken. I served this chicken with the yogurt sauce (which helps tone down some of the heat) called for in the recipe, rice and a simple side salad.

The verdict? I was in love with this chicken as was the rest of the family. We all couldn't get enough of this meal. The ginger taste was there, but along with all the other spices and ingredients it didn't overpower anything, just enhance. This dish is going in my permanent recipe files and will be made many more times. I hope you'll give this one a try as well!


Tandoori Chicken
(Print this Recipe)

Ingredients: 
8 skinless, boneless chicken thighs (about 2 1/2 pounds)
Juice of 1 Lemon
Kosher Salt
1/2 cup plus 2 tablespoons plain yogurt (I used Greek style)
1 tablespoon vegetable oil
1/2 small red onion, roughly chopped
3 cloves garlic, smashed
1 2-inch piece fresh ginger, peeled and roughly chopped
4 teaspoons tomato paste
2 teaspoons ground coriander
1 1/2 teaspoons ground cumin
1 3/4 teaspoons hot paprika
2 tablespoons chopped fresh cilantro
Cooked rice, for serving (optional)

Directions: 
Preheat the broiler.* Make shallow cuts in the chicken thighs with a sharp knife. Toss the chicken with the lemon juice and 1 1/2 teaspoons salt in a large bowl.

Pulse 2 tablespoons yogurt, the vegetable oil, onion, garlic, ginger, tomato paste, coriander, cumin,
1 1/2 teaspoons  paprika, and 1/2 teaspoon salt in a food processor to make a paste. Toss the chicken in the mixture and let marinate 15 minutes.

Place the chicken on a foil-lined broiler pan. Broil, turning once, until slightly charred and a thermometer inserted into the center registers 165 degrees F, 5 to 6 minutes per side.

Meanwhile, combine the remaining 1/2 cup yogurt and 1/4 teaspoon paprika, the cilantro and a pinch of salt in a bowl. Top the chicken with the yogurt sauce and serve with rice, if desired.


Note: If you have the opportunity to grill the chicken thighs on a charcoal or even a gas grill, I would suggest going that route as it adds so much flavor.

Adapted from: Food Network Magazine

Thursday, March 25, 2010

Chicken-Zucchini Alfredo


With the weather heating up and pool season approaching you will start to find some lighter recipes on this blog along with all the other decadent dishes. Cooking light can be quite a challenge for a lot of people. One of the biggest complaints of "cooking light" are the pre-conceived misconceptions that meals will taste boring and bland. If that was the case, my family wouldn't eat any of it but since no meal in our house has ever gone uneaten, I can assure you cooking light, done the right way, is anything but boring and bland.

A lot of times eating light in the summer time is quite easy for us. My husband is amazing on his grills (yes grills, he has several). So many times it is a simple side salad and a grilled "white" meat like chicken, pork, or seafood. But sometimes despite the heat of the southwest I crave comfort food that is rich and creamy tasting. When I found Ellie Krieger's recipe I knew I had to make it. With a few substitutions I had cooked a fantastic meal that was very well received all the way around.

The recipe is pretty straight forward and comes together in about 30 minutes which is always great, since I don't like spending as much time in the kitchen when the weather is so nice. This dish has all the flavor and taste that a "normal" Alfredo recipe would have but with a lot less fat. If you are trying to eat healthier and don't want to give up comfort then give this recipe a try. You can find Ellie's original recipe on Food Network or if you like my substitutions you can try my version.


Chicken-Zucchini Alfredo
~serves 6-8~
Ingredients:
Kosher Salt
3 tablespoons extra-virgin olive oil, divided
1/2 medium onion, finely chopped
2 cloves garlic, minced
3 (about 1 pound) zucchini, thinly sliced into half-moons
5 (4 ounce) thin skinless, boneless chicken breasts
Kosher Salt and Pepper
16 ounces fettuccine
2 1/2 tablespoons all-purpose flour
1 1/2 cups cold low-fat (1%) milk
1 1/2 cups (12 ounce can) low-fat evaporated milk
1 1/2 cups freshly shredded Parmesan cheese
1/4 cup fresh parsley, chopped

Directions:
Bring a large pot of salted water to a boil. Heat 1 tablespoon olive oil in a nonstick skillet over medium heat. Add onion, cook until translucent, then add 1 clove garlic and cook for another 30 seconds. Add the zucchini, cover and cook until tender, stirring, about 4 minutes. Transfer to a bowl.

Heat another tablespoon oil in the same skillet over medium-high heat. Season the chicken with kosher salt and pepper and cook through, 4 to 7 minutes per side depending on thickness of meat. Transfer to a plate.

Cook the pasta in the boiling water as the label directs. Drain, reserving 1 cup cooking water; return pasta to the pot to keep warm.

Meanwhile, whisk the flour and low-fat milk in a bowl. Place the remaining 1 clove garlic and 1 tablespoon olive oil in the skillet and cook over medium-high heat, 30 second. Add the flour-milk mixture and bring to a boil, stirring. Reduce the heat to low and cook, stirring, 2 minutes. Add the evaporated milk, salt to taste and the cheese; stir to melt, about 1 minute.

Cut the chicken into strips. Toss with the pasta, sauce, zucchini-onion mixture and parsley, adding the reserved pasta water as needed to loosen (you might only need 1/2 to 3/4 cup). Serve immediately.

Adapted from: Ellie Krieger for Food Network Magazine


Sunday, March 7, 2010

"Oven Fried" Chicken Chimichangas

 
Whether it is Tacos, Fajitas, Burritos or Carnitas, my family does not care as long as it is Mexican Food. So far the Chimichanga has always been reserved for eating out. Making them at home would have required me to deep fry them. I'm not crazy about a big pot of oil on my stove and then there is always the question of what to do with the oil afterward.

The only logical choice was to make Chimichangas in the oven that would still have the crisp like the fried version, but without the mess of oil and additional calories. The debate continued if the filling should be beef or chicken but ultimately the latter won out in this battle.

Chicken Chimichangas can be extremely bland and we sure had our share of those at restaurants. With this in mind I tried to come up with the perfect combination of ingredients that would complement the chicken, add flavor but without overpowering the dish. 

A few diced peppers along with cilantro, onions and your typical Mexican cuisine spices cumin and oregano made the chicken filling delicious. Adding this to a mix of cream cheese (for firmness), sour cream, bacon bits and  lots of cheese and you have the perfect "oven fried" Chimichanga that no one could get enough off.


"Oven Fried" Chicken Chimichangas

Ingredients:
3 whole roasted or poached* chicken breasts, shredded
1 tablespoon extra-virgin olive oil
6 scallions, thinly sliced
2 cloves garlic, minced
1 whole jalapeno, finely minced
1/2 cup red bell pepper, small diced
1 teaspoon ground cumin
1 teaspoon dried oregano
4 ounces cream cheese, softened
1/2 cup sour cream
1/2 teaspoon Kosher salt or to taste
1/4 cup cilantro, chopped
6 ounces Monterey Jack Cheese, shredded
8 whole flour tortillas (8")
Oil for brushing

*To poach the chicken: place chicken in a single layer in a pot or pan.  Fill with canned chicken broth or water until chicken is completely covered.  Season with salt, pepper, onion, carrot and any other herbs you like.  Bring to a boil, then turn the broth/water down to a simmer.  Cook for 8-12 minutes, depending on the size of your meat, or until it is firm to the touch. Cool slightly before handling.


Directions:
Preheat oven to 400 degrees F. Line your baking sheet with parchment paper. Set aside.

Add the oil to a skillet over medium heat. Once the oil is hot add the scallions, garlic, jalapeno, red bell pepper, cumin and oregano. Cook for 1 to 2 minutes. Set aside to cool.

In a large bowl cream together cream cheese and sour cream and salt. Add the cooled down vegetable mixture, shredded chicken, cilantro and cheese. Mix to combine well and taste again for seasonings adjusting as needed.

Microwave the tortillas (wrapped between 2 damp paper towels) for about 25 seconds to make them more pliable. Using one tortilla add a time add about 1/2 cup filling in the center of the tortilla. Wrap the Chimichanga like you would a burrito (without wrapping too tight or it will burst later) making sure the sides are tucked in well to enclose the filling. Place the rolled up tortilla with filling seam-side down on the parchment lined baking sheet. Proceed with the additional tortillas in the same fashion.

Brush the top and sides of each Chimichanga with some oil or spray with cooking spray. Bake for 21 to 23 minutes or the filling is heated through and the chimis are golden brown and crispy.

Serve with your favorite Mexican rice, refried beans and salsa.


Tuesday, February 23, 2010

Chicken Parmigiana


Sunday Dinners are an important part of our family. I love spending a quiet day in the kitchen trying my best to prepare a special meal that I wouldn't necessarily have time for on a weekday. I take pride in making all of the components by scratch and the process is made even sweeter by having my husband work side by side with me. That, along with some good music playing in the background makes for a perfect day.

Chicken Parmigiana is one of those meals that takes a little more time then I usually have. The meal itself is not a hard meal to cook but putting all of the different layers together certainly takes a bit of time. The meal has a fantastic tomato sauce that's spooned over breaded browned chicken which is then topped with Parmesan and Mozzarella and baked in the oven until the cheese is bubbly and golden. This is best served with some Spaghetti and a slice of warm, crusty bread.


Chicken Parmigiana

Ingredients:
For the sauce
2 Tablespoons extra-virgin olive oil
1 medium onion, chopped
2 garlic cloves, minced
2 bay leaves
2 Tbsp. red wine vinegar
2 Tbsp. balsamic vinegar
1 (28 ounce) can crushed tomatoes
1 (15 ounce) can tomato sauce
Fresh basil, chiffonade cut
Pinch red pepper flakes
1 teaspoon dried oregano
Kosher Salt and Pepper to taste

For the chicken
4 skinless, boneless, chicken breasts (about 1 1/2 pounds)
1/2 cup all purpose flour
Kosher Salt and Pepper
2 large eggs, lightly beaten
1 cup dried plain bread crumbs
3/4 cup freshly grated Parmesan
1/2 cup flat-leaf parsley, chopped
3 tablespoons extra-virgin olive oil 

For Finishing
1 (8 ounce) ball fresh mozzarella, thinly sliced
1/4 cup freshly grated Parmesan
1/4 cup fresh Basil, chiffonade cut

Directions:
Preheat oven to 350 degrees F.

Coat a saute pan with olive oil and place over medium heat. When the oil gets hot, add the onions, garlic and bay leaves; cook and stir for about 5 minutes until the onions are translucent and fragrant. Add both of the vinegars and carefully add the tomatoes (crushed and sauce) along with the basil. Season with red pepper flakes, oregano, salt and pepper. Cook and stir until the liquid is cooked down and the sauce is thick about 15 minutes. Lower the heat, cover and keep warm.

Put the flour in a large shallow bowl, season flour with salt and pepper, and mix to distribute. Put the two beaten eggs into another shallow bowl and lastly combine the bread crumbs, along with the Parmesan and chopped parsley in a third shallow bowl.

Dredge the chicken breasts one by one first in the flour, then dip them into the egg wash and finally into the bread crumb mixture making sure to coat them entirely. 

Heat the 3 tablespoons of olive oil over medium high heat in a pan and when the oil is hot add the cutlets and fry for about 4 minutes on each side until they are golden brown and crusty.

Place the browned chicken into an oven proof dish and ladle the tomato sauce over the chicken. Arrange the mozzarella on top and sprinkle with remaining Parmesan.

Bake for 20 minutes or until the cheese is bubbly and golden. Finish the dish with the rest of your basil and serve over spaghetti.


LinkWithin

Related Posts with Thumbnails