Showing posts with label cream. Show all posts

Tuesday, March 8, 2011

Spicy Tuscan Soup


The days for comfort food are dwindling down and with temperatures on the rise I knew I had to get in just a few more of those homey recipes before I start focusing on some lighter fare for Spring. I'm pretty sure I've mentioned before how much I adore soups. I like them actually year round, reserving some of the heartier ones for the cooler months and reaping the benefits of the wonderful produce available in the spring and summer for creating fresh and light tasting ones.

I found the recipe for this soup a couple of years ago on Tasty Kitchen. The description mentioned that this soup comes pretty close to one that Olive Garden serves. Not being a fan of any chain restaurant, I actually can't vouch for this statement since I have never eaten there before. However, the ingredients sounded interesting and unlike any soup I had in my repertoire, so I gave it a go.
This dish has become a family favorite ever since the first time I made it. This is a nice "stick to your ribs" kind of recipe, which is perfect, especially on those cool evenings.


Talk about a pork feast. Spicy breakfast sausage, red onions and bacon add tons of flavor, especially when paired with garlic, Yukon gold potatoes and kale. The liquid base of this soup comes from chicken broth. I used a homemade one (I usually have some in my freezer) which adds some nice depth, but even a quality store bought kind will do the trick and works very nicely, especially when short on time. A little bit of heavy cream added during the last few minutes of cooking adds richness and rounds out this fantastic soup.

The first time I made this recipe, I really wasn't sure how Kale would go over with the family, but everyone ended up loving it so much, that I have been increasing the amount of Kale by quite a bit more. This in turn really helps me justify the health factor of this dish. ;-)
This soup has it all. Flavor, spice, and creaminess without being too heavy. When paired with a nice loaf of bread or some bread sticks, it makes for a wonderful quick weeknight meal. Friends of ours who have actually eaten the Olive Garden version before thought this was even better than the original. I would say that is quite the compliment.


Spicy Tuscan Soup
~makes 6 servings~

Ingredients:
1 pound spicy breakfast sausage
1 whole medium red onion, diced
3 slices bacon, diced 
3 cloves garlic, minced 
4 Yukon gold potatoes (about 1 1/4 lbs.), peeled and diced 
6 cups chicken broth  
4 cups loosely packed Kale, cleaned 
1/2 cup heavy cream 
Kosher Salt and Pepper to taste  


Preparation:
Crumble sausage into a dutch oven over medium-high heat until cooked through and no longer pink. Remove from pan and set aside.

Add red onion and bacon to dutch oven. Reduce heat to medium and cook until onions soften and bacon begins to crisp. Add minced garlic and cook for 1 minute.

Add the diced potatoes and chicken broth. Cook for 15 - 20 minutes or until potatoes are almost done. Return crumbled sausage back to the dutch oven.

Add the kale and let simmer for another 5 minutes or until kale is wilted and soft. Add heavy cream, warm through, but don't boil.  Serve immediately.

Adapted from: Tasty Kitchen

Sunday, February 13, 2011

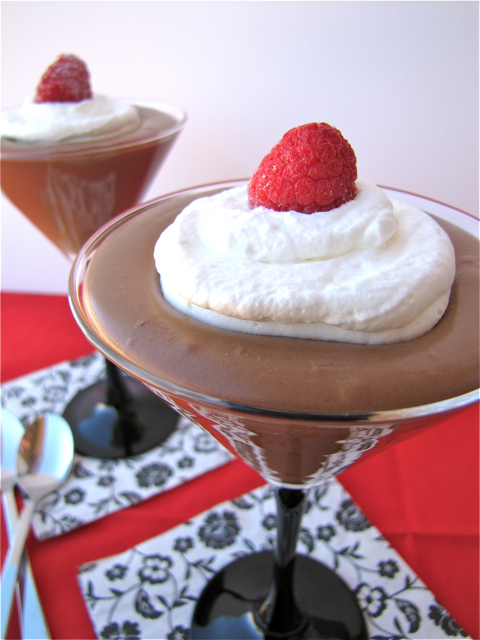
Nutella Espresso Mousse


Tomorrow is Valentine's Day! I know a lot of people think this is a Hallmark holiday, but it is nonetheless a great day to show that special person in your life how much you love them. And what better way to show that, than in the form of food, by making a dinner at home from scratch rather than going out. We always stay home, but that is because Valentine's Day is also my husbands birthday. I always cook him a special by request meal and tomorrow will be no different. He picked a wonderful authentic German meal for his birthday dinner and he could not be more excited about it. If you are a fan of my facebook page you know I have already spilled the beans of what I'm cooking. The recipes will certainly be featured soon. Anyway, I'm sure a lot of you already have your dinner plans for tomorrow firmed up as well, but if you are still looking for that final touch without a lot of fuss, then look no further.

Sometimes we tend to "over-think" desserts when in reality, simple can just be as effective and tasty. I had it in my head that I wanted to feature a chocolate mousse. After looking through some of my cookbooks I knew I didn't want to mess with raw eggs in my recipe that many versions suggested. I was looking for something simpler. I also wanted to kick up the flavors so instead of chocolate I decided I was going to use Nutella. Trying to think of ways to enhance the hazelnut flavor, Frangelico liqueur was my logical choice and to take it just a step further I figured espresso powder would harmonize with the mousse as well. For the espresso powder I have come to love the Starbucks Via packets. They pack a lot of flavor and incorporate beautifully into wet or dry ingredients.

This recipe literally does not get much easier and with only a handful of ingredients it won't break the bank either. Heavy Cream, a Starbucks Via packet, Frangelico liqueur and of course the star of this concoction; Nutella. The ingredients get mixed with a handmixer until everything comes together and the mixture forms soft peaks. Fill into your favorite dessert glasses and chill for a few hours in the refrigerator. Before serving, you can top the mousse with additional whipped cream or simply place some fruit on top. Easy, yet elegant, and the flavor is amazing! It tastes rich, full of chocolate with a hint of coffee. Even my non-chocolate loving husband gave this one the thumbs up. Think of this one as a chocolate pudding for grown-ups and spoil your special someone with this recipe tomorrow, he or she might thank you later ;o)


Nutella Espresso Mousse
(A Susi's Kochen und Backen Original) 
~makes 4 servings~

(Printable Version)

Ingredients:
1 cup chilled heavy cream
1 Starbucks Via Italian Roast Packet (1/2 teaspoon of espresso powder will work also)
 2 tablespoons Frangelico liqueur (Kahlua would be wonderful as well)
3/4 cup Nutella
Whipped Cream and Berries for topping (optional)

Preparation:
Combine heavy cream and espresso powder in a medium mixing bowl. Stir together. Add Frangelico and Nutella. Beat with an electric mixer 1 minute. Scrape down the sides and continue beating until soft peaks form. At this point the mousse is very soft/loose, but will firm up once chilled. Divide the mixture into the serving dishes of your choice and chill at least 2 hours in the refrigerator.
If desired, top with additional whipped cream or berries just before serving.

Thursday, November 4, 2010

Southwestern Corn-Potato Chowder


My husband is by all means a great eater. I don't recall many things he won't eat or at least try once. However, he is a huge flavor person. If the food is tasteless or bland he won't touch it. I've learned over the years that big flavors and especially a good amount of spice, will make him love pretty much anything. In the early years of our marriage I tried my hand at corn chowder. It was only received lukewarm and so I figured the time had come to give this soup another go. This time around I thought I would have a true winner on my hands if I went the Southwestern route and boy was I ever right. 

Looking all over the internet for a recipe for this chowder I came to find out very quickly that most of them weren't going to cut it and would just end up being another mediocre meal. My plan was to just take bits and pieces from several recipes and come up with my own version. This soup comes with a bit of a warning though. If you are a sissy when it comes to spicy food, then this is probably not the bowl for you, but if you love a good flavorful soup with a good kick, I encourage you to read on.


I started the soup by crisping up some bacon. See, already a step in the right direction! Sauteing onions in the leftover bacon flavored grease was the next step. Flour, salt, pepper, chili powder and cumin made up my seasonings. For the stock I decided to go with chicken stock since that is what I had in my freezer, but you could certainly use vegetable as well. Potatoes are then added, and again I went with flavor by using the Yukon Gold variety. Once the potatoes are cooked nice and tender in the flavorful broth, I added frozen corn which I always have in my freezer and consider one of my convenience items. To add the final touch and to make this truly Southwestern, I decided on a combination of canned diced green chiles and minced chipotle peppers in adobo sauce which added a wonderful smokiness to the dish. To "cool" the palate down, I went with some half-and-half which made the soup creamy, without making it too rich. For garnish, I used the previously crisped bacon bits and fried tortilla strips which my husband ever so kindly agreed to fry for me. They are simply flour tortillas cut into thin strips and fried in some hot oil before getting a sprinkling of sea salt.

Great soup, great flavors and you will definitely get warmed through and through with a bowl of this corn-potato chowder. This dish is going into my permanent recipe file and will be made many more times throughout the colder months.


Southwestern Corn-Potato Chowder
(Printable Recipe)

Ingredients:

8 ounces bacon, chopped
1 large onion, chopped
2 tablespoons unsalted butter
4 tablespoons flour
1 teaspoon kosher salt
1/2 teaspoon freshly ground black pepper
3/4 teaspoon chili powder
1/2 teaspoon ground cumin
6 cups chicken stock (vegetable can be used as well)
3 cups Yukon Gold potatoes, peeled and medium-diced (about 1 pound)
4 cups frozen corn
1 (7 ounce) can diced green chiles
3 whole chipotle peppers in Adobo Sauce, finely minced
2 cups half-and-half
Fried tortilla strips for garnish (optional)

Preparation:

In a large stockpot over medium-high heat, cook the bacon until crisp. Remove the bacon with a slotted spoon and reserve. Reduce the heat to medium, add the onions and butter to the bacon fat, and cook until onions are translucent.

Stir in the flour, salt, pepper, chili powder and cumin and cook for a couple of minutes. Add the chicken stock and potatoes, bring to a boil, and simmer uncovered for 15 minutes or until the potatoes are tender. Add the corn to the soup, then stir in the green chiles and minced chipotle peppers. Cook for 5 minutes, add the half-and-half and cook for another 5 minutes. Check one more time for additional salt and pepper. Serve hot with a garnish of the reserved bacon and fried tortilla strips (if desired).

Thursday, October 14, 2010

White Chicken Chili


I know I sound like a broken record but it is still hot in Arizona. Not "I'm melting" hot, but still hot enough that we are having a hard time recognizing it is fall by the time 3:00 pm rolls around. This is why I have decided I would just pretend it is nice and crisp outside and I started treating my meals as such. My youngest has also decided he had enough of this heat and started wearing jeans to school again, despite the fact that he is a sweaty mess by the time he arrives back home. He pointed to the calendar the other day and told me that he HAS to wear long pants after fall break because that's just what you do. Seriously, how can I argue with this logic?

I found this recipe probably a little over a year ago on Tasty Kitchen and it caught my eye right away. After a little bit of tweaking the recipe, it has come to be a family favorite, especially after a long day of school and soccer practice in the evening. The chili comes together quickly and while I realize you could make this with dry beans that have been soaked and cooked, it would defeat the convenience of the recipe for me, but if that's what you like to do, I say go ahead and knock yourself out. Chicken breast is cubed and browned along with onion and garlic powder in a big pot. The drained and rinsed beans are added along with chicken broth, green chilies and spices. The mixture is simmered for about 30 minutes and for the final touch sour cream and heavy cream are added. This ensures a perfect balance of spiciness and creaminess.

The soup has quite a kick, so if you like it a little milder, make sure to use less chilies or leave the cayenne pepper out. I like to serve this chili with tortilla chips and a little sprinkling of cheddar cheese, but a good cornbread on the side would be just as delicious. This is one of those meals that never has leftovers in our house and my kids fight over the last few spoons. It is also not as thick as a traditional thick chili, think of it more like a hearty soup with a kick. The spiciness of this dish will warm you nicely on a chilly evening, so make it tonight and get yourself all toasty warm!


White Chicken Chili
(adapted from Tasty Kitchen)
(Printable Recipe)

Ingredients:

1 1/2 pounds boneless, skinless chicken breast, cubed
1 whole medium onion, chopped
3/4 teaspoon garlic powder
2 tablespoons olive oil
3 cans (15.5 oz) Great Northern Beans, drained and rinsed
2 cans (14.5 oz) chicken broth
3 cans (4 oz) chopped green chilies
1 1/4 teaspoon Kosher salt
1 1/2 teaspoons dried oregano
1 teaspoon ground cumin
1/2 teaspoon black pepper
1/4 teaspoon cayenne pepper
1/2 cup sour cream
1/2 cup heavy cream
Shredded cheddar cheese, for serving  (optional)


Preparation:

Heat oil in a large pot. Saute chicken, onion, and garlic powder until chicken is no longer pink. Add beans, broth, chilies, and seasonings. Bring to a boil. Reduce heat and simmer uncovered for 30 minutes. Remove from heat and stir in sour cream and cream. Serve garnished with cheese if desired.

Thursday, September 23, 2010

Ragù alla Bolognese


Want to know how I spent my weekend? Besides hanging out with wonderful friends who came to visit we were also baking in the heat and jumping in the pool just to get the slightest bit of relief. Oh yeah, fall is in full swing in Arizona and blessed us with record temperatures of 109 degrees F over the weekend. My head keeps saying, "but it is fall, I want to to wear sweaters, and jeans and eat soups and stews" and my body keeps screaming "cool me off, it's another scorcher, find me the tank top and only feed me ice cream and salads". Quite the conundrum, don't you think?

So seriously, what's a woman (or man) to do when the rest of the country is begging for comfort food, and you as a food blogger have a responsibility to appeal to the crowds? You have to find a happy medium. Something that is comfort food, but also won't make you sit next to your open freezer while you eat that steaming bowl of soup. This is were one of our favorites always helps. Ragù alla Bolognese IS comfort food, but by adding a nice big bowl of salad on the side it fits the "scorcher" requirement as well.


I found this recipe a while back on one of my favorite blogs "Crepes of Wrath". If you haven't visited there, you should. Anyway, I only slightly adapted Sydney's already fabulous recipe to fit our taste and the result ended up "being on the money" as Guy Fieri would say. The recipe starts by sauteing onions, along with celery and carrots in butter. You add in some garlic and bacon, glorious bacon! This gets cooked until the bacon is slightly crisp. Ground beef is added and cooked until no longer pink. Then you throw in crushed tomatoes, diced tomatoes, tomato paste and your usual Italian suspects of basil, thyme and oregano. Season with salt and pepper, some nutmeg, red pepper flakes and bay leaves. This mixture then gets a good dousing of white wine and finally some heavy cream or half-and-half (if you must). The sauce will then hang out for a good hour on your stove which will give you plenty of time to make your salad, cook your pasta and grate your fresh Parmesan (step away from the green can on this dish).

This sauce is out of this world and there are hardly ever any leftovers, but if there are, it tastes just as good if not better the second time around. The sauce is flavorful, rich and has you smacking your lips while eating it. I've served this to friends and family and everyone keeps asking for the recipe which to me always means it is a keeper recipe. I hope you'll give this recipe a try, it is one that works wearing fall gear, but also works while baking in the sun!


Ragù alla Bolognese

Ingredients:
2 tablespoons butter
1 large onion, diced
2 stalks celery, diced
2 carrots, diced
2 cloves garlic, minced
6 slices thick-cut bacon, diced
1 1/2 pounds ground beef (I use 93 % lean)
1 (28 ounce) can crushed tomatoes
1 (14 ounce) can diced tomatoes
1 (6 ounce) can tomato paste
1 teaspoon dried oregano
1 teaspoon dried basil
1/2 teaspoon dried thyme
1 teaspoon kosher salt
1/2 teaspoon ground black pepper
1/2 teaspoon red pepper flakes
1/8 teaspoon ground nutmeg
2 bay leaves
1 cup white wine (don't use cooking wine!)
1/3 cup heavy cream or half-and-half
1 pound Pasta
Parmigiano-Reggiano, grated

Directions:
Melt your butter in a large pot or pan over medium heat. Turn the heat up to medium-high heat and then add in the diced onions, diced celery and diced carrots. Cook for 5 minutes until softened then add in the garlic and cook for 1 minute until fragrant.

Add in the bacon and cook for 5 minutes or so until slightly crisp. Add in the ground beef and cook for another 5 minutes or until cooked through. Add in the crushed tomatoes, diced tomatoes, tomato paste, dried oregano, basil, thyme, salt, black pepper, red pepper flakes, nutmeg, and bay leaves. Stir to combine.

Add in the white wine and heavy cream (or half-and-half) and stir. Bring the bolognese to a simmer over medium-low heat and cook for an hour, stirring every so often so that it doesn't burn.

Cook the pasta according to package directions, drain, and add to the bolognese. Stir to combine. Serve and top with some grated Parmigiano-Reggiano. 

Adapted from: Crepes of Wrath

Friday, September 3, 2010

Ice Cream Fridays: Chocolate-Raspberry Ice Cream and Giveaway Winner Announcement


Welcome to the final installment of Ice Cream Fridays for the year. All of you ice cream fans, this does not mean that I won't be featuring seasonal ice cream flavors every now and then, it just means, that for now it will not be a regular feature anymore. But don't fret, Ice Cream Fridays will be back for sure next year with new ideas and flavors. For the time being though, I'm cooking up a couple of different ideas for a new Friday feature, so stay tuned to see what I have in store.

Which ice cream did I chose to cap off my feature? It is none other than a Chocolate-Raspberry Ice Cream with Chambord. To break this one down with one simple word would be: Decadence. I had this flavor bookmarked in my all time favorite ice cream book, "The Perfect Scoop" for a very long time. I figured there was no better time than now to feature a flavor combination that I have loved for as long as I can remember, raspberries and chocolate.

This ice cream was another very easy, non-custard based, quick to fix recipe. Heavy cream, unsweetened (dutch processed) cocoa powder and sugar are whisked together and brought to a boil. Fresh (or in my case freshly frozen) raspberries are added and left to "steep" for a bit. The mixture is then processed in a food processor or blender until smooth, and finally strained to remove all those pesky little "get stuck in your teeth" seeds. To kick the flavor up another notch, I added a couple of tablespoons of Chambord liqueur to really enhance the raspberry flavor. After chilling in the refrigerator for a few hours the mixture is churned in an ice cream maker.


True bliss with every creamy, rich, decadent bite. On first taste you think it's just a chocolate ice cream until the bright tartness of the raspberries gets you upon swallowing - heavenly. One of my definite favorites this year. One that I will be making over and over again. Maybe next time I'll add some chopped semi-sweet chocolate to the final mix to make it even better (if possible).
In case you were wondering what my personal top 5 ice cream flavors were this season, here they are in no particular order:

- Chocolate-Raspberry Ice Cream with Chambord


 And finally, here is the winner (who was generated by Random.org) of the giveaway. The winner receives the book that has brought me,
and hopefully all of you, so much joy this summer:

Congratulations to:
Carole
who said:
"I recently purchased an ice cream maker so I've been enjoying your ice cream posts. I'm a Nutella fan."

Please contact me by email with your address so I can send you the book! :o)


Chocolate-Raspberry Ice Cream with Chambord

Ingredients:
1 1/2 cups (375 ml) heavy cream
5 tablespoons (40 g) unsweetened Dutch-process cocoa powder
2/3 cup (130 g) sugar
2 cups (240 g) raspberries, fresh or frozen
2 tablespoons Chambord liqueur

Directions:
Whisk together the cream, cocoa powder, and sugar in a large saucepan. Heat the mixture, whisking frequently, until it comes to a full, rolling boil (it will start to foam up). Remove from the heat and add the raspberries. Cover and let stand for 10 minutes.

Puree the mixture in a food processor or blender. If you wish, press the mixture through a mesh strainer to remove the seeds. Add the Chambord.

Chill the mixture thoroughly, then freeze it in your ice cream maker according to the manufacturer's instructions.

Adapted from: The Perfect Scoop

Friday, August 27, 2010

Ice Cream Fridays: Vietnamese Coffee Ice Cream


Welcome to another edition of Ice Cream Fridays. Every Friday you can look forward to a new ice cream recipe which will hopefully inspire you to break out your old dust covered ice cream maker that is hiding somewhere in a closet (yes, I'm talking about you). Since I'm always looking for inspiration and ideas, feel free to leave me a comment here on my blog or on my facebook page, and let me know what ice cream flavor you would like to see.

If you are like me, there is no way to get the day started without a couple of cups of decent coffee. In fact, my family knows not to mess with me until I'm properly caffeinated. Strange thing is, I never liked coffee or anything coffee flavored while growing up. This all changed when I met my husband. He couldn't start his day without a few cups of coffee and would continue drinking coffee throughout the day. There was always freshly brewed coffee around, and I started getting hooked on the brown stuff as well. The adults take coffee serious in our home!


So, when I was looking over my list of ice cream flavors still left to make before I retire Ice Cream Fridays for the year, I realized I had yet to make a coffee ice cream. Well, I definitely knew that needed to be changed. Again, I was torn between several different recipes, but this one simply won out for it's ease of preparation. The recipe calls for only a handful of ingredients and is made in 5 minutes flat. Strong coffee or espresso is mixed with sweetened condensed milk (the nectar of the gods) and a bit of half-and-half with a pinch of finely ground coffee. That's all there is to it. I think one of my easiest ice creams to date. After a good chill in the refrigerator it is churned in the ice cream maker. Done!

Whoa, can I just say buzz! This flavor was strong, delicious, and melted in your mouth. It was like eating your morning coffee in a bowl. Definite hit, and because of the ease-of-preparation factor, it deserves one of the highest ratings. My teenage daughter, who by the way is NOT a coffee lover, thought this was one incredible flavor that should be packaged and sold (if only this was my recipe). This will go into my top 5 ice creams I have made this year for sure.
So, if you are one of those coffee addicts as well, don't wait, and make this ice cream as soon as possible, and thank me later ;o)


Vietnamese Coffee Ice Cream
(adapted from "The Perfect Scoop")
(Printable Recipe)

Ingredients:

1 1/2 cups sweetened condensed milk
1 1/2 cups brewed espresso or very strongly brewed coffee
1/2 cup half-and-half
Big pinch of finely ground dark roast coffee

Preparation:

Whisk together the condensed milk, espresso, half-and-half, and ground coffee. Chill the mixture thoroughly, then freeze it in your ice cream maker according to the manufacturer's instructions.
 

Friday, August 20, 2010

Ice Cream Fridays: Honey Peach Ice Cream


Welcome to another edition of Ice Cream Fridays. Every Friday you can look forward to a new ice cream recipe which will hopefully inspire you to break out your old dust covered ice cream maker that is hiding somewhere in a closet (yes, I'm talking about you). Since I'm always looking for inspiration and ideas, feel free to leave me a comment here on my blog or on my facebook page, and let me know what ice cream flavor you would like to see. Who knows, you might just get lucky and it will be featured the following week. 

With only a couple more Fridays left after today's featured post I will be retiring the Ice Cream series for the year. I'm still left with a list a mile long of different ice creams yet to try. So, picking and choosing which one to make should have been hard, but I was getting a little help in the form of a gentle nudge from my friend Sharon and facebook follower Christy. Both of them named Peach Ice Cream as their favorite flavor when I had asked a while back. I love a good peach ice cream as well, but there was only one problem with the execution, the peaches. For the life of it, I could not get my hands on decent tasting peaches. I was looking for bright red peaches, the same ones that as you bit into them the juices are running everywhere and you'd better have a napkin handy. Nope, all I could find for weeks and weeks were great looking peaches on the outside but they were hard as rocks and flavorless on the inside. My husband (the official taste tester and critic for this blog), took it upon himself to try peach after peach in search of the perfect one. Did he ever find it? Unfortunately not, so I ended up having to use some mediocre ones that "worked" since I really wanted to make this ice cream. 


While I was looking for the perfect peach ice cream, I had a couple of criteria in mind. One, it had to be full of peach flavor (this would have been achieved with better peaches) and two, it couldn't just be a vanilla base with peach chunks mixed in. So, after looking at different recipes I had narrowed it down to one from David Lebovitz and one from Dorie Greenspan. I really liked David's concept (he adds sour cream to the mix) but ended up choosing Dorie's version since I had already made a Strawberry Sour Cream Ice Cream earlier in the year. Dorie's version was different by including honey and I thought it sounded heavenly in combination with the peaches.
Peeled peaches are chopped and cooked with honey until soft, then the mixture is pureed. Meanwhile a basic egg custard is cooked and the peach puree is added to the finished base along with vanilla extract. I went a step further and added ground up vanilla bean to my custard for additional flavor. After a good chilling in the refrigerator, the custard is churned in the ice cream maker, and right before finishing, more diced peaches are added.

This ice cream turned out very well, despite the sub-par peaches, so I can only imagine how incredibly tasty it would be with ripe, juicy ones. I loved the subtle honey flavor that infused the ice cream throughout. My kids were not sure about this flavor when I set out to make it, but every single one of them happily emptied their bowls. I will stay on the hunt for decent peaches, and will definitely make this flavor again. Maybe next year I'll have to have a peach ice cream throw-down between Dorie and David!


Honey-Peach Ice Cream
(adapted from "Baking: From my home to yours")
(Printable Recipe)

Ingredients:

4 large ripe peaches (about 2 pounds), peeled and pitted
1/4 cup honey
1 cup whole milk
1 cup heavy cream
3 large egg yolks
1/2 cup sugar
2 teaspoons pure vanilla extract
1/4 teaspoon ground vanilla beans

Preparation:

Coarsely chop half the peaches into 1/2-inch chunks and toss them into a small saucepan. Add the honey and bring to a boil, then lower the heat, cover the pan and cook, stirring occasionally, until the peaches are soft abut not mushy, about 10 minutes. Scrape the mixture into a  blender or food processor and whir to puree. Set the peach puree aside while you make the custard.

Bring the milk and cream to a boil in a medium heavy-bottomed saucepan. Meanwhile, in a medium bowl, whisk the yolks and sugar together until very well blended and just slightly thickened. Still whisking, drizzle in about one third of the hot liquid - this will temper or warm, the eggs so they don't curdle. Whisking all the while, slowly pour in the remaining liquid. Pour the custard back into the pan and cook over medium heat, stirring without stopping, until the custard thickens slightly and coats the back of a spoon; if you run your finger down the back of the spoon, the custard should not run into the track. The custard should reach at least 170 degrees F, but no more than 180 degrees F, on an instant-read thermometer. Immediately remove the pan from the heat and our the custard into a 2-quart glass measuring cup or clean heatproof bowl. Stir in the vanilla and the peach puree.

Refrigerate the custard until chilled before churning it into ice cream.

Scrape the chilled custard into the bowl of an ice cream maker and churn according to the manufacturer's instructions. While the ice cream is churning, finely dice the remaining 2 peaches, then, just before the ice cream is thickened and ready, add the peaches and churn to blend. Pack the ice cream into a container and freeze it for at least 2 hours, until it is firm enough to scoop.

Monday, August 16, 2010

Peas and Carrots "German Style"


Peas and carrots mixed together always bring me back to my childhood. It was my absolutely favorite vegetable my mom prepared, and to this day, it holds a special place in my heart. It is a super kid friendly vegetable mix, and my children have loved it since they were little babies and were able to start eating table food. This is another one of my mom's recipes that I made sure to acquire as soon as I moved out, and it has been a staple in our home ever since.

The dish is reminiscent of creamed vegetables without the heaviness. It starts by sauteing diced onions in a bit of olive oil. Cleaned, chopped carrots are added and sauteed for a minute. A little bit of water is added along with a vegetable bouillon cube, salt, and pepper. Frozen peas are thrown into the mix, and everything is cooked until the carrots are soft, but still have a bit of bite left to them (nothing worse than mushy vegetables). A couple tablespoons of heavy cream along with freshly chopped parsley add the finishing touch. This recipe is certainly not difficult to fix, chopping the vegetables will be the hardest "chore" in this dish. After that, it is finished in no time.

I especially like to serve this along side mashed potatoes or simple boiled potatoes and a protein. Anything from a steak, to chicken or pot roast will be delicious. It is a very mild vegetable that is always incredibly well received, and despite the few ingredients, it tastes fresh and flavorful. So, if you are still guilty of heaving canned peas and carrots in your pantry, go ahead, and try this from scratch version, you might never go back to store bought again!


Peas and Carrots "German Style"

Ingredients:
1 tablespoon olive oil
1/2 medium onion, finely chopped
2 cups carrots, diced
1 cup water
1 vegetable bouillon
Salt and pepper to taste
2 cups frozen peas
2 tablespoons heavy cream
2 tablespoons fresh parsley, minced

Directions:
In a medium saucepan over medium-high heat, add onion to the olive oil and saute until the onion turns translucent and slightly soft. Add the carrots and cook for another minute. Add water, vegetable bouillon, salt, and pepper. Bring to a boil, add the frozen peas, turn down heat and simmer for about 5-10 minutes or until the carrots have the desired consistency. Add the heavy cream and parsley, taste for seasonings and serve!

A Susi's Kochen und Backen Family Recipe

Friday, August 13, 2010

Ice Cream Fridays: Brown Butter Candied Bacon Ice Cream


Welcome to another edition of Ice Cream Fridays. Every Friday you can look forward to a new ice cream recipe which will hopefully inspire you to break out your old dust covered ice cream maker that is hiding somewhere in a closet (yes, I'm talking about you). Since I'm always looking for inspiration and ideas, feel free to leave me a comment here on my blog or on my facebook page, and let me know what ice cream flavor you would like to see. Who knows, you might just get lucky and it will be featured the following week.

I blame my husband for this flavor. He had checked out my open TasteSpotting site and this recipe caught his eye. He was sold then and there! I on the other hand, was not convinced about adding bacon to an ice cream. But hey, this is my blog, and I can at least try everything once, right? Isn't that what being a food blogger is all about? Trying new things and stepping out of your comfort zone for recipes that you might not have made normally? See, I knew you would all nod your head in agreement.


The ice cream starts by taking some bacon (I used center cut), laying it out on a foil covered baking sheet and sprinkling it generously with brown sugar. The bacon is baked until dark and caramelized. Once crisp, it is set aside to cool and firm up on a baking rack before chopping into little pieces.
Meanwhile I got started on the brown butter ice cream. I made a few ever so slight changes to the recipe to bring out more flavor. First up, butter is melted in a saucepan, I actually let it get brown (the recipe did not mention this step) before adding in brown sugar and half-and-half. Once the mixture is hot, you proceed as you do with any custard based ice cream. After the mixture has thickened, I strained it into the rest of my half and half and added brandy, vanilla, and cinnamon. This mixture is then chilled before churning it in an ice cream maker until thick. During the last few minutes, the cooled, caramelized bacon bits are added.

So, what did we think? Well, despite all of my reservations, I have to give credit where credit is due, this was surprisingly delicious! My husband loved this flavor (it doesn't get more "manly" than with bacon),  and my boys loved it as well. I thought the base was amazing with the brown butter flavor and I did like the crunch the bacon provided, but was slightly thrown off by the smokiness left after each bite. The only one who absolutely did not care for this flavor was my teenage daughter. She was totally revolted after her first and only bite. Will I be making this ice cream again? Maybe. In the right entertainment setting, it could be fun to serve, but I certainly won't be stocking it in my freezer. If you are adventurous go ahead, give it a try, and let me know what you think about this one!


Brown Butter Candied Bacon Ice Cream 
(adapted from Coolhaus Ice Cream Truck and as featured on TasteSpotting)
(Printable Recipe)


Ingredients:

For the bacon:
5 strips bacon (I used center cut)
approx. 2 tablespoons brown sugar

For the ice cream base:
3 tablespoons (45 g) salted butter
3/4 cup (170 g) packed dark brown sugar
2 3/4 cups (675 ml) half-and-half
5 large egg yolks
2 teaspoons brandy (whiskey or dark rum will work too)
1/4 teaspoon vanilla extract
1/4 teaspoon ground cinnamon (optional)

Preparation:

For the bacon: Preheat the oven to 400 degrees F. Lay the strip of bacon on a baking sheet lined with aluminum foil, shiny side down. Sprinkle 1 1/2 to 2 teaspoons of brown sugar evenly over each strip of bacon.  Bake for 12 -16 minutes. Midway during baking, flip the bacon strips over and drag them through the dark, syrupy liquid that's collected on the baking sheet. Continue to bake until deep brown (watch carefully during the last few minutes). Remove from oven and cool the strips on a rack.
Once crisp and cool, chop into little pieces.

For the ice cream base: Melt the butter in a heavy, medium-size saucepan. Cook the butter, watching carefully, until caramel colored. Stir in the brown sugar and 1 1/2 cups of the half-and-half.
In a separate bowl, stir together the egg yolks, then gradually add some the warm brown sugar mixture to them, whisking the yolks constantly as you pour. Pour the mixture back into the saucepan. Cook over low to moderate heat, constantly stirring and scraping the bottom with a heatproof spatula, until the custard thickens. Pour the cooked custard through a strainer into a large bowl containing the rest of the half-and-half (1 1/4 cups). Add brandy, vanilla and cinnamon (if using) and whisk together.

Chill the mixture for about 5 hours in the refrigerator. Once thoroughly chilled pour into ice cream maker and chill according to the manufacturer's instructions. Add the bacon bits during the last couple minutes of churning, or stir them in when you remove the ice cream from the machine.

Friday, August 6, 2010

Ice Cream Fridays: Banana Cajeta Cashew Gelato


Welcome to another edition of Ice Cream Fridays. Every Friday you can look forward to a new ice cream recipe which will hopefully inspire you to break out your old dust covered ice cream maker that is hiding somewhere in a closet (yes, I'm talking about you). Since I'm always looking for inspiration and ideas, feel free to leave me a comment here on my blog or on my facebook page, and let me know what ice cream flavor you would like to see. Who knows, you might just get lucky and it will be featured the following week.

Sometimes my friends get a kick out of supplying me with an ingredient and letting me "loose" in the kitchen to come up with a dish. This is how today's ice cream flavor came about. My friend Laura supplied me graciously with some Cajeta. Cajeta is sweetened goat's milk that is cooked until thick and dark in color, like Dulce de Leche, it is also very popular in Mexico. It is quite delicious by itself drizzled over the top of plain vanilla ice cream, but I knew I wanted to find something that really integrated the flavor.


This is where one of my ice cream books came to play. While my daughter was flipping through the pages one day she got very excited when she came across this Banana Cajeta Cashew Gelato. She showed it to me, thinking it would certainly fit the bill for working the ingredient into a great dessert. Boy, was she right. What made this even better was the cashews which I had received from Oh!Nuts. All I needed to do was make the ice cream base. I still had some ripe bananas left over from my banana cake so I was covered.  The ice cream starts by making a plain vanilla base. After chilling it thoroughly, ripe bananas are blended with half of the mixture until smooth before mixing it with the rest of the base. The mix is then frozen in your ice cream maker, and finally towards the end, chopped cashews are added to the Gelato. Upon layering the finished mix in your freezer bowl, cajeta is drizzled over the top and then quickly swirled in before freezing.


This was a very different but wonderful flavor combination. The kids didn't care for the cajeta by itself, but once integrated into the ice cream they went crazy for it. I'm really glad my friend introduced me to an unknown product which I ended up liking a lot. In case you can't find cajeta readily available, I'm including a recipe on how to make it yourself. However, if the thought of goat milk caramel is just a bit too exotic for you, the cajeta can be simply replaced with Dulce de Leche and you will still be left with a delicious ice cream.


Banana Cajeta Cashew Gelato
(adapted from Ciao Bella)
(Printable Recipe)

Ingredients:

Plain Base (recipe to follow)
2 ripe bananas, chilled
1 tablespoon sugar
1/2 tablespoon fresh lemon juice
1/2 cup coarsely chopped roasted salted cashews
1/2 cup Cajeta, slightly warmed (recipe to follow)

Preparation:

Make the Plain Base and chill as directed.

Place the bananas, sugar, and lemon juice in a blender and add half of the base. Blend until smooth, then whisk into the remaining base.  Pour the mixture into the container of an ice cream machine and churn according to the manufacturer's instructions. Add the cashews 5 minutes before the churning is completed.

Just after churning, drizzle the cajeta over the top and quickly and lightly swirl in a zigzag pattern with a spoon or butter knife.


Plain Base


2 cups whole milk
1 cup heavy cream
4 large egg yolks
2/3 cup sugar


In a heavy-bottom saucepan, combine the milk and cream. Place over medium low heat and cook, stirring occasionally so a skin doesn't form, until tiny bubbles start to form around the edges and the mixture reaches a temperature of 170 degrees F.

Meanwhile, in a medium heat-proof bowl, whisk the egg yolks until smooth. Gradually whisk in the sugar until it is well incorporated and the mixture is thick and pale yellow. Temper the egg yolks by very slowly pouring in the hot milk mixture while whisking continuously. Return the custard to the saucepan and place over low heat. Cook, stirring frequently with a wooden spoon, until the custard is thick enough to coat the back of the spoon and it reaches a temperature of 185 degrees F. Do not bring to a boil.

Pour the mixture through a fine-mesh strainer into a clean bowl and let cool to room temperature, stirring every 5 minutes or so. to cool the custard quickly, make an ice bath by filling a large bowl with ice and water and placing the bowl with the custard in it; stir the custard until cooled. Once completely cooled, cover and refrigerate until very cold, at least 4 hours or overnight.


Cajeta
(makes about 3 cups)

2 cups goat's milk
2 cups sugar
1/8 teaspoon pure vanilla extract, preferably Mexican
1/2 teaspoon baking soda dissolved in 1 tablespoon water

In a large, heavy-bottom saucepan, combine the milk, sugar, and vanilla and place over medium heat. Bring to a simmer, stirring constantly with a wooden spoon to dissolve the sugar. Remove the pan from the heat and stir in the dissolved baking soda. When the bubbling stops, return the pan to the heat, bring back to a simmer, and cook, stirring often, for 1 hour, or until the mixture starts to thicken and turn golden. At this point the cajeta will start to thicken fast, so don't leave the pan unattended. Continue to cook stirring constantly so it doesn't burn or stick to the bottom of the pan, for another 20 minutes, or until the cajeta is a  rich brown color and thick enough to coat the back of the spoon. It should cool to a medium- thick caramel consistency. If it's too thick, add a samll amount of water; if ti's too think continue to cook until thickened.

Transfer to a container, let cool, then cover and refrigerate until ready to use. Warm slightly before serving. It will keep for about 1 month in the refrigerator.

Monday, August 2, 2010

Cheesy Cauliflower Casserole


Cauliflower happens to be one of my favorite vegetables. This is another vegetable that my mom had in her garden in abundance while I was growing up, so it was frequently on the dinner table. My mom had a few different ways to prepare it, but most of the time she just turned it into a simple dish of cauliflower in a white sauce with a hint of cheese. Most of the time she served it along with boiled salt potatoes and Schnitzel or Fleischkuechle (they are a mix between a mini meatloaf and a burger). I still love eating it this way, but I also like to cook today's "kicked up" version.

I found this recipe in my trusty "Ich helf Dir kochen" book which I received over 20 years ago from my parents. I've added a few of my own touches to this recipe over the years, which makes this cauliflower irresistible, at least for my family. I always start by cutting up the cauliflower into florets and soaking them in a big bowl of salt water for about 30 minutes. One reason why I do this is because, growing up and harvesting the fresh crop from my mom's garden (which is completely organic and without commercial fertilizer) it wasn't uncommon to find that a little snail or the like had made its way into the lettuce or cauliflower. The salt water kills them, and lets them float to the top for easy removal. It is probably not necessary to do so today, especially if purchasing the cauliflower at a super market, but sometimes old habits die hard.


The cleaned cauliflower is then cooked "al dente" in a big pot of salted water that has a bit of milk added to it. The milk in the water helps preserve the white color of the vegetable. Make sure you don't overcook the cauliflower as it tends to get a "soapy" taste if it is cooked too much.
A white sauce is then made by making a simple roux. Reserved cauliflower cooking water is added to the roux and seasoned with salt, pepper, cayenne, and nutmeg (very important!). Freshly grated Swiss cheese is added, and the mixture is stirred until smooth. This is poured over the cooked cauliflower into a casserole dish and more Swiss cheese is sprinkled on top prior to baking.

Just like my mom, I love to serve this with boiled Yukon Gold potatoes. Sometimes I add a bit of chopped up ham to the cauliflower casserole for an easy fulfilling meal, but usually I serve it with some kind of protein on the side. Everyone loves this dish, and since cauliflower is on sale quite frequently for less than a dollar, it also makes for a fairly cheap meal. If you haven't had cauliflower in a while or only know it overcooked with a pat of butter on it, you should give this version a try, you won't be disappointed.


Cheesy Cauliflower Casserole

Ingredients:
1 large head cauliflower
10 cups salted water
1 cup milk

For the cheese sauce:
3 tablespoons butter
3 tablespoons flour
1 1/2 cups reserved cauliflower cooking water
1 cup milk
Salt and Pepper to taste
Pinch of cayenne pepper
1/4 teaspoon freshly grated nutmeg
1 vegetable bouillon cube
3 tablespoons heavy cream
6 ounces grated Swiss Cheese, divided

Directions:
Clean and cut up the cauliflower into florets. Rinse or use method described above.
Bring saltwater along with 1 cup milk to a boil in a large pot. Add cauliflower and cook on medium-low heat for about 10-15 minutes or until "al dente". Drain, making sure to reserve 1 1/2 cups of the cooking liquid. Set aside.

Preheat oven to 400 degrees F.

For the cheese sauce: Melt butter in a saucepan over medium heat. Add flour and cook for about 1 minute. Slowly add your reserved cooking liquid along with the additional cup of milk making sure to whisk constantly as you do so. Season with salt, pepper, cayenne, nutmeg, and bouillon cube and cook on low heat for about 10 minutes stirring occasionally or until thickened.

Add heavy cream and 4 ounces of the Swiss Cheese and stir until combined making sure not to bring the mixture to a boil.

Butter a casserole dish and add the cauliflower. Pour cheese sauce evenly over the top. Sprinkle with reserved Swiss cheese. Bake for about 10 minutes in preheated oven, or until the dish is heated through and nicely browned.

Adapted from: Ich helf Dir Kochen

LinkWithin

Related Posts with Thumbnails