Showing posts with label vegetables. Show all posts

Tuesday, March 18, 2014

German Cucumber Salad (Gurkensalat)


When I was little, I wasn't a big fan of any salad that contained green lettuce leaves. I thought it tasted like grass and was better used as food for rabbits. I ate it, but many times it was very begrudgingly and only the smallest amount my mom would let me get away with. However, there was always one salad I didn't need convincing for and that was my mom's Gurkensalat (cucumber salad). I could happily eat a big bowl in one sitting without complaint.


Gurkensalat is as quintessential in Germany as Bratwurst, Sauerkraut or Schnitzel. Most families have a recipe that has been handed down from generation to generation with a few slight variations depending on the region in Germany. My love for this salad has only grown stronger over the years and I'm happy that my family loves it equally as well. In fact, this is one of my most requested recipes from friends who have tried it at our home. I've always told them "it's a little of this and a little of that", so I guess many of them will be happy that I've finally added it to my blog with a "real" recipe.


Cucumbers are mild and pretty neutral tasting, plus they are very refreshing, especially on a warm day. Making this salad doesn't require a lot of time, but there are a few key points to remember. I peel my cucumber and use a mandolin to get thin, even slices. Salting the cucumbers prior to adding the salad dressing helps remove some of the moisture and prevents the salad from being to watery. Fresh dill will really bring out the freshness in this salad, but in a pinch I've used dried dill before and it will work just fine, but in this case fresh is best. Last, but not least, while I use extra virgin olive oil for every other salad dressing or vinaigrette I make, for this salad I prefer a very neutral tasting oil like grapeseed oil which is a great healthy alternative.


This salad tastes best if it can "hang out" for about an hour before serving. It helps all the flavors meld together and makes it even more tasty. Gurkensalat is a great side dish for any grilled meat, but one of my favorite ways to eat it is the way my mom and grandma served it quite frequently, alongside some freshly made Käsespätzle (Cheese Spaetzle). I really hope you will give this recipe a try and that it becomes a family favorite of yours as well.


German Cucumber Salad (Gurkensalat)
~makes 4 servings~
(Print this recipe)

Ingredients:
1 English Cucumber, peeled and finely sliced
1/2 tsp. Kosher salt


For the dressing:
2 Tbsp. grapeseed oil
2 Tbsp. white vinegar
2 Tbsp. apple cider vinegar
1/2 tsp. Kosher salt
1/2 tsp. black pepper
1 tsp. spicy brown mustard
1 Tbsp. honey
1/4 cup sour cream
1/3 cup red onion, finely diced
1 Tbsp. fresh dill, finely chopped
1 Tbsp. fresh chives, finely chopped

Directions:
Peel and slice cucumber and place in a strainer over a bowl. Add 1/2 tsp. Kosher salt, mix with the cucumbers and let sit for about 20 minutes to drain.

Meanwhile to make the dressing whisk oil, white vinegar, cider vinegar, salt, pepper, mustard and honey in a small bowl until emulsified. Whisk in sour cream, onions, dill and chives.

In a bowl add your drained cucumber and your prepared dressing. Combine and let sit for about 1 hour in the refrigerator before serving.

Notes: My mom taught me to peel the cucumber from the "flower to the stem" (top to bottom), this way if you have a bitter cucumber end you don't drag the bitterness across the entire cucumber.

Always taste both ends of your cucumber before using, there is nothing worse than a bitter cucumber ruining your salad.

I use a mix of white vinegar and apple cider vinegar for this salad. Over the years I have found that this mix comes pretty closely to the unique taste German vinegar has.

A Susi's Kochen und Backen Family Recipe


Tuesday, February 18, 2014

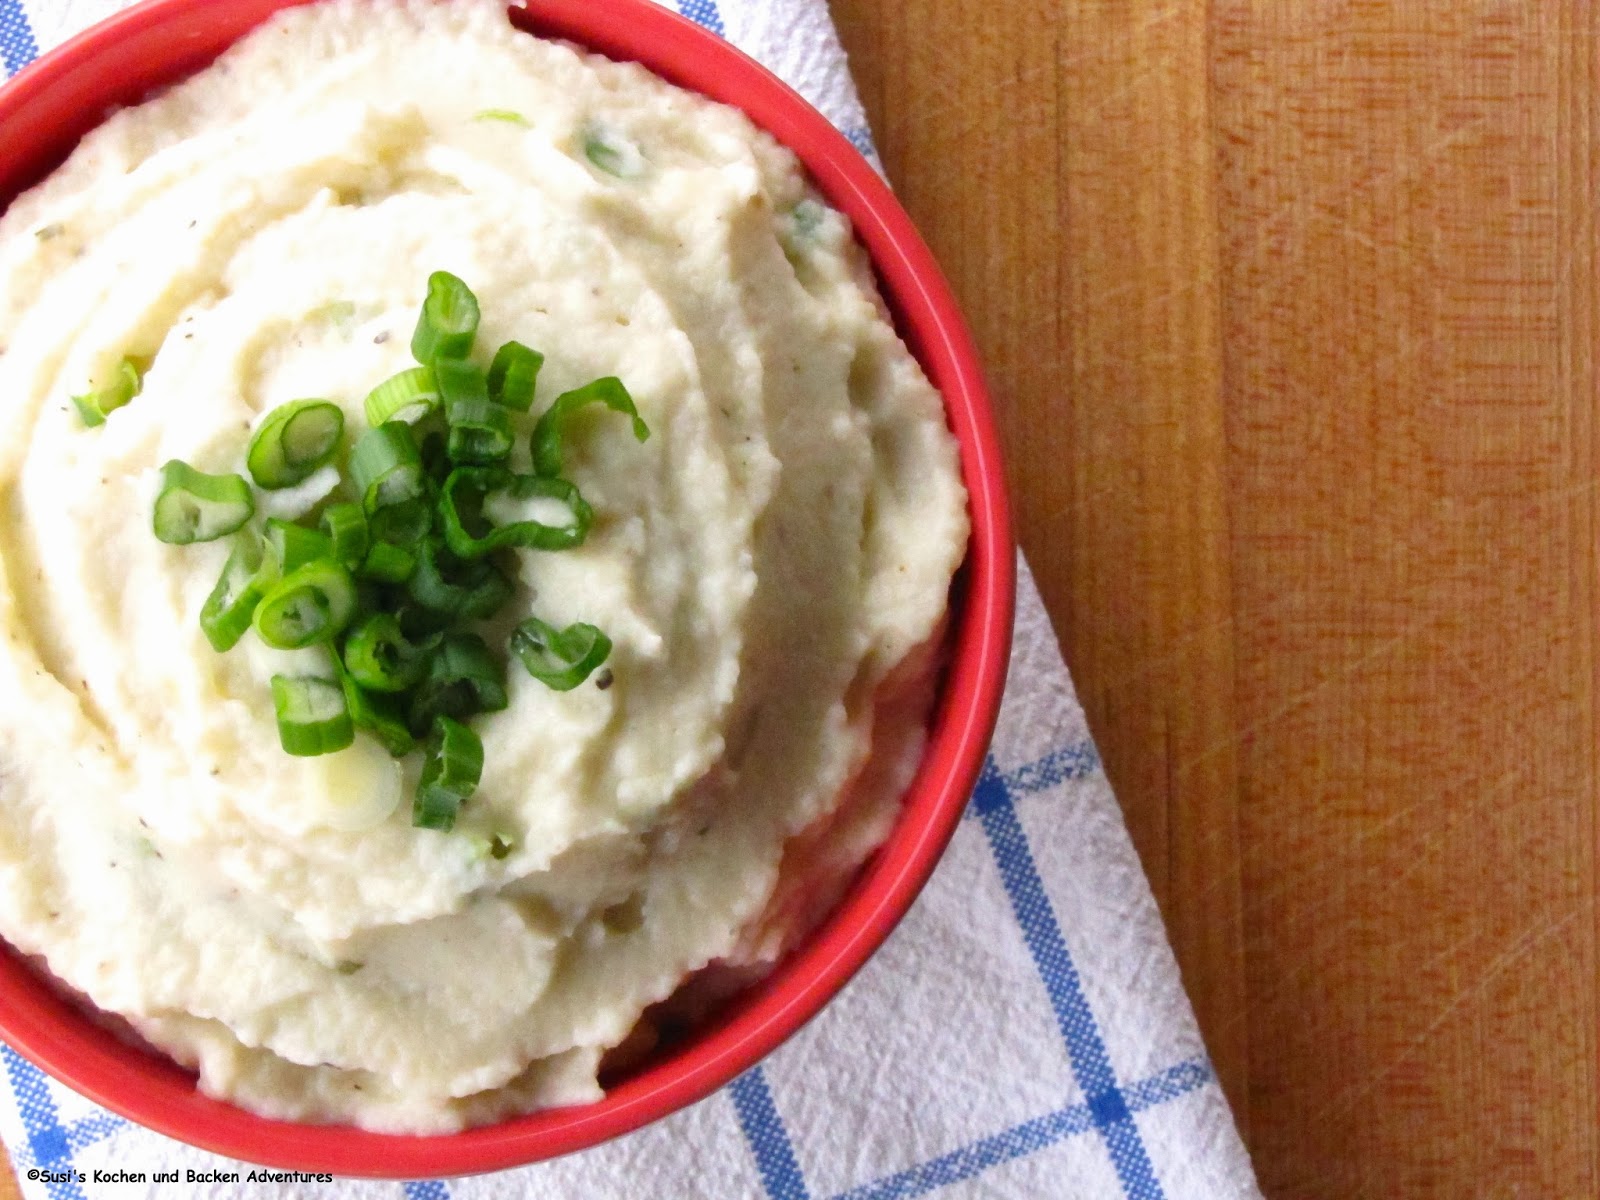
Mashed Cauliflower with Roasted Garlic & Goat Cheese


I have come to the conclusion that many times when people claim they don't like to eat certain vegetables, it really means they probably have never had it prepared in a way that would appeal to them. With so many different options and recipes available on how to turn an otherwise boring vegetable into a showstopper, it makes it hard to believe that an aversion against a certain food couldn't be overturned.

I think Cauliflower is a great example. By simply steaming the vegetable you end up with a "blah" version that can be kind of tasteless, but because of its mild flavor it can also be extremely versatile and lend itself to a lot of different and tasty applications. Recently there has been a surge in popularity for cauliflower. The florets are low in fat and carbs, high in fiber, folic acid and vitamin C, which makes this vegetable a winner in my book. If you perform a quick search, you can find an amazing variety of recipes. They range from roasted cauliflower, gratins, soups, dips, faux alfredo sauces and even pizza crust. While I've tried quite a few of these different versions, cauliflower pizza crust is still one that eludes me, but I will never say never.

A few weeks ago I made Canadian Bacon Cauliflower Cheddar Cups for my family with great results, so  I decided to experiment a little more and came up with this delicious mashed version. I started with a basic recipe, but by adding sweet, roasted garlic along with tangy and tart goat cheese, the dish was elevated to a whole new level. I achieved the desired consistency with my food processor, but an immersion blender or even a good old fashioned potato masher should do the trick as well. I served this with grilled steak and a big side salad, but ate leftovers with a couple of over-easy eggs the next day and had to restrain myself from licking the plate. So tasty, so simple, and most definitely one of my new favorites.  


Mashed Cauliflower with Roasted Garlic & Goat Cheese
~makes 5-6 servings~
(Print this Recipe)

Ingredients:
5-6 cups cauliflower florets (about 1 medium head)
1 vegetable bouillon cube
8-10 roasted garlic cloves (see notes)
4 Tbsp. soft goat cheese
1/8 tsp. grated nutmeg
Kosher Salt and Pepper to taste
4 Tbsp. green onions, chopped

Directions:
Roast garlic (see note), remove cloves from skin and set aside.

On the stove-top, add cauliflower to a pot, fill with about 4 cups of water. Add the vegetable bouillon cube and steam/cook cauliflower until soft. Drain the cauliflower and add to a food processor.

Process cauliflower along with the roasted garlic cloves, goat cheese, 1/2 tsp. salt, 1/4 tsp. pepper and 1/8 tsp. nutmeg until smooth.

Transfer mixture to a bowl, check for additional salt and pepper and fold in 3 Tbsp. of the green onions. Sprinkle with additional reserved onions and serve immediately.

Notes: To roast the garlic, preheat oven to 400° F. Take one whole garlic bulb and cut 1/4 to 1/2 inch off the top. Lay on a piece of aluminum foil big enough to wrap the head of garlic, drizzle with about 1 tsp. of olive oil and season lightly with salt and pepper. Wrap it in the foil and roast in preheated oven for 35-45 minutes or until garlic is soft and golden brown. Let cool for about 15 minutes before handling. Use your fingers or a fork to squeeze and pull roasted garlic out of the skin. 

If you don't like the taste of goat cheese, cream cheese would also be an acceptable substitution.

A Susi's Kochen und Backen Original Recipe

Tuesday, March 8, 2011

Spicy Tuscan Soup


The days for comfort food are dwindling down and with temperatures on the rise I knew I had to get in just a few more of those homey recipes before I start focusing on some lighter fare for Spring. I'm pretty sure I've mentioned before how much I adore soups. I like them actually year round, reserving some of the heartier ones for the cooler months and reaping the benefits of the wonderful produce available in the spring and summer for creating fresh and light tasting ones.

I found the recipe for this soup a couple of years ago on Tasty Kitchen. The description mentioned that this soup comes pretty close to one that Olive Garden serves. Not being a fan of any chain restaurant, I actually can't vouch for this statement since I have never eaten there before. However, the ingredients sounded interesting and unlike any soup I had in my repertoire, so I gave it a go.
This dish has become a family favorite ever since the first time I made it. This is a nice "stick to your ribs" kind of recipe, which is perfect, especially on those cool evenings.


Talk about a pork feast. Spicy breakfast sausage, red onions and bacon add tons of flavor, especially when paired with garlic, Yukon gold potatoes and kale. The liquid base of this soup comes from chicken broth. I used a homemade one (I usually have some in my freezer) which adds some nice depth, but even a quality store bought kind will do the trick and works very nicely, especially when short on time. A little bit of heavy cream added during the last few minutes of cooking adds richness and rounds out this fantastic soup.

The first time I made this recipe, I really wasn't sure how Kale would go over with the family, but everyone ended up loving it so much, that I have been increasing the amount of Kale by quite a bit more. This in turn really helps me justify the health factor of this dish. ;-)
This soup has it all. Flavor, spice, and creaminess without being too heavy. When paired with a nice loaf of bread or some bread sticks, it makes for a wonderful quick weeknight meal. Friends of ours who have actually eaten the Olive Garden version before thought this was even better than the original. I would say that is quite the compliment.


Spicy Tuscan Soup
~makes 6 servings~

Ingredients:
1 pound spicy breakfast sausage
1 whole medium red onion, diced
3 slices bacon, diced 
3 cloves garlic, minced 
4 Yukon gold potatoes (about 1 1/4 lbs.), peeled and diced 
6 cups chicken broth  
4 cups loosely packed Kale, cleaned 
1/2 cup heavy cream 
Kosher Salt and Pepper to taste  


Preparation:
Crumble sausage into a dutch oven over medium-high heat until cooked through and no longer pink. Remove from pan and set aside.

Add red onion and bacon to dutch oven. Reduce heat to medium and cook until onions soften and bacon begins to crisp. Add minced garlic and cook for 1 minute.

Add the diced potatoes and chicken broth. Cook for 15 - 20 minutes or until potatoes are almost done. Return crumbled sausage back to the dutch oven.

Add the kale and let simmer for another 5 minutes or until kale is wilted and soft. Add heavy cream, warm through, but don't boil.  Serve immediately.

Adapted from: Tasty Kitchen

Thursday, August 26, 2010

Grilled Panzanella Salad


In some areas of the country, summer has been quite the mixed bag. Very hot days, but also very cold and rainy days. For us it has just been plain hot and unbearable with very little rain. Summer in Arizona is unfortunately not letting up for probably another couple of months. It will hold a firm grip on us, making us wish for cooler temperatures, even if it just means to dip below 100 degrees F. Yes, most of us Arizonians should be used to it, but are fed up with this terrible heat by early August. Unfortunately, we forget year after year about the temperatures when we are sitting outside enjoying a BBQ-ed meal in January while the rest of the country is freezing.

Since summer is still here to stay for at least a while longer, I'm still on the hunt for great salad recipes to expand my repertoire. This one comes courtesy of "Cuisine at Home" yet again. I really like their approach to recipes which are fairly simple, but wonderful tasting, and most of my magazines from them are covered in sticky notes for dishes to try. Today's post had been on my to-do list for a while, and last weekend I finally got around to it. Panzanella Salad is an Italian dish that is a bread salad. It varies widely depending upon region and ingredients available, however, day old bread is always included. It is also important to use a sturdy bread when making this dish. It is best to use a chewy, rustic bread that can withstand being tossed with a vinaigrette, otherwise your bread will get way too mushy. Ripe, juicy tomatoes are another must, and while any tomato will work, the sweetness of cocktail or grape tomatoes seem to harmonize best with this salad. Cucumbers, red onions, kalamata olives, fresh mozzarella and basil round out this dish.

This is a fantastic salad to serve along side any kind of meat. We had pork chops with it, but steak or chicken would be wonderful as well. Since the bread is grilled on the BBQ, grilling the meat is a logical choice and with that you can leave the stove off, which is always a plus with this heat. We all really enjoyed this unique salad. It incorporated all of our favorite ingredients and so it was kind of a given that we liked it, but nonetheless, I'm surprised by the simplicity of certain recipes that just "wow" you. This is another recipe I'm keeping, and will be making over and over again!


Grilled Panzanella Salad
(adapted from "Cuisine at Home")
(Printable Recipe)

Ingredients:

1/4 cup olive oil
2 tablespoons white wine vinegar
1 teaspoon Dijon mustard
Salt and Pepper to taste
1 cup grape tomatoes, halved
1 cup cucumber, seeded and chopped
1 cup red onion, sliced
1/2 cup fresh mozzarella, cubed
1/4 cup kalamata olives, pitted and halved
1/4 cup torn fresh basil leaves
1/2 a baguette or ciabatta bread, halved lengthwise and brushed with olive oil
2 garlic cloves

Preparation:

Preheat grill to medium-high. Whisk oil, vinegar, mustard, salt, and pepper together; set aside.

Toss vegetables, mozzarella, olives, and basil together in a bowl.

Grill bread, cut side down, until golden, 2-3 minutes, then rub with the garlic cloves. Slice bread into cubes, add to vegetables, and toss with vinaigrette.

Monday, August 16, 2010

Peas and Carrots "German Style"


Peas and carrots mixed together always bring me back to my childhood. It was my absolutely favorite vegetable my mom prepared, and to this day, it holds a special place in my heart. It is a super kid friendly vegetable mix, and my children have loved it since they were little babies and were able to start eating table food. This is another one of my mom's recipes that I made sure to acquire as soon as I moved out, and it has been a staple in our home ever since.

The dish is reminiscent of creamed vegetables without the heaviness. It starts by sauteing diced onions in a bit of olive oil. Cleaned, chopped carrots are added and sauteed for a minute. A little bit of water is added along with a vegetable bouillon cube, salt, and pepper. Frozen peas are thrown into the mix, and everything is cooked until the carrots are soft, but still have a bit of bite left to them (nothing worse than mushy vegetables). A couple tablespoons of heavy cream along with freshly chopped parsley add the finishing touch. This recipe is certainly not difficult to fix, chopping the vegetables will be the hardest "chore" in this dish. After that, it is finished in no time.

I especially like to serve this along side mashed potatoes or simple boiled potatoes and a protein. Anything from a steak, to chicken or pot roast will be delicious. It is a very mild vegetable that is always incredibly well received, and despite the few ingredients, it tastes fresh and flavorful. So, if you are still guilty of heaving canned peas and carrots in your pantry, go ahead, and try this from scratch version, you might never go back to store bought again!


Peas and Carrots "German Style"

Ingredients:
1 tablespoon olive oil
1/2 medium onion, finely chopped
2 cups carrots, diced
1 cup water
1 vegetable bouillon
Salt and pepper to taste
2 cups frozen peas
2 tablespoons heavy cream
2 tablespoons fresh parsley, minced

Directions:
In a medium saucepan over medium-high heat, add onion to the olive oil and saute until the onion turns translucent and slightly soft. Add the carrots and cook for another minute. Add water, vegetable bouillon, salt, and pepper. Bring to a boil, add the frozen peas, turn down heat and simmer for about 5-10 minutes or until the carrots have the desired consistency. Add the heavy cream and parsley, taste for seasonings and serve!

A Susi's Kochen und Backen Family Recipe

Monday, August 2, 2010

Cheesy Cauliflower Casserole


Cauliflower happens to be one of my favorite vegetables. This is another vegetable that my mom had in her garden in abundance while I was growing up, so it was frequently on the dinner table. My mom had a few different ways to prepare it, but most of the time she just turned it into a simple dish of cauliflower in a white sauce with a hint of cheese. Most of the time she served it along with boiled salt potatoes and Schnitzel or Fleischkuechle (they are a mix between a mini meatloaf and a burger). I still love eating it this way, but I also like to cook today's "kicked up" version.

I found this recipe in my trusty "Ich helf Dir kochen" book which I received over 20 years ago from my parents. I've added a few of my own touches to this recipe over the years, which makes this cauliflower irresistible, at least for my family. I always start by cutting up the cauliflower into florets and soaking them in a big bowl of salt water for about 30 minutes. One reason why I do this is because, growing up and harvesting the fresh crop from my mom's garden (which is completely organic and without commercial fertilizer) it wasn't uncommon to find that a little snail or the like had made its way into the lettuce or cauliflower. The salt water kills them, and lets them float to the top for easy removal. It is probably not necessary to do so today, especially if purchasing the cauliflower at a super market, but sometimes old habits die hard.


The cleaned cauliflower is then cooked "al dente" in a big pot of salted water that has a bit of milk added to it. The milk in the water helps preserve the white color of the vegetable. Make sure you don't overcook the cauliflower as it tends to get a "soapy" taste if it is cooked too much.
A white sauce is then made by making a simple roux. Reserved cauliflower cooking water is added to the roux and seasoned with salt, pepper, cayenne, and nutmeg (very important!). Freshly grated Swiss cheese is added, and the mixture is stirred until smooth. This is poured over the cooked cauliflower into a casserole dish and more Swiss cheese is sprinkled on top prior to baking.

Just like my mom, I love to serve this with boiled Yukon Gold potatoes. Sometimes I add a bit of chopped up ham to the cauliflower casserole for an easy fulfilling meal, but usually I serve it with some kind of protein on the side. Everyone loves this dish, and since cauliflower is on sale quite frequently for less than a dollar, it also makes for a fairly cheap meal. If you haven't had cauliflower in a while or only know it overcooked with a pat of butter on it, you should give this version a try, you won't be disappointed.


Cheesy Cauliflower Casserole

Ingredients:
1 large head cauliflower
10 cups salted water
1 cup milk

For the cheese sauce:
3 tablespoons butter
3 tablespoons flour
1 1/2 cups reserved cauliflower cooking water
1 cup milk
Salt and Pepper to taste
Pinch of cayenne pepper
1/4 teaspoon freshly grated nutmeg
1 vegetable bouillon cube
3 tablespoons heavy cream
6 ounces grated Swiss Cheese, divided

Directions:
Clean and cut up the cauliflower into florets. Rinse or use method described above.
Bring saltwater along with 1 cup milk to a boil in a large pot. Add cauliflower and cook on medium-low heat for about 10-15 minutes or until "al dente". Drain, making sure to reserve 1 1/2 cups of the cooking liquid. Set aside.

Preheat oven to 400 degrees F.

For the cheese sauce: Melt butter in a saucepan over medium heat. Add flour and cook for about 1 minute. Slowly add your reserved cooking liquid along with the additional cup of milk making sure to whisk constantly as you do so. Season with salt, pepper, cayenne, nutmeg, and bouillon cube and cook on low heat for about 10 minutes stirring occasionally or until thickened.

Add heavy cream and 4 ounces of the Swiss Cheese and stir until combined making sure not to bring the mixture to a boil.

Butter a casserole dish and add the cauliflower. Pour cheese sauce evenly over the top. Sprinkle with reserved Swiss cheese. Bake for about 10 minutes in preheated oven, or until the dish is heated through and nicely browned.

Adapted from: Ich helf Dir Kochen

Thursday, July 22, 2010

Zucchini-Creme Soup


Many years ago, the year I had moved out from my parents home, I received a cookbook from my mom and dad. To this day, it is still a cookbook I love looking for recipes in first. The copy of the book has been through many moves, including even one overseas, has food splatters on it, and got soaked in a water main flooding. Still, this book is perfect, and I can't wait to order a copy for my own daughter when she moves out one day. The book is called "Ich helf Dir kochen" by Hedwig Maria Stuber which practically translates to "I'm helping you cook".

Helping me cook, it sure did. I had helped my mom in the kitchen growing up, but was mostly reduced to easy activities like peeling potatoes, cooking the pasta, or stirring the batter for a quick bundt cake. Seasoning the meals was something that my mother always took into her own hands, and she still does  to this day. So after I had moved out, I needed to teach myself how to cook from "scratch". Let's just say, my poor husband got served a lot of Schnitzel, mashed potatoes and mac and cheese (which I had just discovered after meeting him) and for some reason, oodles of white rice and gravy. He didn't seem to mind at the time, since we were young and in love (we are still the latter but certainly not young anymore), although I'm pretty sure he is glad that my recipe repertoire, along with my abilities, have increased over the years.


This soup was actually one of the first recipes I made out of the book. I had received some zucchinis and tomatoes from my mom's garden and was looking for a dish to make. I don't care for eating many soups in the hot summer months, but this one tastes best if made when the plants are ready for harvesting, plus it is so light tasting that I don't mind. The tomatoes definitely need to be at their prime for this soup. The soup takes start to finish about 25 minutes. The zucchini, onions, and garlic are cooked in olive oil for a bit, then fresh tomatoes along with seasonings are added to the mixture. After the vegetables are soft, you can add either chicken or vegetable broth (to keep it vegetarian) and the cooked soup is blended. For the final touch, heavy cream is added to the mixture for a wonderful creaminess.

I love this soup, and so does the rest of my family. I like to serve it for a quick dinner along with sandwiches, but it also makes for a great light lunch. I've certainly come a long way since the days of easy, repetitive meals, but this soup still remains a favorite!


Zucchini-Creme Soup

Ingredients:
1 pound zucchini, cut into cubes
1 medium onion, diced
2 garlic cloves, minced
2 tablespoons olive oil
5 vine tomatoes, skinned and chopped*
Salt and Pepper to taste
3 cups chicken or vegetable broth
1/2 cup heavy cream

* To skin tomatoes, cut an x in the bottom of the tomato with a sharp knife and submerge in boiling water for a few minutes. Add a few ice cubes, let sit for 30 seconds and drain. The skins should slide right off. 

Directions:
In a large pot, add zucchini and onion to oil. Saute for a couple of minutes, add the garlic, and cook for another minute. Add the tomatoes, season with salt and pepper, and simmer for 10 minutes more. Add the chicken (or vegetable) broth and cook for an additional 10 minutes.

Add the soup to your blender* and puree in a couple of batches, adding the heavy cream to the final batch. Add soup back to the pot and stir to combine.

*Alternately you can leave the soup in the pot, and blend with an Immersion Hand Blender until desired consistency. Add the heavy cream and give it a final whirl.

Adapted from: Ich helf Dir kochen

Monday, June 21, 2010

Boursin Creamed Spinach


There isn't a lot of things grilled that I like better than a great cut of steak! Yes, I love red meat, and I'm not ashamed to admit it. Everything in moderation, right? Anyway, with a good steak you have to have sides that either compliment or stand up to the dominance of beef. Spinach is one of those dishes, maybe that's why you frequently find creamed spinach or spinach salad served along side at many steak houses as well. 

I've already proclaimed my love for spinach on this blog, but just in case you missed that, yes, I could eat spinach at least once a week and be happy. I grew up eating spinach, fresh spinach from my mom's garden, and have loved it ever since. Usually, I prefer my spinach either in salad form or just lightly sauteed and seasoned. Sometimes I will also make a creamed version which is one of my favorites but higher in calories, and with that, only reserved for the occasional meal. 


When I saw this recipe in "Cuisine at Home", I knew I had to try it out and couldn't wait for our next steak dinner to do so. Creamed spinach is taken to the next level with the addition of Boursin Cheese, and preparation is quick with the use of frozen chopped spinach. The flavor is further enhanced by adding a bit of lemon zest to the dish which is topped with a bread crumb mixture before baking it. The recipe itself doesn't make a lot, but was enough to feed our family of five with no problem. A little of this rich dish goes a long way.

This was a wonderful recipe that really showcased the spinach in a great way. I will most definitely serve this again with another steak dinner, but next time I will try it with fresh spinach instead of frozen, I think it would be even more tasty this way. So if you love spinach and have Popeye on speed dial, I hope you'll make this recipe for your next steak house meal!


Boursin Creamed Spinach
~makes about 2 cups~

Ingredients:
For the Spinach Filling:
1/2 cup diced onion
1 tablespoon unsalted butter
2 tablespoons all-purpose flour
1 cup milk
1/2 cup heavy cream
1 package (5.2 ounces) Boursin Garlic & Fine Herbs cheese
1 package (10 ounces) frozen chopped spinach, thawed and squeezed dry of excess moisture
2 tablespoons grated Parmesan
1 teaspoon minced lemon zest
Salt, white pepper, cayenne pepper, and ground nutmeg to taste

For the Crumb Topping:
2/3 cup coarse fresh bread crumbs (made from 2 slices firm white bread)
1 tablespoon unsalted butter, melted
1 tablespoon olive oil
Salt and black pepper to taste

Directions:
Preheat oven to 425 degrees F. Coat a shallow 2-cup baking dish with nonstick spray; set aside.

Saute onion in 1 tablespoon butter in a saucepan over medium heat until soft, 5 minutes.
Add flour and stir to coat onion. Cook about 1 minute.
Gradually whisk milk and cream into onion mixture, stirring constantly to prevent lumps. Simmer sauce for 1 minute.
Stir in Boursin, a little at a time, until cheese is melted and sauce is smooth. Remove saucepan from heat.
Add spinach, Parmesan, zest, and seasonings. Transfer spinach mixture to prepared baking dish.

Combine crumbs, 1 tablespoon butter, oil, salt and pepper. Top spinach with crumbs, pressing them to adhere. (Dish may be covered and chilled at this point to be baked later.) 
Place dish on a baking sheet; bake until crumbs are golden and sauce is bubbly, 20-25 minutes.

Adapted from: Cuisine at Home

Monday, April 5, 2010

Asian Slaw


I like cabbage - I always have, even as a little girl. Maybe it had to do with the fact that I grew up in Germany and I was always exposed to Sauerkraut from a young age. Or, maybe it was because my mom always had red and white cabbage in her garden and with that, there was never a lack of cabbage dishes especially in the winter months. Whatever the reason though I still love it to this day and I'm glad the rest of my family shares my love.

One of my favorite side dishes for a BBQ meal is Coleslaw. Unfortunately creamy coleslaw isn't always the perfect accompaniment. A couple of weeks ago it was one of those occasions. We had decided on a Korean BBQ for dinner. Deliciously marinated chicken, short ribs and flank steak along with rice which was the obvious choice but I wasn't sure what else to serve. I had made an Asian Cucumber Salad before that was well received but a quick look in the fridge and I saw that I was out of red onions and cucumbers. After further investigation of my vegetable drawer I decided on making an Asian Slaw.

A lot of recipes online for Asian Slaw called for Nappa Cabbage and while there is absolutely nothing wrong with Nappa Cabbage (in fact we really like it) it wasn't what I was going for. After looking at several recipes I took a little bit of this and little bit of that out of all of them and came up with my own version containing a bag of coleslaw mix along with bell peppers, serrano chillies, green onions, cilantro and a fantastic dressing which turned this into a show stopper worthy of any Asian meal.

We really enjoyed this slaw, so if this inspired you as well then give it a try at your next BBQ or Potluck.


Asian Slaw
~serves 6~

Ingredients:
1 tablespoon freshly grated ginger
1/2 cup rice wine vinegar
1 tablespoon soy sauce
1 lime, juiced
1 1/2 tablespoons honey
2 tablespoons sesame oil
1/4 cup peanut butter
1 bag coleslaw mix with carrots
1 red bell pepper, julienne fine
2 serrano chiles, minced fine
3 green onions, cut on the bias, all of white part and half of the green
2 tablespoons cilantro, chopped
Sesame seeds (optional)


Directions:
In a small bowl, or food processor combine ginger, vinegar, soy sauce, lime juice, honey, oil, and peanut butter.  In a large bowl combine all the other ingredients and the toss with dressing. Sprinkle with sesame seeds if desired.


Thursday, March 25, 2010

Chicken-Zucchini Alfredo


With the weather heating up and pool season approaching you will start to find some lighter recipes on this blog along with all the other decadent dishes. Cooking light can be quite a challenge for a lot of people. One of the biggest complaints of "cooking light" are the pre-conceived misconceptions that meals will taste boring and bland. If that was the case, my family wouldn't eat any of it but since no meal in our house has ever gone uneaten, I can assure you cooking light, done the right way, is anything but boring and bland.

A lot of times eating light in the summer time is quite easy for us. My husband is amazing on his grills (yes grills, he has several). So many times it is a simple side salad and a grilled "white" meat like chicken, pork, or seafood. But sometimes despite the heat of the southwest I crave comfort food that is rich and creamy tasting. When I found Ellie Krieger's recipe I knew I had to make it. With a few substitutions I had cooked a fantastic meal that was very well received all the way around.

The recipe is pretty straight forward and comes together in about 30 minutes which is always great, since I don't like spending as much time in the kitchen when the weather is so nice. This dish has all the flavor and taste that a "normal" Alfredo recipe would have but with a lot less fat. If you are trying to eat healthier and don't want to give up comfort then give this recipe a try. You can find Ellie's original recipe on Food Network or if you like my substitutions you can try my version.


Chicken-Zucchini Alfredo
~serves 6-8~
Ingredients:
Kosher Salt
3 tablespoons extra-virgin olive oil, divided
1/2 medium onion, finely chopped
2 cloves garlic, minced
3 (about 1 pound) zucchini, thinly sliced into half-moons
5 (4 ounce) thin skinless, boneless chicken breasts
Kosher Salt and Pepper
16 ounces fettuccine
2 1/2 tablespoons all-purpose flour
1 1/2 cups cold low-fat (1%) milk
1 1/2 cups (12 ounce can) low-fat evaporated milk
1 1/2 cups freshly shredded Parmesan cheese
1/4 cup fresh parsley, chopped

Directions:
Bring a large pot of salted water to a boil. Heat 1 tablespoon olive oil in a nonstick skillet over medium heat. Add onion, cook until translucent, then add 1 clove garlic and cook for another 30 seconds. Add the zucchini, cover and cook until tender, stirring, about 4 minutes. Transfer to a bowl.

Heat another tablespoon oil in the same skillet over medium-high heat. Season the chicken with kosher salt and pepper and cook through, 4 to 7 minutes per side depending on thickness of meat. Transfer to a plate.

Cook the pasta in the boiling water as the label directs. Drain, reserving 1 cup cooking water; return pasta to the pot to keep warm.

Meanwhile, whisk the flour and low-fat milk in a bowl. Place the remaining 1 clove garlic and 1 tablespoon olive oil in the skillet and cook over medium-high heat, 30 second. Add the flour-milk mixture and bring to a boil, stirring. Reduce the heat to low and cook, stirring, 2 minutes. Add the evaporated milk, salt to taste and the cheese; stir to melt, about 1 minute.

Cut the chicken into strips. Toss with the pasta, sauce, zucchini-onion mixture and parsley, adding the reserved pasta water as needed to loosen (you might only need 1/2 to 3/4 cup). Serve immediately.

Adapted from: Ellie Krieger for Food Network Magazine


Thursday, March 18, 2010

Springtime Shell Salad


We are a barbecuing family and since it is barbecue weather year round where I live, I'm always looking for side salad recipes. I have quite some in my recipe files and I'm sure that I will be sharing them with you throughout the next several months. You will be finding recipes for pasta salads, potato salads, rice salads, grain salads and vegetable salads. Nothing is off limits in our house and we are always trying to enrich our meals with new and exciting ingredients. 

This salad came about after I decided to combine two of my favorite salads (pasta salad and English pea salad) into one. The result was delicious. Even my pea hating oldest kid loved this one and had seconds. I will be making this salad again on many more barbecue occasions.


Springtime Shell Salad
~serves 8-10~

Ingredients:
1 pound small pasta shells, cooked and drained
6 ounces medium or sharp cheddar cheese, cut in small cubes
2 cups baby peas, fresh or frozen
1 medium red pepper, chopped
1/2 medium onion, chopped
1/3 cup sweet pickle relish
1/2 cup mayonnaise
3/4 cup (6 ounces) plain yogurt
1/4 cup chopped pimientos
Salt and Pepper to taste

Directions:
In a large bowl, mix together all the ingredients. Refrigerate, covered, for at least 1 hour to develop the flavors.This salad keeps well for several days in the fridge.


Friday, March 12, 2010

Fried Cabbage


Irish week continues today with another great recipe on Susi's Kocken und Backen. If you've read my blog the last couple of days you have already seen two great dishes with a little twist on the old classics. I started with Glazed Corned Beef  and yesterday continued with Irish Colcannon Potatoes. Today I'm going to talk about my Fried Cabbage which is not an Irish dish in the traditional sense.

The Irish dish is called Bacon and Cabbage. The dish consists of boiled bacon (this refers to back bacon which is cured and/or smoked. It does not refer to sliced bacon which one might fry) served with boiled cabbage and potatoes. Historically, this dish was common fare in Irish homes as the ingredients were readily available (many families grew their own vegetables and reared their own pigs), nourishing and satisfying. The dish continues to be a very common meal in Ireland. There are many different variations on the theme of bacon and cabbage, but in general the dish tends to involve slicing the back bacon after it has been well boiled and serving it with whole boiled potatoes and boiled cabbage (which is often boiled with the bacon for flavor).

Since I already had potatoes in the dish with the Colcannon and quite some leftover bacon and cabbage I decided to go a slightly different route and make fried cabbage. It is a simple straight forward dish that gets its flavor from frying the cabbage in bacon grease. A little salt and pepper along with a pinch of sugar are added along with the rendered bacon bits and you have the perfect accompaniment to any meal.
We enjoy cabbage very much in our house so this was a no-brainer that turned out very well.


Fried Cabbage
~serves 4~ 
(Print this Recipe)

Ingredients:
1/4 pound (about 3 slices) thick cut bacon, chopped
1/2 cup chopped onion
1 1/2 pounds cabbage, shredded
2 tablespoons water
1 pinch white sugar
Kosher Salt and Pepper to taste

Directions:
Place bacon in a large skillet. Cook over medium-high heat until evenly brown and crisp. Remove bacon, and set aside.

Cook Onion in the hot bacon grease until tender. Add cabbage, and stir in water, sugar, salt, and pepper. Cook until cabbage wilts, about 10 minutes. Stir in reserved bacon. Serve immediately.


Coming up tomorrow: Irish Soda Bread

LinkWithin

Related Posts with Thumbnails